Enhancement to Appointments
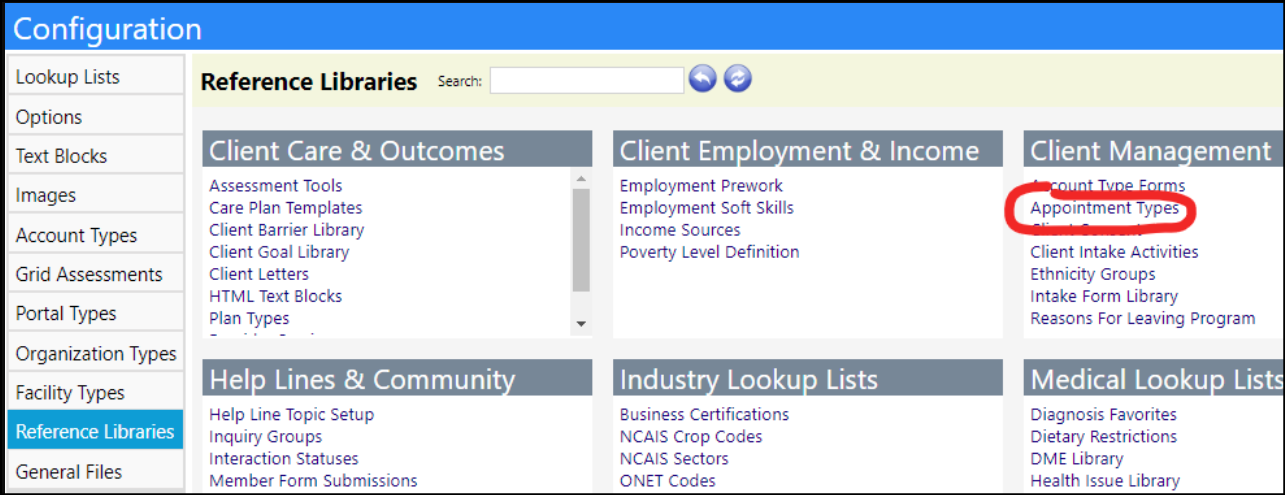
Appointment types are now configured from their own configuration page in the Configuration Reference Library:
-
Users can set the name, colors, and group review flag when editing an existing type or creating a new appointment type:

-
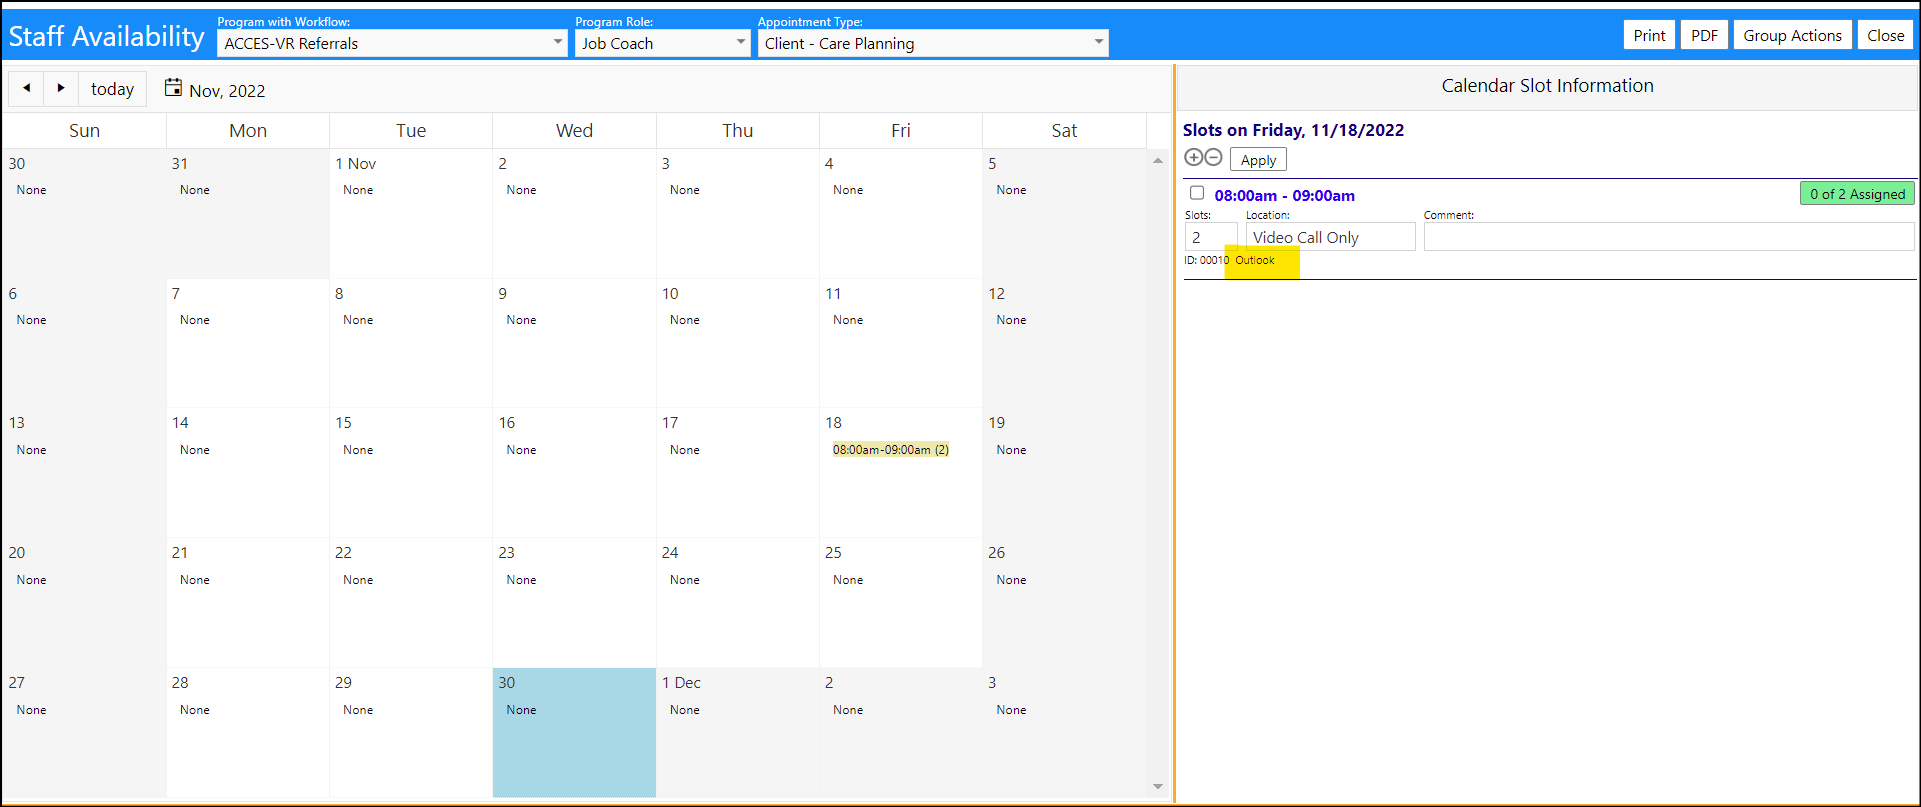
Regarding Appointment Availability, please refer to the Staff Appointments Calendar information listed below, in another section of these Release Notes.
Change to Schedule Multiple Asset Inspections
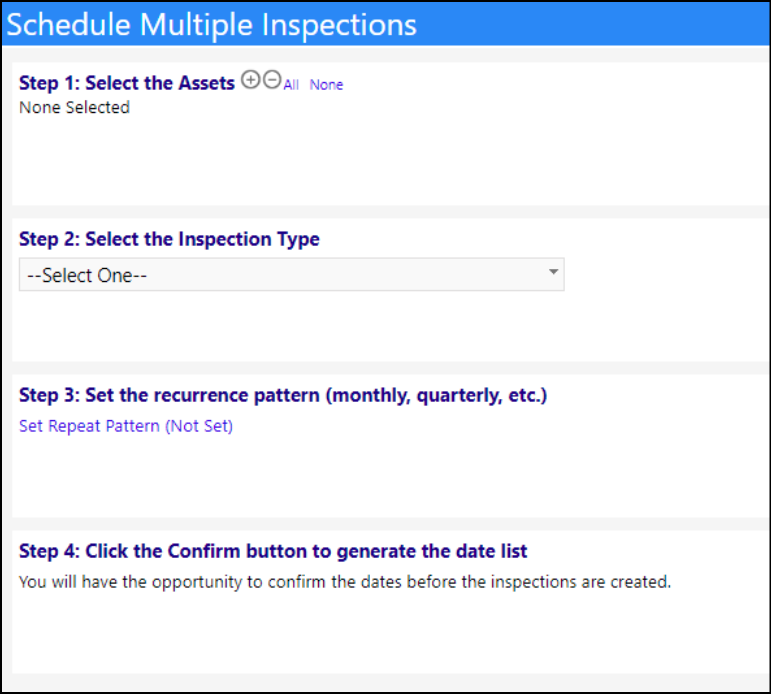
The schedule multiple inspections button on the asset inspection list now goes to a full page instead of popping up a window. This full page functions the same as the popup did, but now, users can select all assets instead of just those displayed in the pop-up selector window.

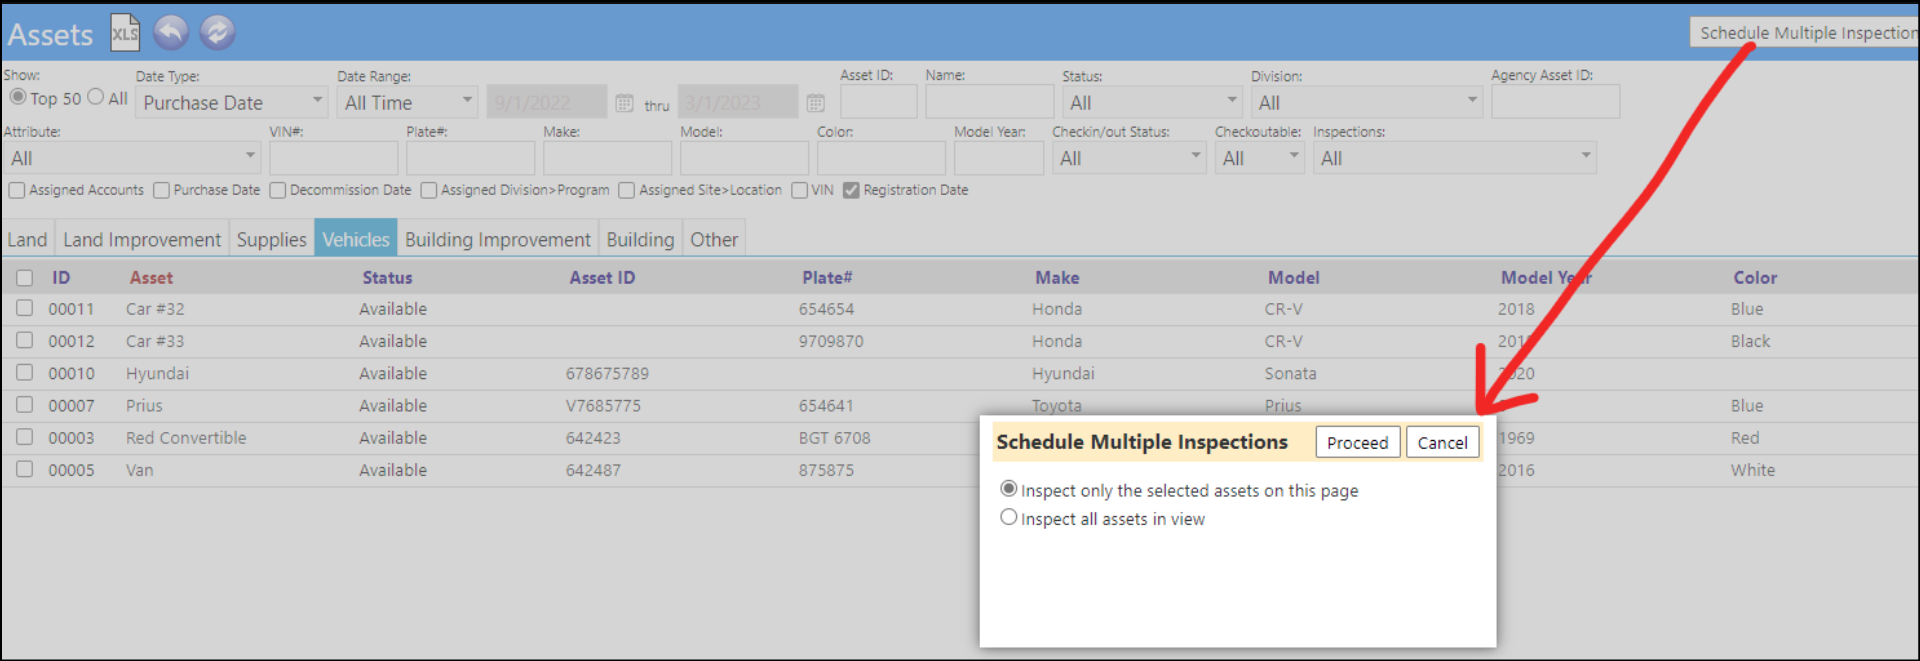
- This button also shows up on the asset list. Clicking here will bring up a popup with two options:
- Select only those assets displayed on the page
- Select all assets in the list
- Clicking proceed will bring the user to the scheduling page, but with a list of assets pre-filled into the page.
- The user can modify this list of pre-filled assets by filtering the asset list.
- On the pop-up in the above screenshot, choosing the first option will only display the assets checked off on the grid. The second option will display every asset on the grid.
- When selecting every asset in view, it's important to remember the Top 50 / all filter. If only the Top 50 filter is set in place, when selecting All, only 50 assets will be captured. If the All filter is selected, then when selecting all assets, every asset in the list (even those not displayed in your current screen view) will be selected.
In the following screenshot, "inspect all assets in view" were selected on the vehicles tab, and all 6 were automatically captured for the inspections:

Client Account Enhancements
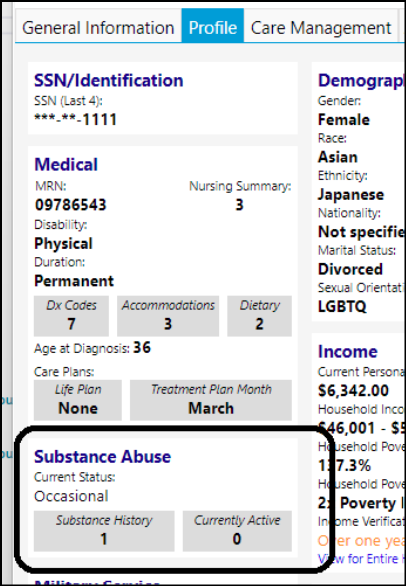
New Substance Abuse Panel
- Displays under medical panel
- The substances themselves are user configurable on the configuration lookup lists
- Frequency, and reporting are fixed for internal use
- An active substance is one without an End date
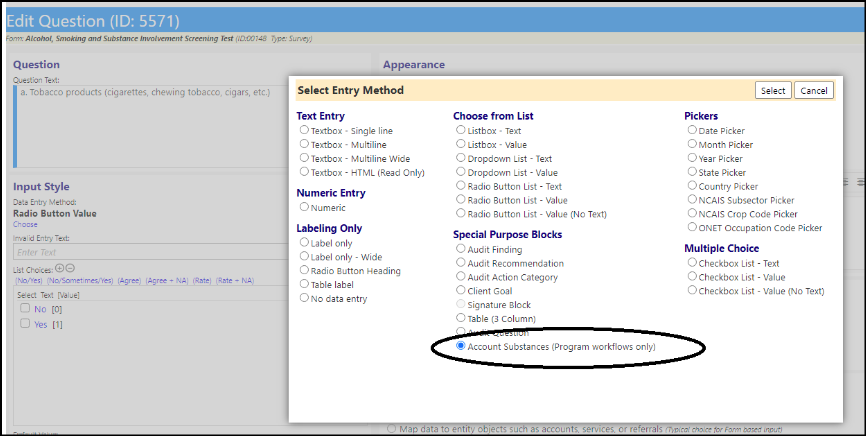
- New form picker for Program Workflows:
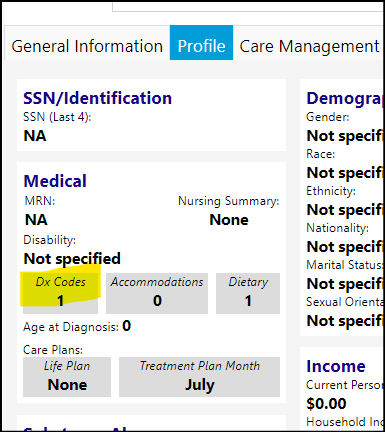
Change to Account Diagnosis Code Link from the Client Profile
- Link found in the Client Profile
- Refactored account diagnoses to be a page rather than a popup. You now can track the diagnosis, who diagnosed it, and when, etc.

New Substance Abuse Form Blocks
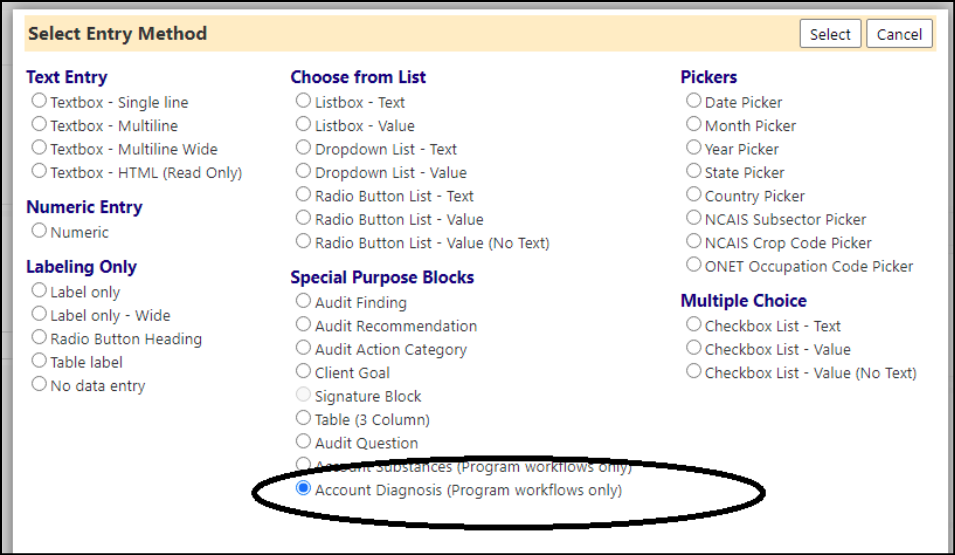
A new Special Purpose Form Block for Substance Abuse, for use with Forms on Program Workflows was added:
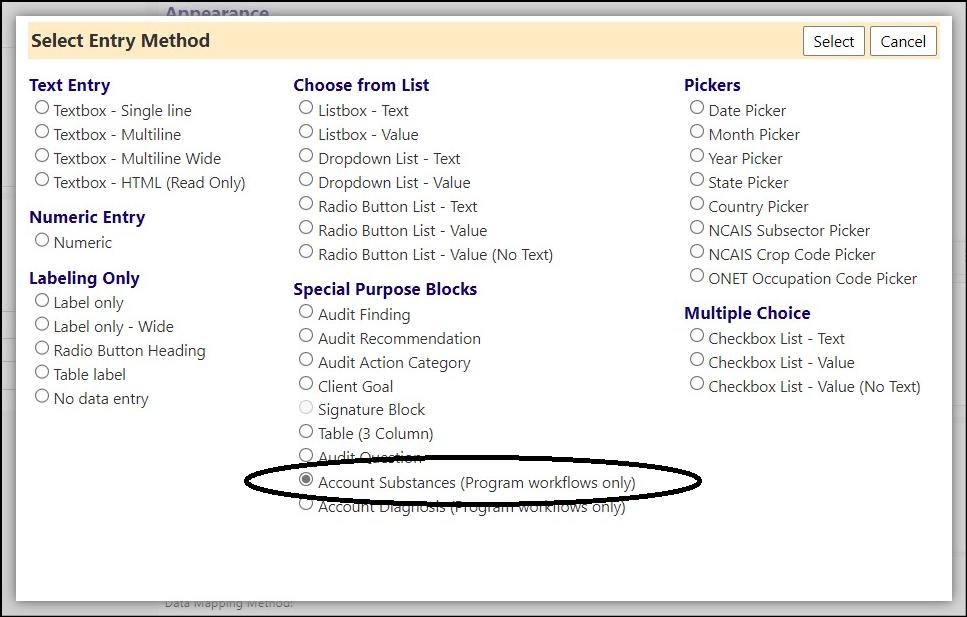
New Diagnosis Codes Form Blocks
-
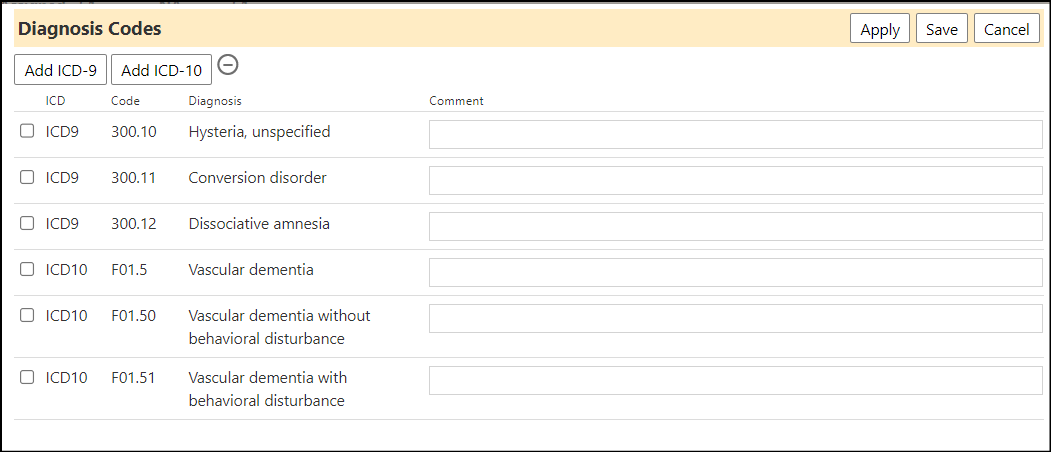
A new Special Purpose Form Block for Diagnosis Codes, for use with Forms on Program Workflows was also added:
-
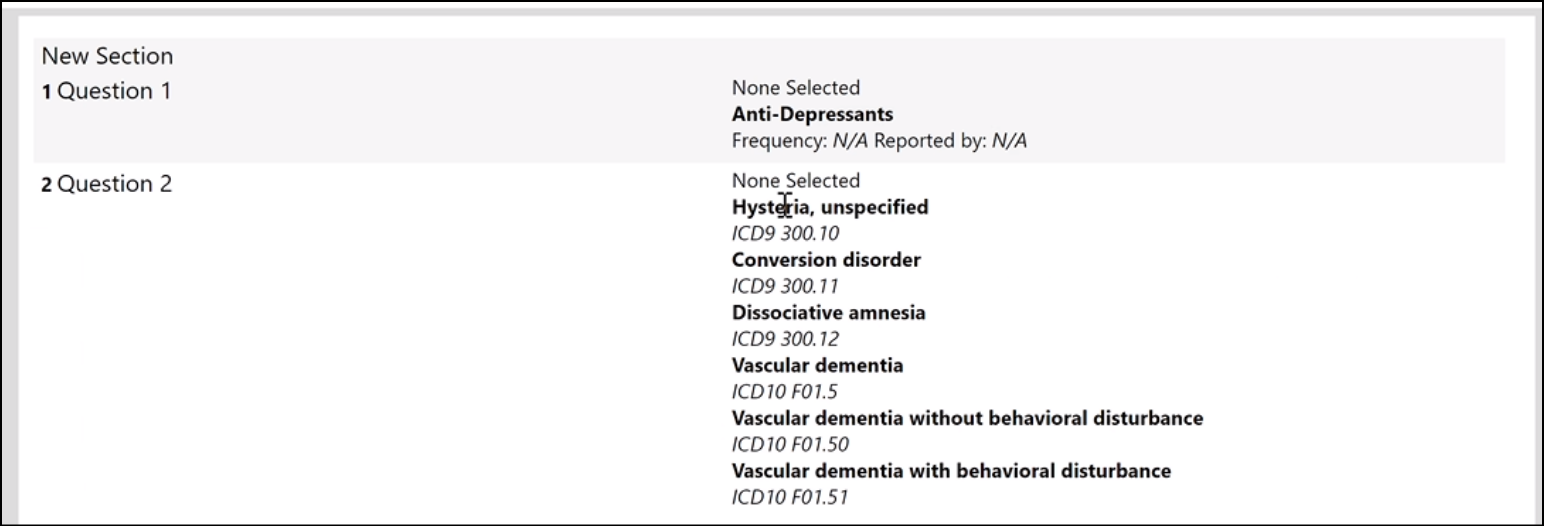
On the data entry form, here is what the new refactored question-findings entry looks like, including the Diagnosis Codes:

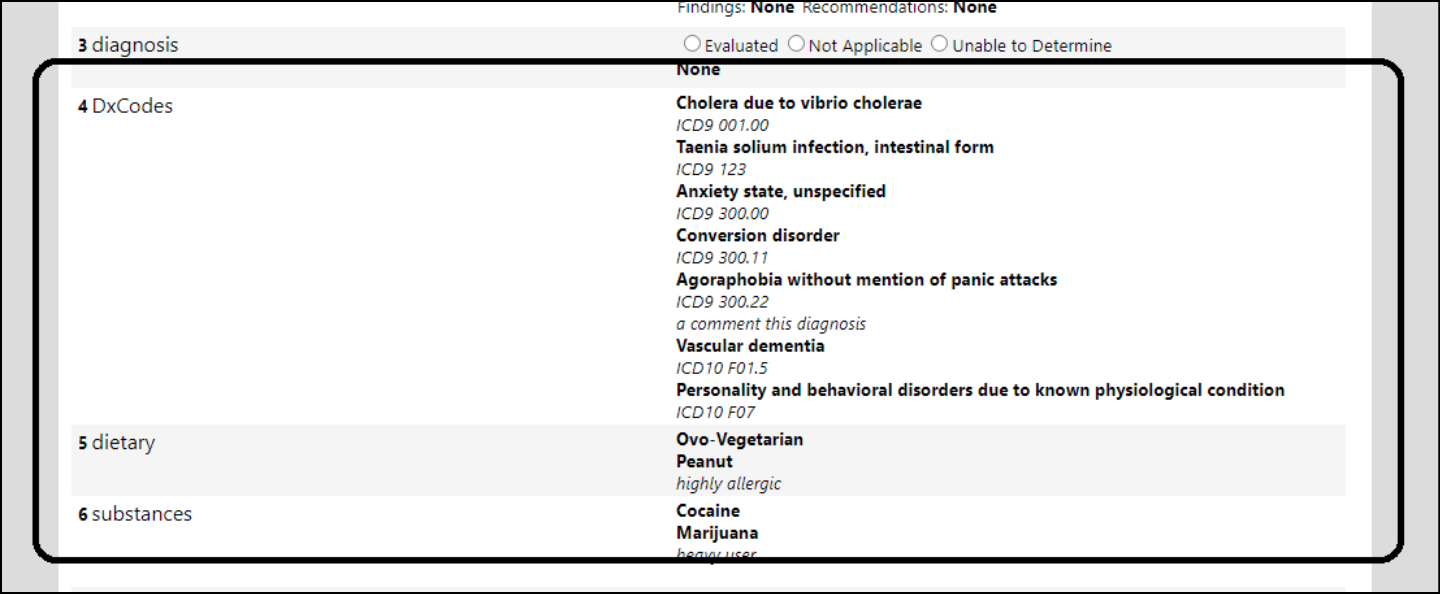
Substance Abuse and Diagnosis Code As-Built pages:


* An already built in feature in Forms allows users to display the account profile info on a form.
A few Reserved Words were added to address these needs:
The setup is to create a 'Label Only' field and then set a default value using a reserved word.
NOTE: Reserved Words only work in context. Setting up a Reserved Word for "Acct" on a form called by an Organization will not display any values.
This is a dynamic field. It initializes with whatever the CURRENT settings are. Once initialized - it does NOT update when the form is re-viewed or edited.
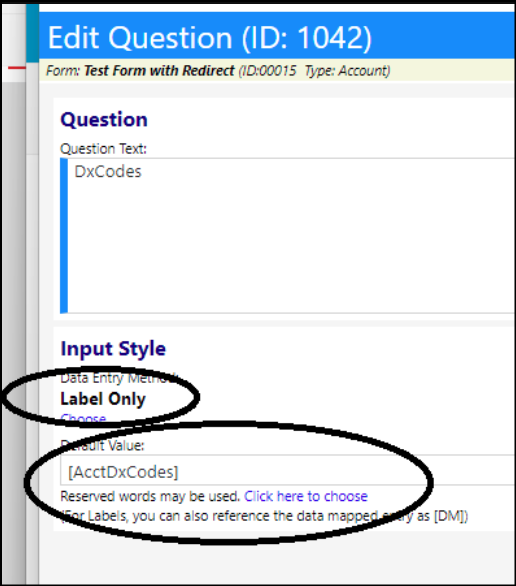
NOTE: The Reserved Word '[MyAcctDxCodes]' is for the user as logged in. Hence the “My”. To display someone else’s data (such as Lisa), users would just remove the 'My' manually, so the Reserved Word becomes [AcctDxCodes]. This is the same as how all the other “MyAcct” and “Acct” Reserved Words work.
Extension of Account Diagnosis and Substance Abuse
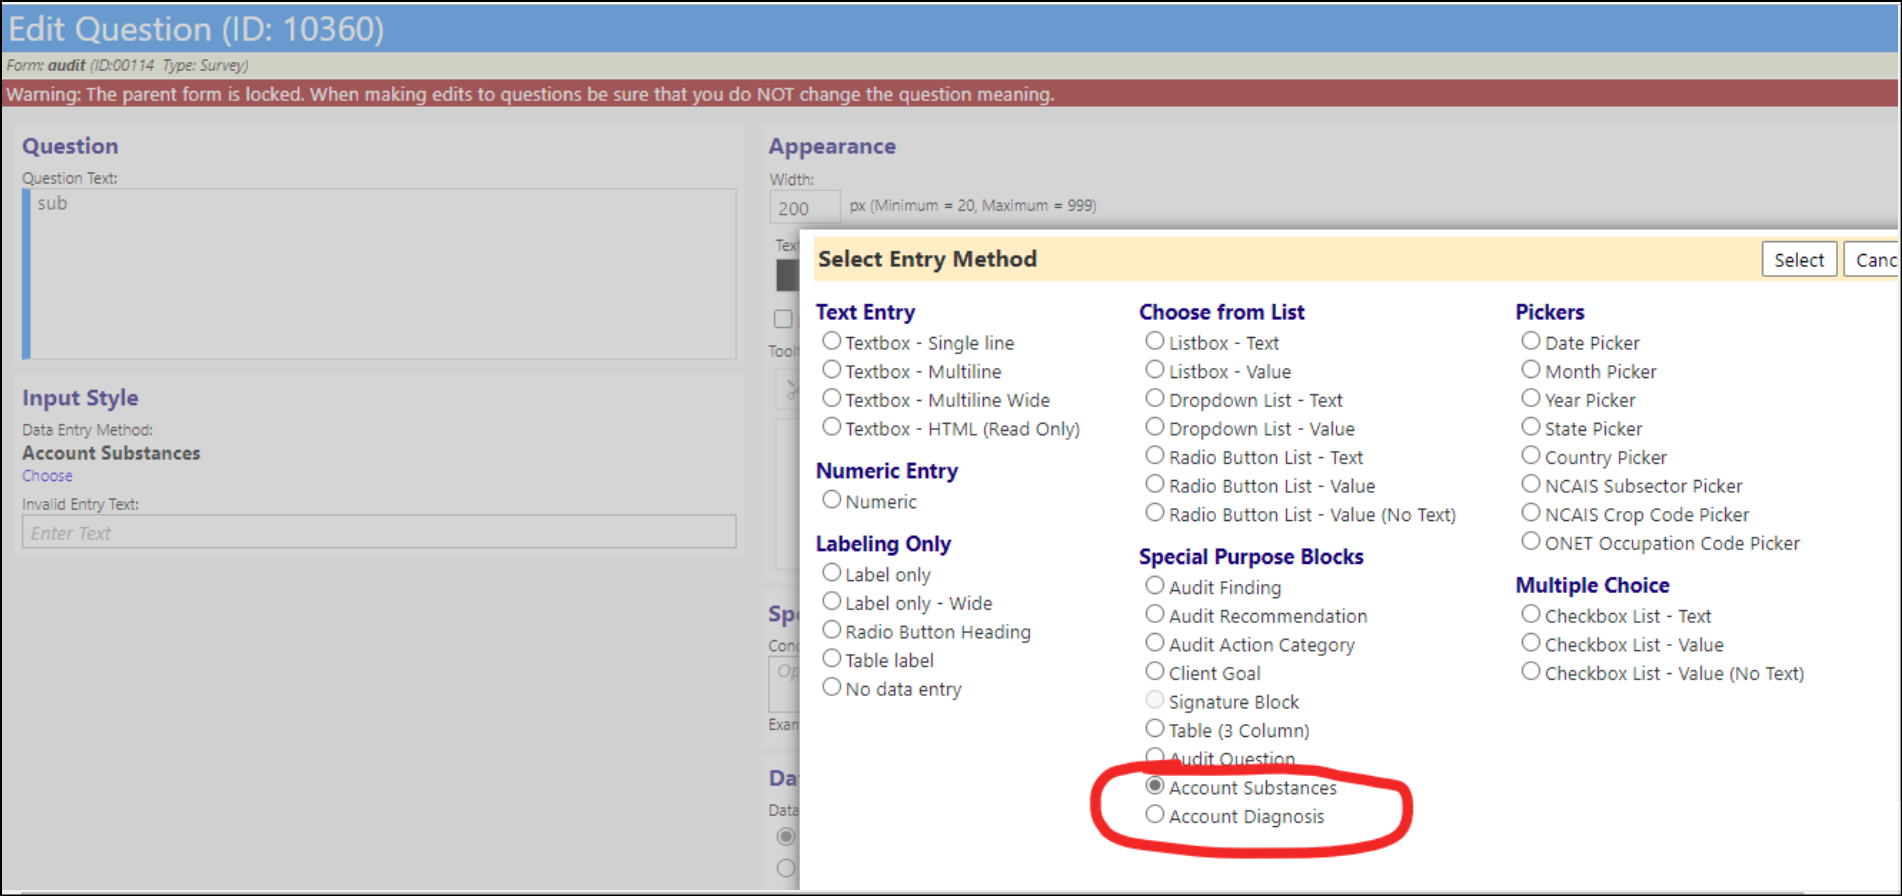
The ability to enter Account Diagnosis Codes and Substance Abuse Codes has been extended beyond accounts and Program Workflows into other things such as forms used by treatment plans, assessments, audits, exams, applicants, and other:
Changes to Accomodations Page
The Accomodations page now captures the person who created the entry, the date it was created, the person who authorized the accomodation, and the date it was authorized. These Accomodations page changes are similar to those made for the Diagnosis page.
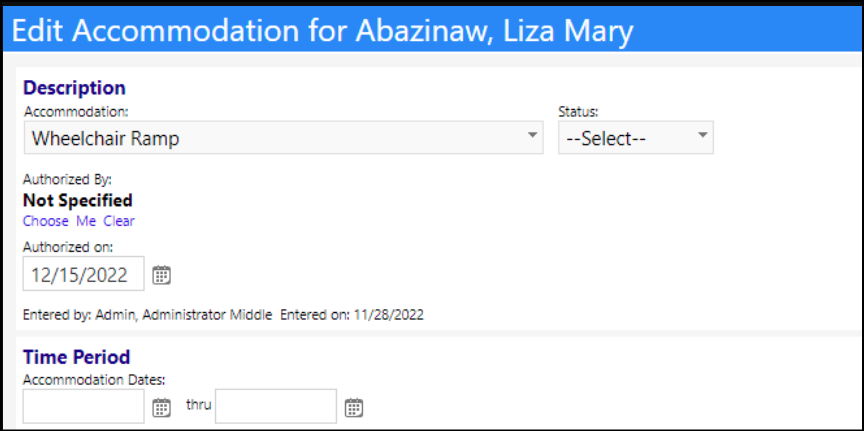
Users can also filter the Accommodations list using these dates.

Internal Audits Enhancement - Random Clients Sample
When doing audits, it is often important to pull a random sampling of clients to inspect. With increased attention on quality and auditing, with this change, users can select a filter set and then pull a random list of clients into a client group.
- On any version of the account list (client lists, non-client accounts, or staff list), users will get a new random sample option.

Selecting this option will bring the user to a new page for creating a list of random accounts. On that page, they can customize which subset of accounts it pulls the random accounts from, by modifying the filtering on the page they initially came from.
In the following example, prior to selecing the Random Sample option, the Clients page was filtered to Top 50 only. Because of that, with the new Random Sample of Accounts page, the user only has the 50 accounts that were on the previous page to choose from for their samples.
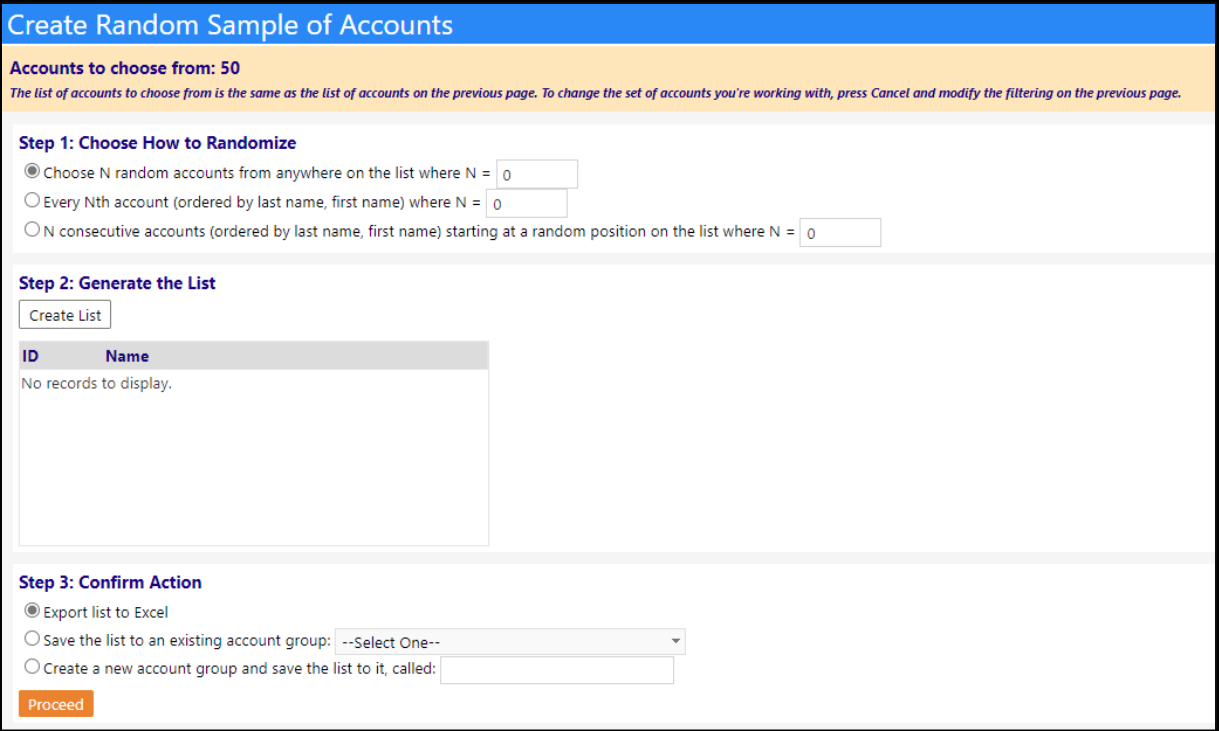
Step 1 lets the user choose how to get the random accounts. Then the user has to hit "create list" in step 2 to generate the list. Once the list is generated, the user can choose a way to save it in step 3 and hit the proceed button. Users won't be able to proceed on step 3 until they've created the list. Modifying the selection in step 1 will cause the list to reset, and the user will need to create it again.
New External System Mapping
External System Mapping provides a way for Administrators to associate imPowr accounts with account IDs in other systems.
-
New privileges have been created for this:

-
The External System Mapping must also be enabled in the Account Type Setup:
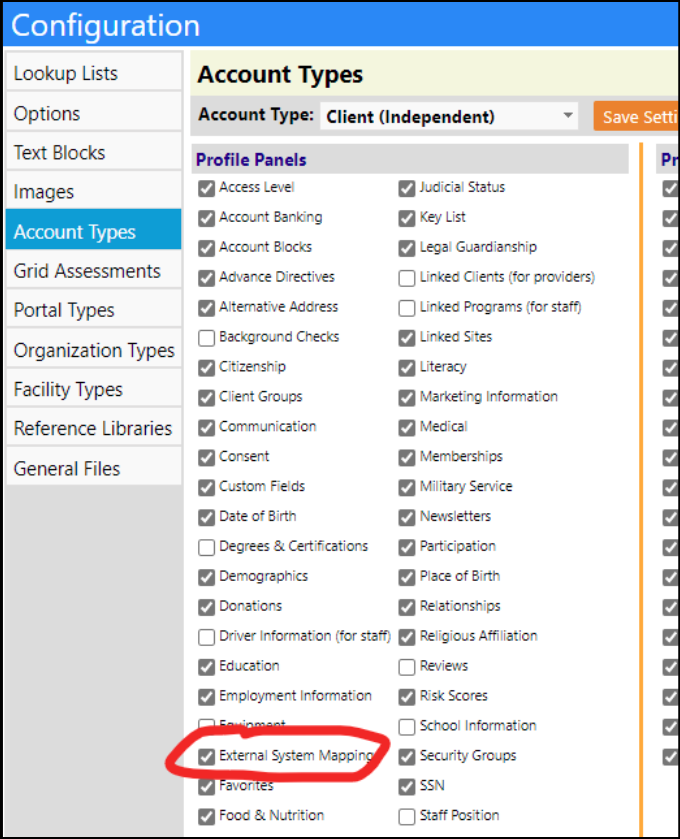
This setup will enable a new button on the account page:

- A new 'Mappable' checkbox has been added to the Technology Details page:
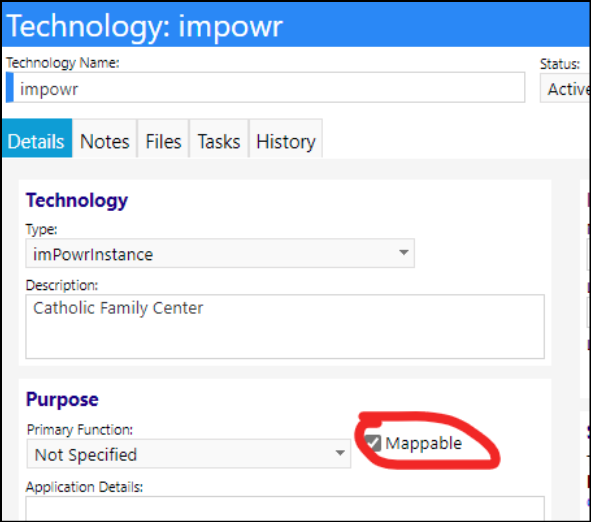
This is reflected on the Technology List in a new Mappable column, along with a column which displays how many Accounts are Mapped to that Technology:

-
When Accounts are linked to a Mapping, the link in the Account Profile becomes active and displays the number of mappings for that account:
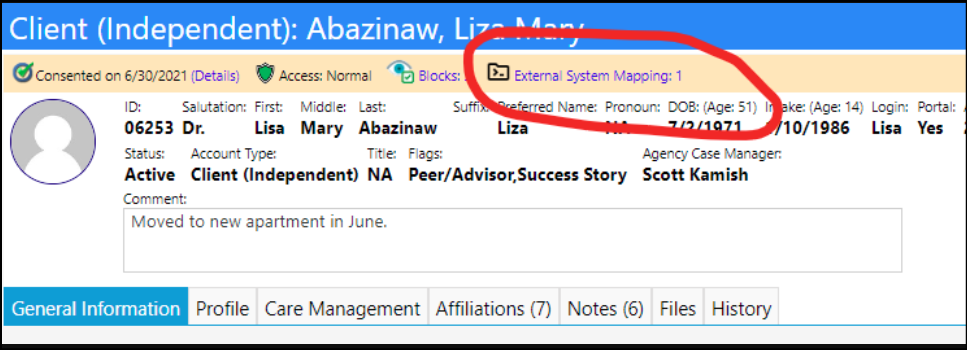
-
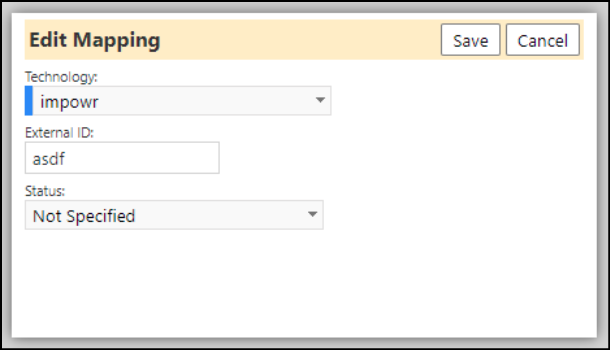
Clicking on the link, opens a new list page which displays all of the mappings for that account:

When in the Edit mode on this page, users can add/edit/delete mappings:
-
A new filter was also added to the Account List page so users can filter on the Mappings. These filters will be hidden unless anyone in the system has at least one active external system mapping. The filters will only search for all mappings.

-
Account merge now includes External System Mappings. On Merge...'
- we auto-merge those fields
- we do not create duplicates
- if both records have the same technology but different mapping fields, both technologies are saved in the merged account (i.e. "netsmart - 12234" and "netsart"45678"
- if both technologies are the same, we save only one technology in the merged account
- if both technologies are the same but one is active and one not active, we save only one technology in the merged account but save it as active
- if one technology has a blank mapping field and one does not, we save one technology in the merged account with a value
- If both technologies are blank, we save one technology in the merged account as a blank
- New data clean up tools related to mapping have been added. The tools are found in the Similar to Other Accounts section of the Data Quality Tools in the Performance module.
- The tools are to:
- Share an external mapping with another account
- Have an external mapping with no ID
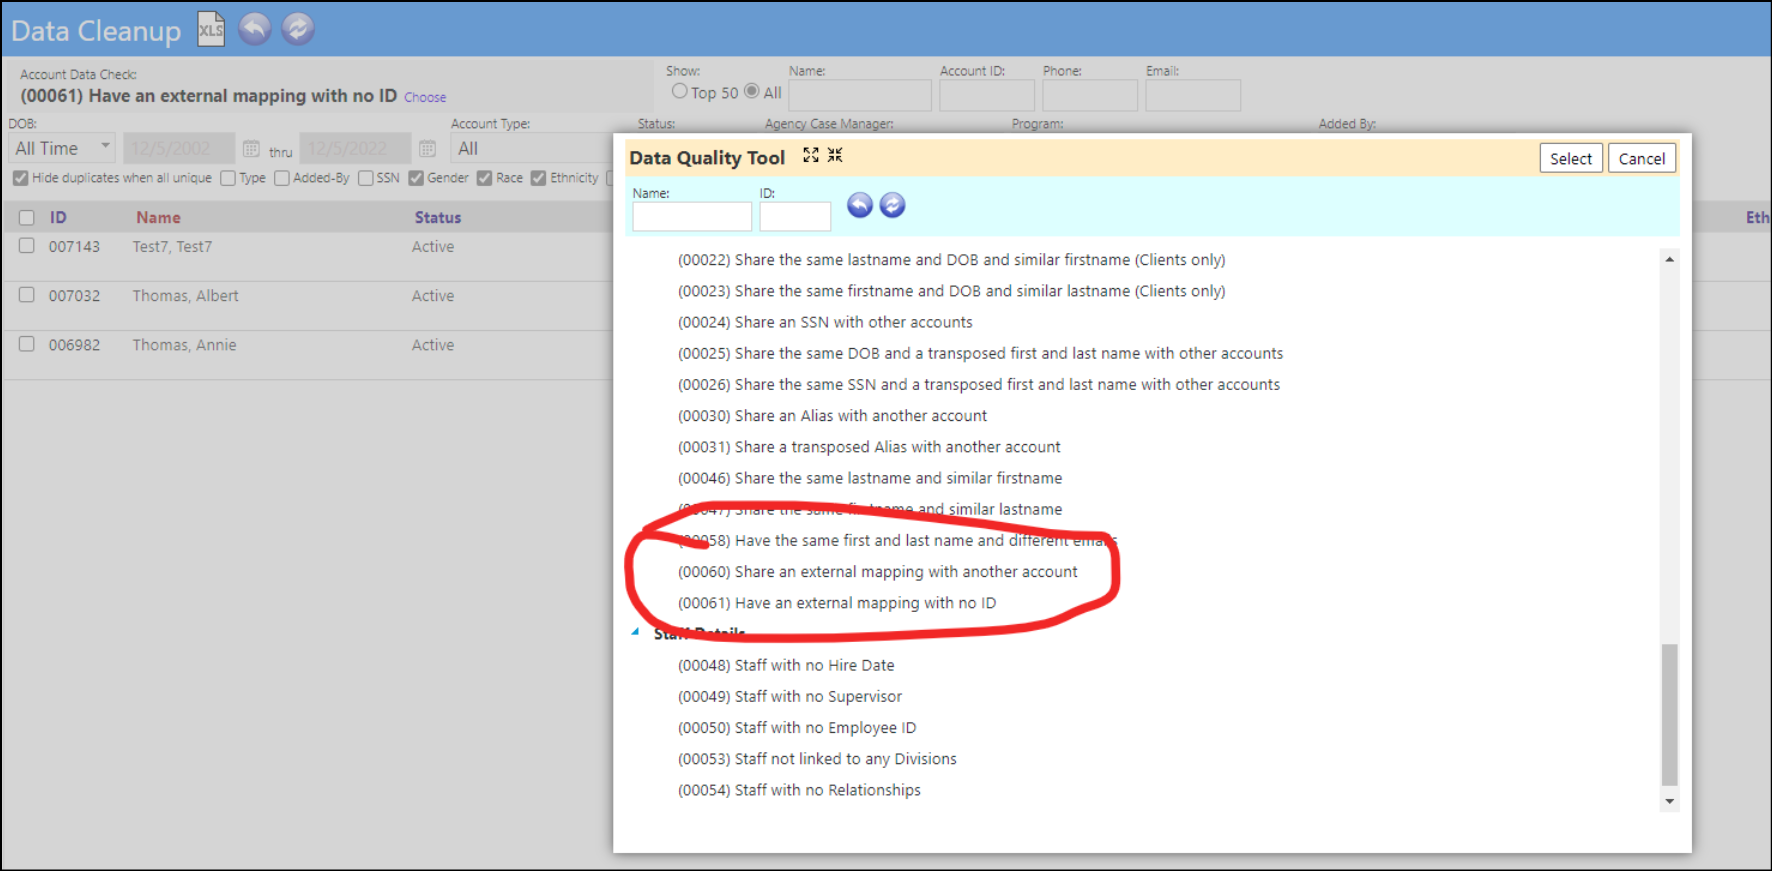
On the "Shares a mapping with another account" option, a column will displayon the right side of the grid that lets the user see who a given client shares external mapping IDs with.

Enhancement to Interpreter Orders - New Calendar View
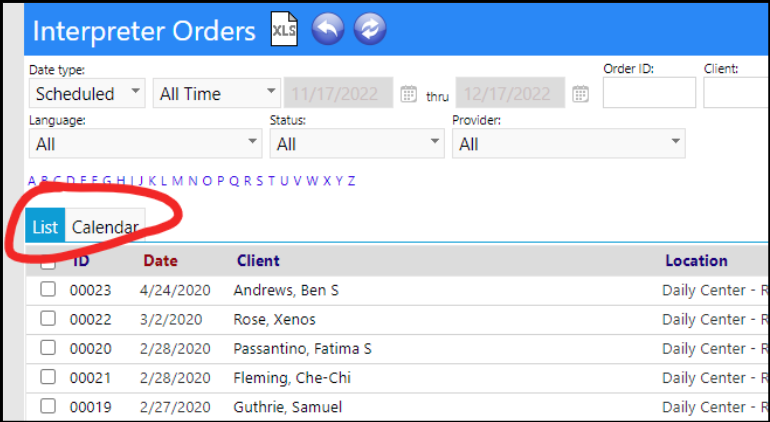
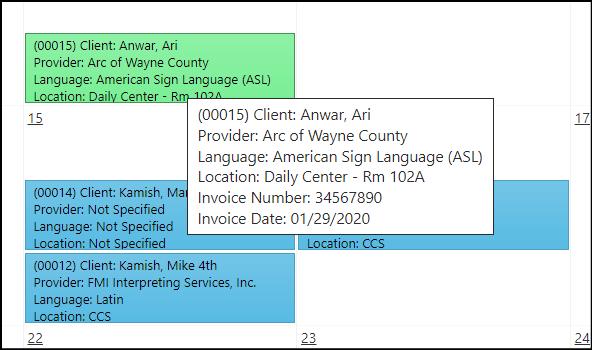
The interpreter orders and interpreter schedule pages have been combined with these new List and Calendar tabs.
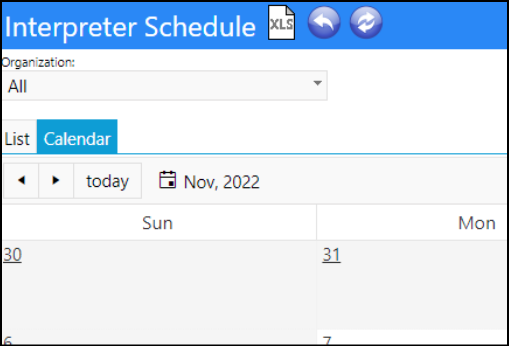
The Calendar tab depicts the interpreter appointments and their status in an easy to view display.
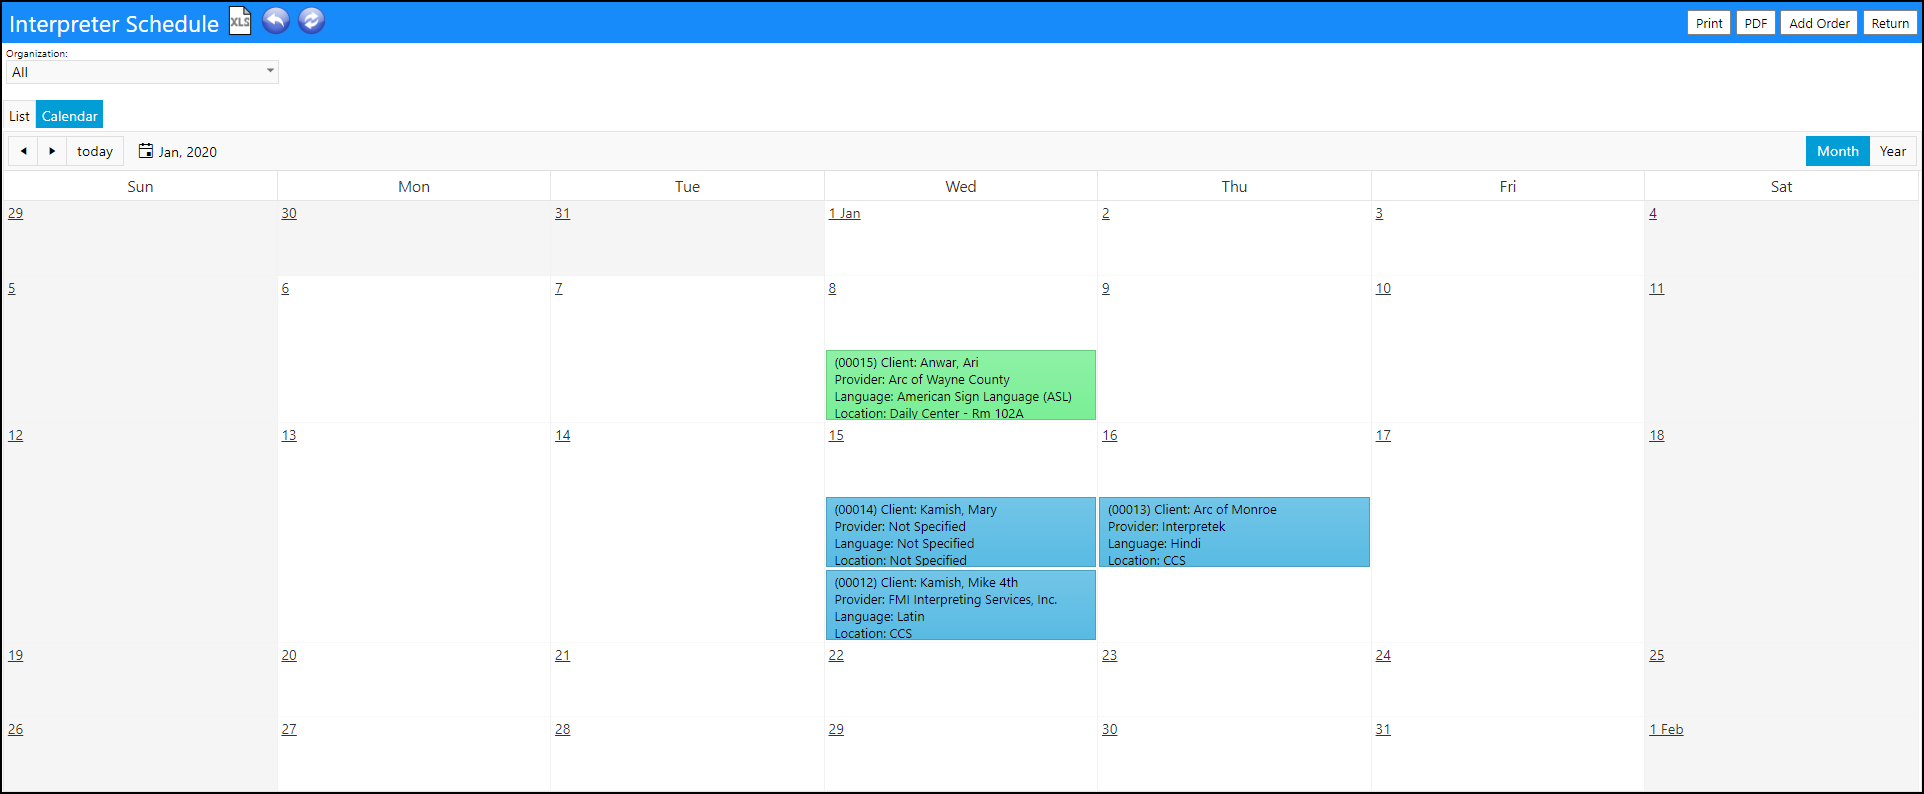
Hovering over the appointment will provide additional details.
New Key Summary Page
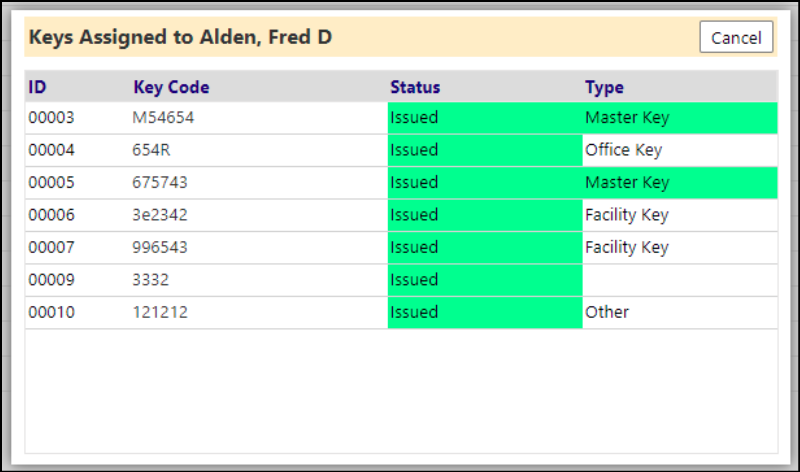
A new Key Summary page was added to the Key List grid. This new page has tabs for accounts, facilities, and assets. Each tab lists the things that are associated with the keys. For example, the accounts tab will list out every account that has a key, and clicking a button on each row will show a popup listing out each key that person has.
A new optional column was also added to Key Lists that lists out all the people listed under "associated accounts", comma delimited (this works in the same way that the "associated accounts" column in the Facilities List works).
This is the new Summary button on the Key List:

Clicking on the Summary button displays the key list by which accounts, facilities, or assets are assigned to each key:

Click the Key icon to view whick keys were assigned to the item you just clicked on:
There is also a new optional column on the regular key list that shows all the accounts assigned to each key. This is off by default since this list can get long.

New Asset Inspection Notification Policy
A new Scheduled Notification Policy has been created for Asset Inspections. The policy work similarly as does the one created for contracts that are coming due or expiring - the new scheduled notification notifies a user when an asset inspection's inspection date is within the date range and does not have a status of "completed". The date range consists of the number of days back and forward from the current date as specified on the notification.
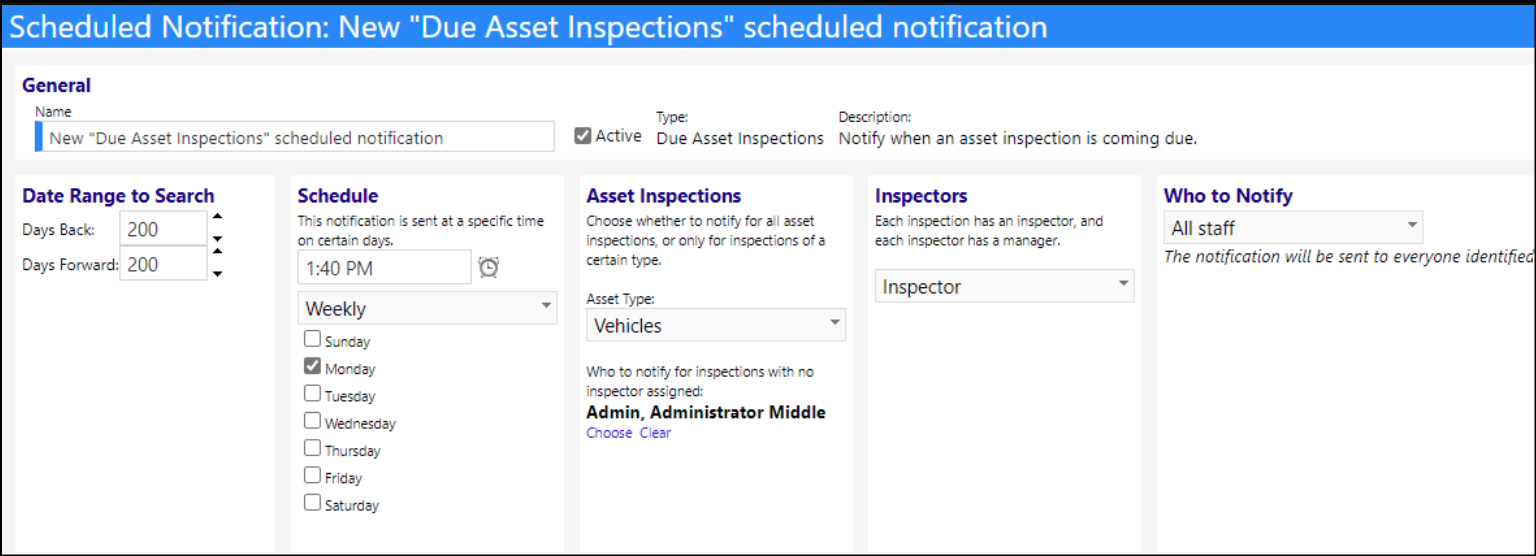
There is a dropdown list for asset type as well, that defaults to "all". Users can set this to vehicles, to only be notified of upcoming vehicle inspections.
The field below the asset type lets users define someone to receive the notification for the inspections that have no inspector. (It's possible to have an inspection with no inspector defined.) This person will be notified if an inspection with no inspector is coming up.
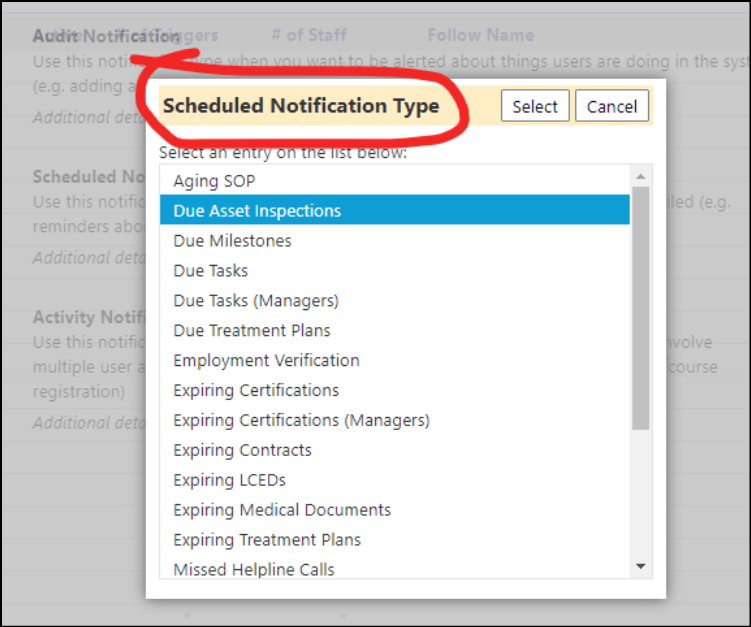
The text on the popup when creating a new notification was also changed. It was changed from Notification "Sub-Type" to "Scheduled Notification Type":
New Notification Policy Finder
A new feature has been added that allows users to click on 'Find' in the Notification Policies, and once they enter their or another person's name, the system will display all notification policies that they are associated with the selected individual, or that the individual is Following, along with the status of that policy.
This will help users locate those which they may be receiving notifications from, but were unaware they were set up to receive them, and help managers see which ones their staff or team members might be receiving. That way, they can contact the administrator to have themselves removed from that policy or make any necessary changes.
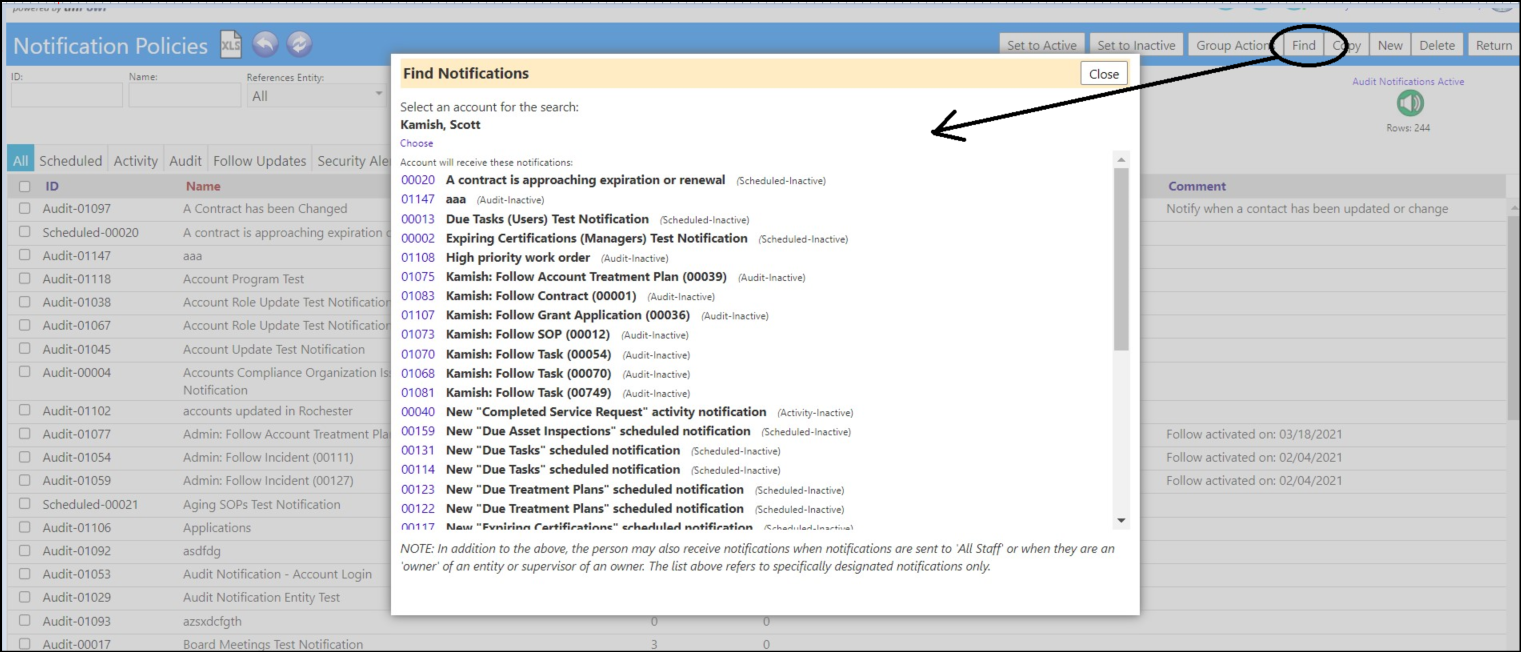
Clicking on the policy ID brings the user directly to the policy. And, if they have the appropriate rights, they can edit the policy.
There is a new filter if a user is on the "audit" or "follow updates" tab. If an account ID is entered, for example, the Admin's ID, the user can see all the audit/follow notifications that admin is getting. Hovering over the question mark icon will tell indicates the list displayed doesn't include notifications where the "who to notify" is set to entity owner, supervisor of entity owner, or task submitter/owner. So this filter will show the notifications where the selected individual is on the list of accounts to receive it, or the notification is being sent to a staff team and they're in that team

this filter only shows on the audit and follow updates tabs. We can't do this kind of thing for scheduled or activity notifications because the "who to notify" for each of those notifications is completely different and depends on what the notification is. For example, for a contract expiring notification, I can set the "who to notify" to be the contract owner. That would technically mean anyone in the system can get notified for that, because anyone in the system can be set to be an expiring contract's owner
The Follow button in the application has also been updated. When an individual Follows something, the Follow button will now change to say "Unfollow". Clicking it now will delete the Follow notification it created, so the user can now un-follow things without needing to have access to the notification policy list page or contacting an admin.

The Follow button on the view/edit account page is a special case. It will now have a dropdown associated with it, with the primary option being follow/unfollow like usual. The other two options will only show if the user has the privilege to the notification policy list page, or they're viewing your own account. Clicking either option will take the user to a new page

The "who follows this?" option displays a very simple list of all the people who are Following changes to this account.

The "what does this account follow?" will display a list of all the things that account is following. Users have the option right on that page to remove any of them, which effectively unFollows them.

Notification Policy Message Title Enhancement
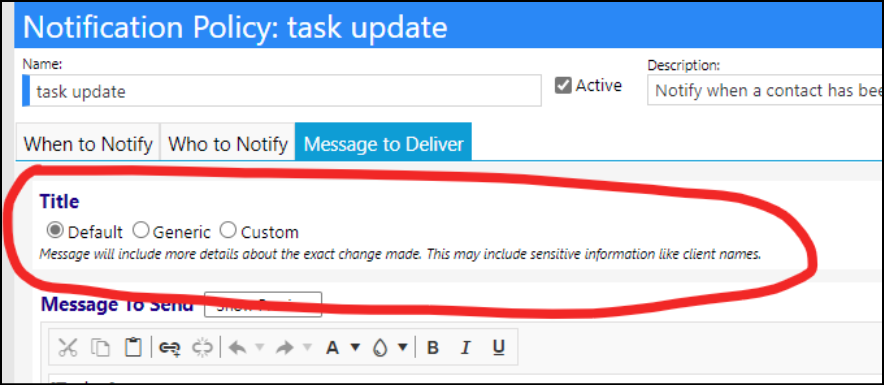
A new option to customize how the "title" of an Audit Notification displays. Users can select from 3 different options:
- Default - Message will include more details about the exact change made. This may include sensitive information like client names.
- Generic - Every message will be formatted in the following way: Entity (CCID) - Action. No sensitive information is included.
- Custom - Reserved words are supported in the title.
The title now defaults to the "default" option of the title, which is how it worked prior to this change.
-
"Default" will display a slightly detailed message of the audit event. If a user edited an account, the default message may be something like "Account 123: John Smith updated", and it may include sensitive information like someone's name. Example: Created Account Care Plan: 54 Client: Aaajuan, Aaasusie.
-
The "Generic" option will always format like "Account 123 - Modified", and will never include sensitive information. It will always be in the following format: Entity (ID) - Action. Example: Care Plan (ID: 00055) - Created.
-
"Custom" lets users enter a customize their message. This allows the message to include reserved words, so the audit notification can contain any text desired. Example: This is a custom option test for 07162.
For example, here's a notification that was received when updating a task. It was sent with a Custom title on it. The custom title will be the first line in the email.
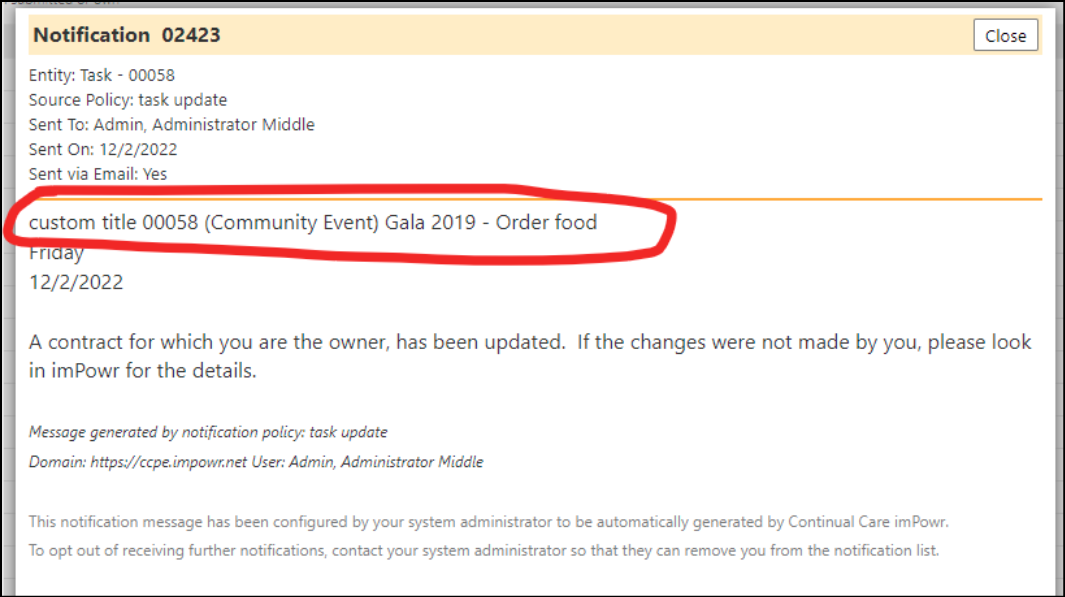
Users can continue to customize the message being presented. The above changes only apply to the title of the email message.
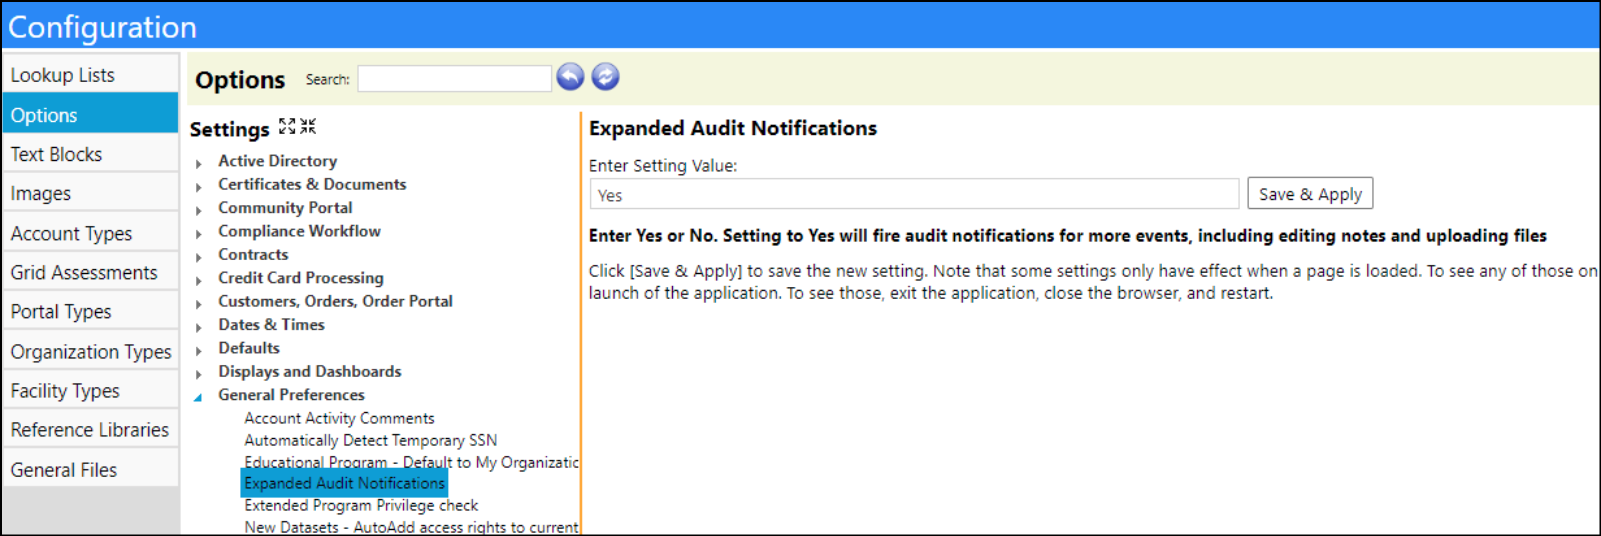
Along with this change, some backend changes to how audit notifications are triggered were also changed. Prior to this change, even though the Audit Trail captured changes made, not every change triggered an Audit Notification. With this new change, users could choose to receive an Audit Notification for every sent Audit Trail entry if so desired. There is a new application setting to enable "Expanded Audit Notifications". It defaults to 'Off', but turning it on will send an Audit Notification for all Audit Trail activity.
New Page Privilege Editor
A new icon has been added along the top of the screen for "page options".
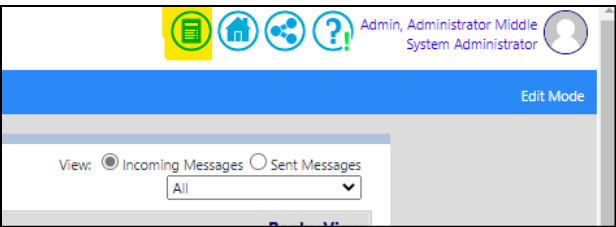
If available, clicking this button provides the user with the ability to see "What roles can see this page" (which has been moved here from the account options popup (clicking on your profile picture in the top right)). This option is available to any account role that has the word "admin" in its name.
This new page is a nice-to-have when building account roles or when trying to troubleshoot why someone cannot view a particular page.
Program and Program Workflow Enhancements
Some new date range options now display on the client list on the program page, if the program Schedule Type is set to "School Year Based".
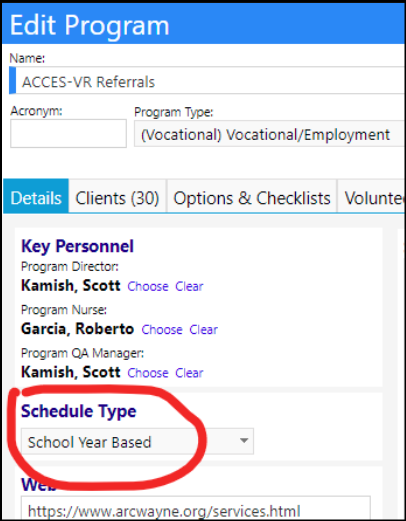
- The visibility of other school-related options on programs is also controlled with this program Schedule Type field as well.
(NOTE: for non-school related programs, please make sure the 'Show School Info' box in the Options & Checklists is unchecked. When it is checked the school grade related options display and become active.)
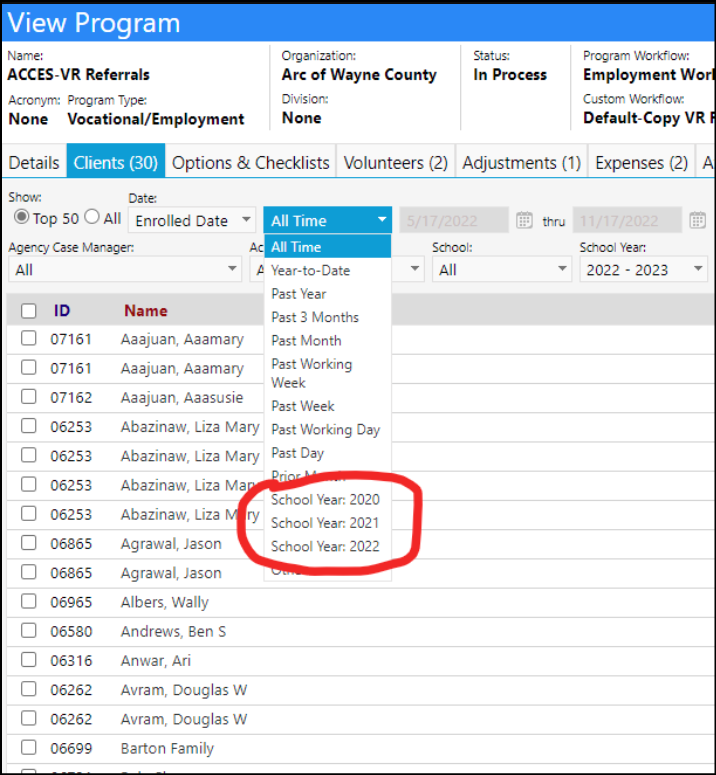
- The school year is defined in a new application setting that defines the school year dates. Essentially the date during the year when a school year ends and a new school year begins. It defaults to September 1st (the year designation on this date is not used, it is just formatted in this way to make it easier to read/write from the database). With a value like September 1st as the date, the 2022 school year would be from 9/1/2022 to 8/31/2023.

- Administrators can override the school year start date on a program by program basis, in case one school uses a different school year. The editor for the override date will also only display if the program schedule is school year based.
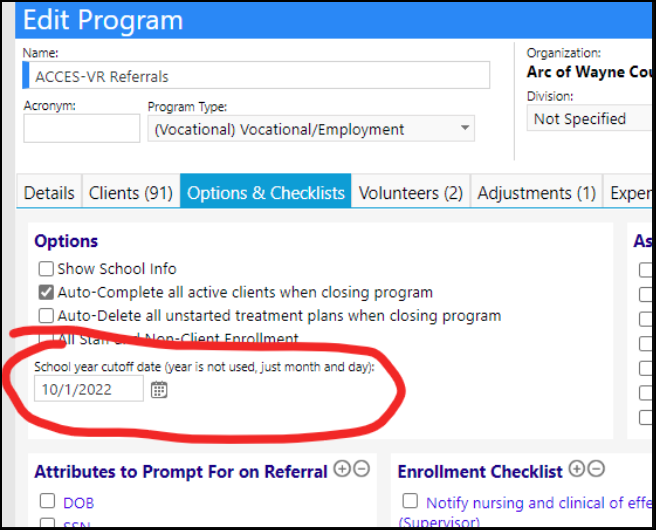
With it overwritten to October 1st, filtering to last school year, the client list will display individuals with a start date between 10/1/2021 and 9/30/2022.

Additional Program Client List Columns Displayed
Additional columns have been added to the Program Client List. Selections are now remembered on a per program basis
Two additional columns have been added:
- Job Developer
- Provider Org
When displayed, if the program has a workflow, the display will attempt to use the job developer and job counselor custom labels for that program. If there is no program workflow, the job counselor appears as Program Case Manager, and the Job developer and provider columns are hidden from selection.
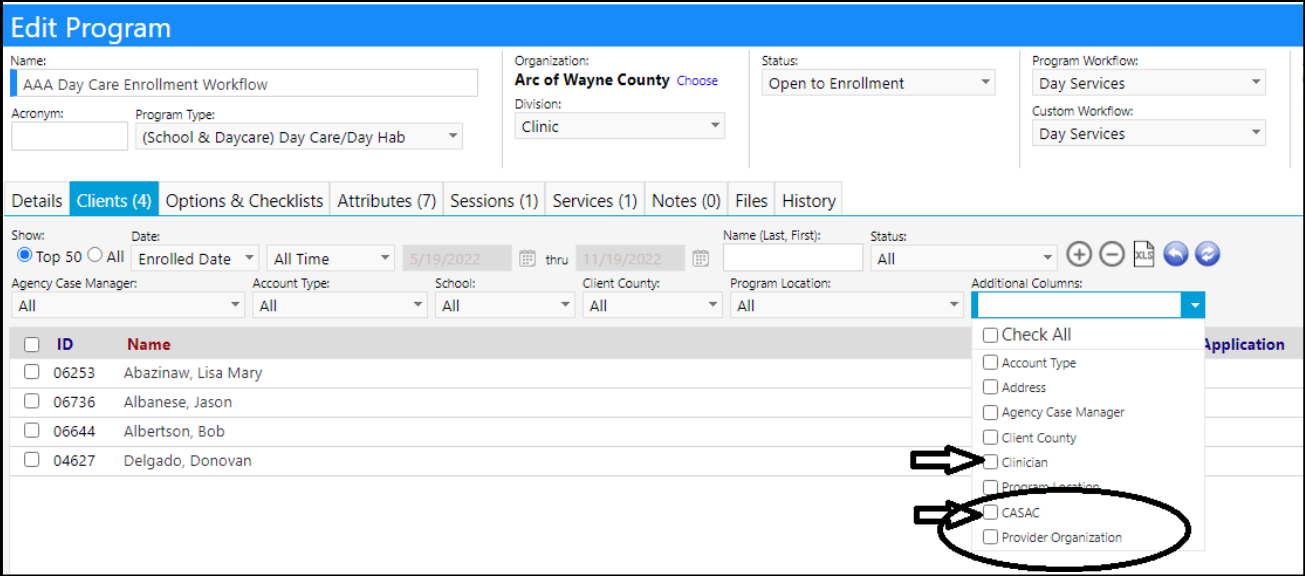
New Form Picker for Program Workflows
 {height="" width=""}Updating Client/provider Appointments in Workflows
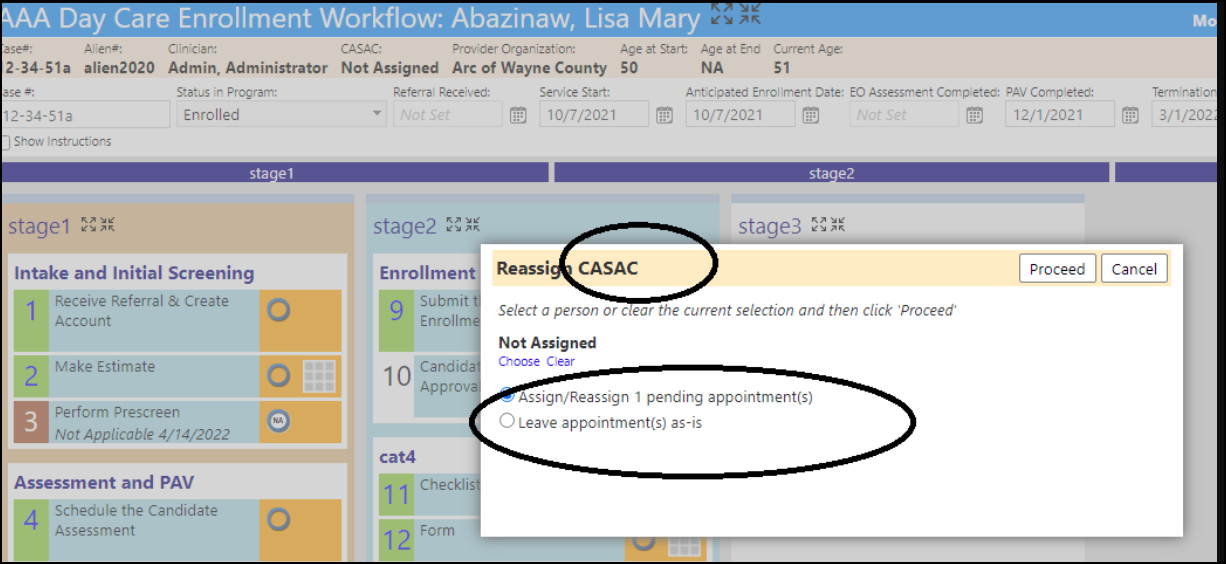
New Assign/Reassign Staff Widget
In the Program Workflow, there is now a new widget for assign/reassign staff - AND - update pending appointments to that person.
- Regarding Appointment Availability, please refer to the Staff Appointments Calendar information listed below, in another section of these Release Notes.
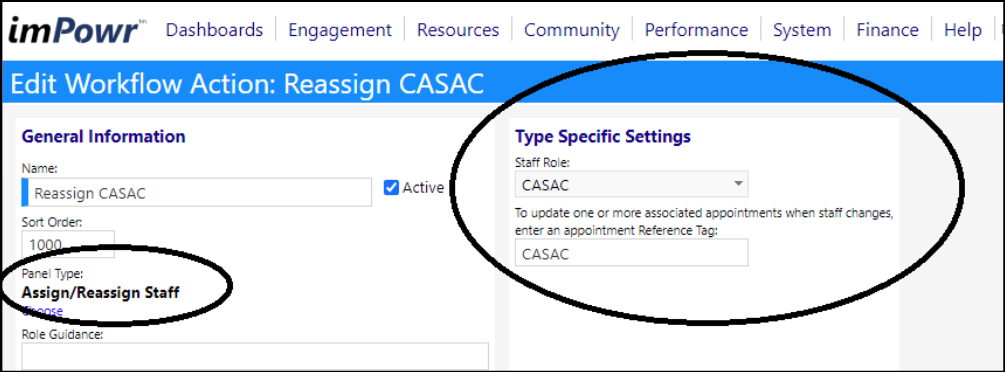
Usage of that pops up a wizard based on the workflow action setup:
Configuring Appointments in Program Workflows
Configuring an appointment widget in the Program Workflow will now let users select multiple letters instead of just one.
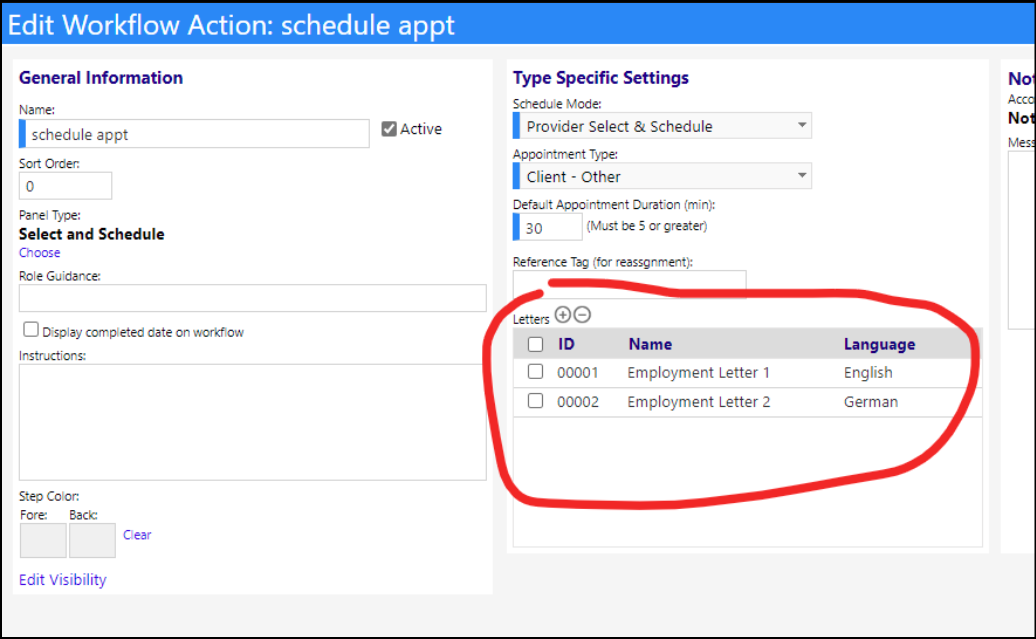
-
When users go to print the letter from the scheduled appointment, if multiple letters are defined, they'll get a popup that lets them choose a letter to view. If just one letter is defined, it'll automatically just show that letter.
-
If there are more than 1 letter attached, clicking on the Print button will bring up multiple print options.

- Regarding Appointment Availability, please refer to the Staff Appointments Calendar information listed below, in another section of these Release Notes.
New Visability Rules to Display and / or Hide Workflow Steps
There is a new type of row available when editing the visibility rules of a program workflow or workflow step.
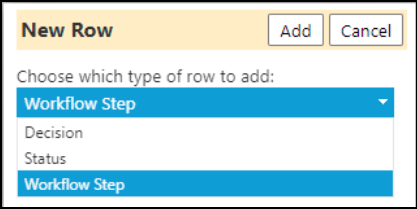
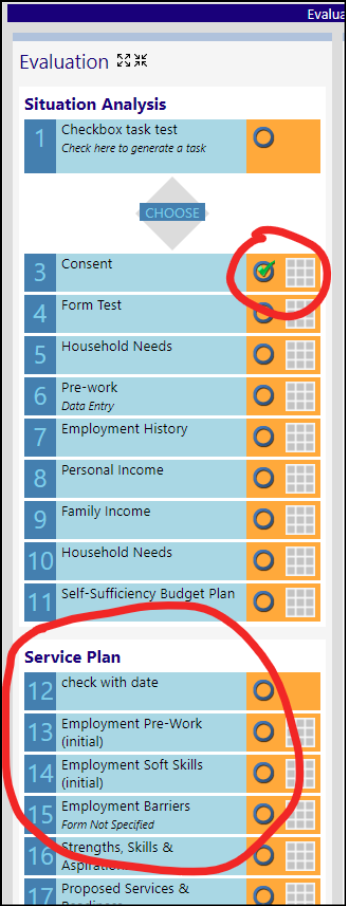
This new type of row allows users to display/hide something based on whether or not a specific step is completed. In this example, the second category in the workflow will only display if the consent step has been completed.

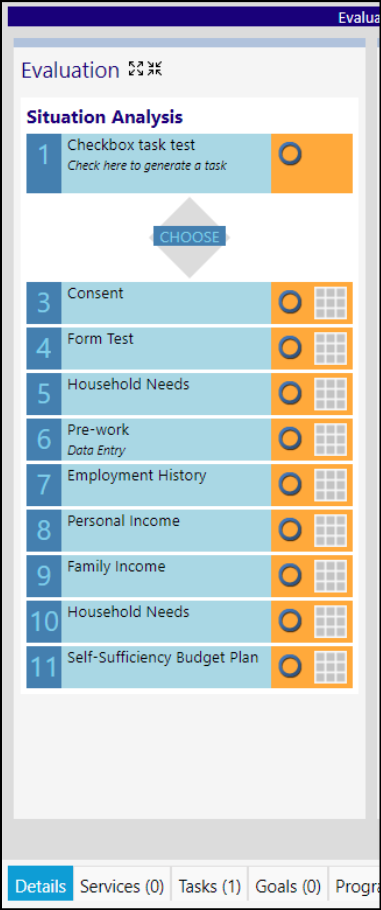
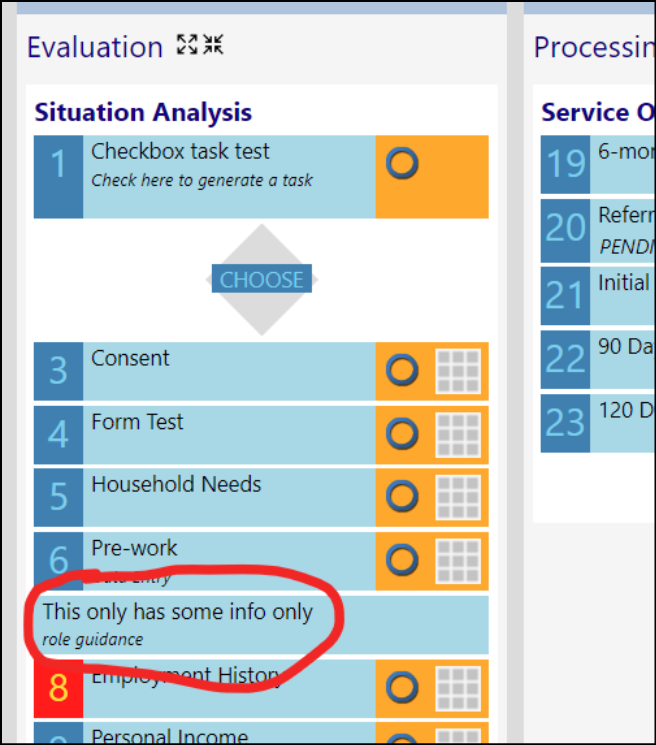
New Information Only Widget
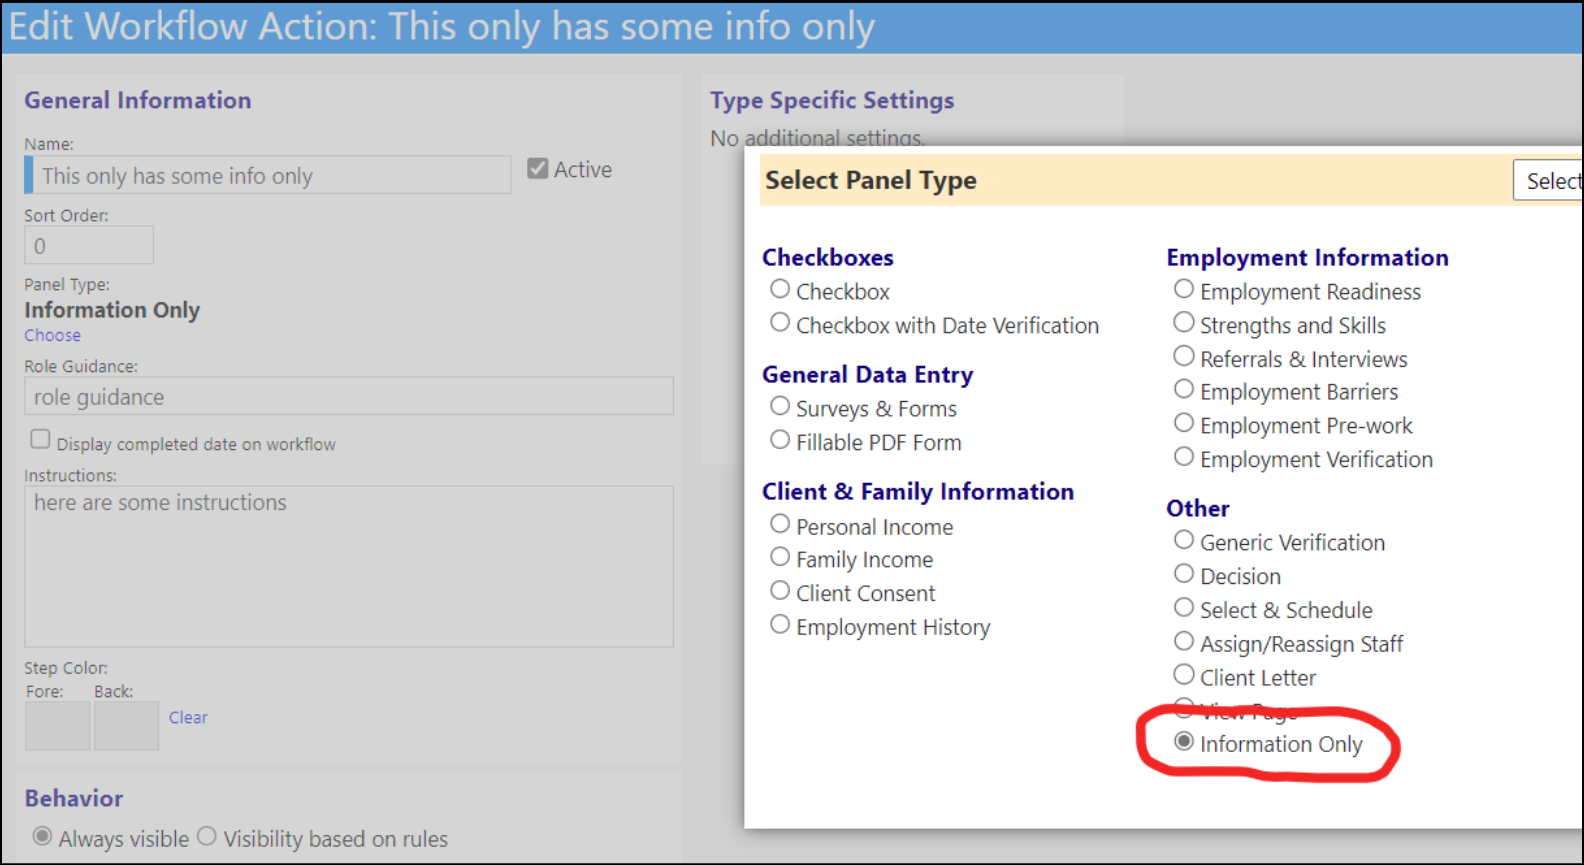
A new Information Only widget has been added to the workflow actions. Its attributes are the same as for other action widgets:
- foreground and background colors
- instructions
- role guidance
- visibility settings
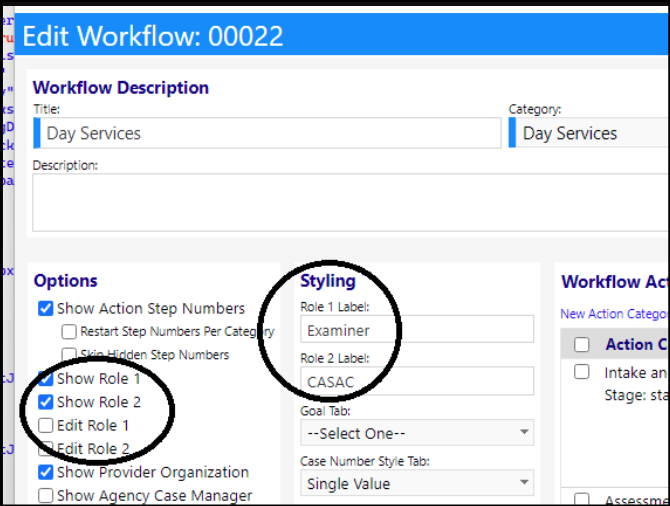
Program Workflow Job Role Changes
The Program Workflow screen has been refactored to make it more role accomodating. The Job Developer and Job Counselor roles were changed to "Role 1" and "Role 2" since the workflows are no longer just for employment.
New Diagnosis Code Form Block
As indicated in the Account Enhancements, a new Special Purpose Form Block for Diagnosis Codes, for use with Forms on Program Workflows was added.

On the data entry form, here is what the new refactored question-findings entry looks like, including the Diagnosis Codes:

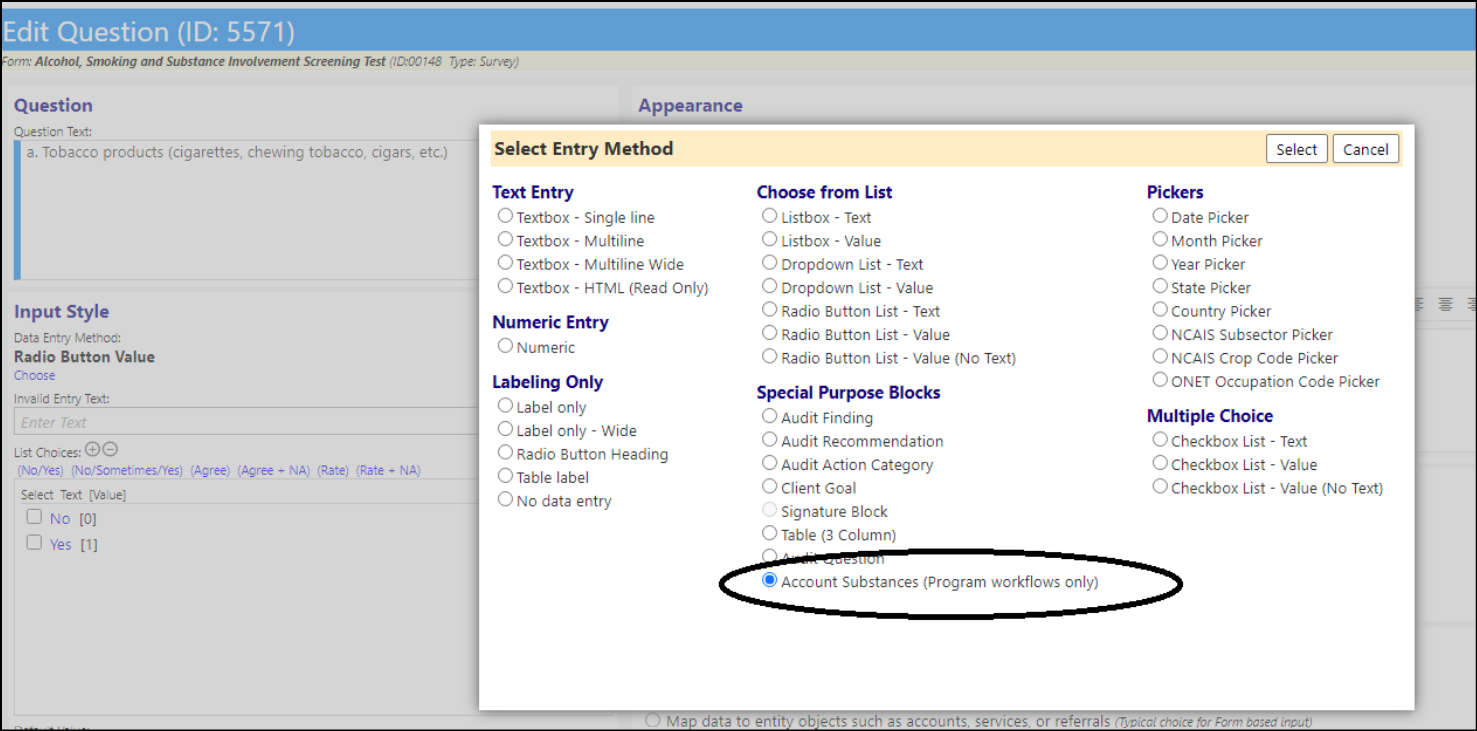
New Substance Abuse Form Block
As also indicated in the Account Enhancements, a new Special Purpose Form Block for Substance Abuse, for use with Forms on Program Workflows, was added.
Use of Substance and Diagnosis - As Built pages:


Changes to the Visibility Rules on Workflow Steps
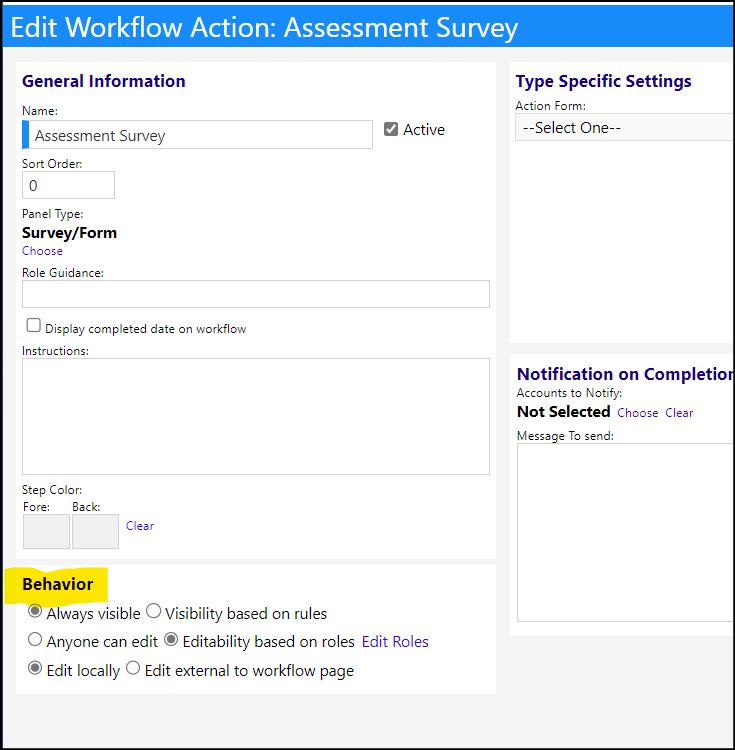
The new behavior rules on workflow steps now have functionality. Through the rules, users can make some steps not editable on the workflow, which will show up as faded and will not be clickable.
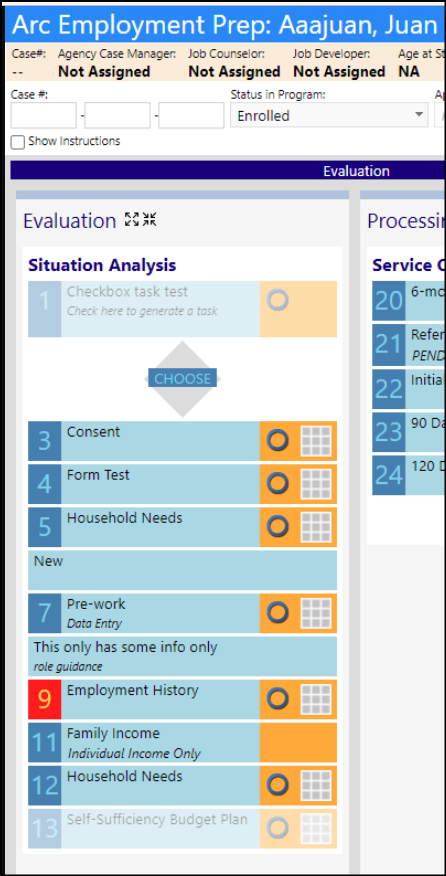
-
For visibility rules, the existing visibility rules will only take effect if a user sets the rules to "set visibility based on rules". Every step defaults to "always show", so users will need to change that setting on existing workflow steps that relied on visibility rules.
-
For editability, users can set it now so only certain roles can edit a step. If a user is not in one of those roles, the step will be faded.
-
There are also options for "local" and "external". If that is set to external, the step will always be faded.
New Workflow Step Tagging
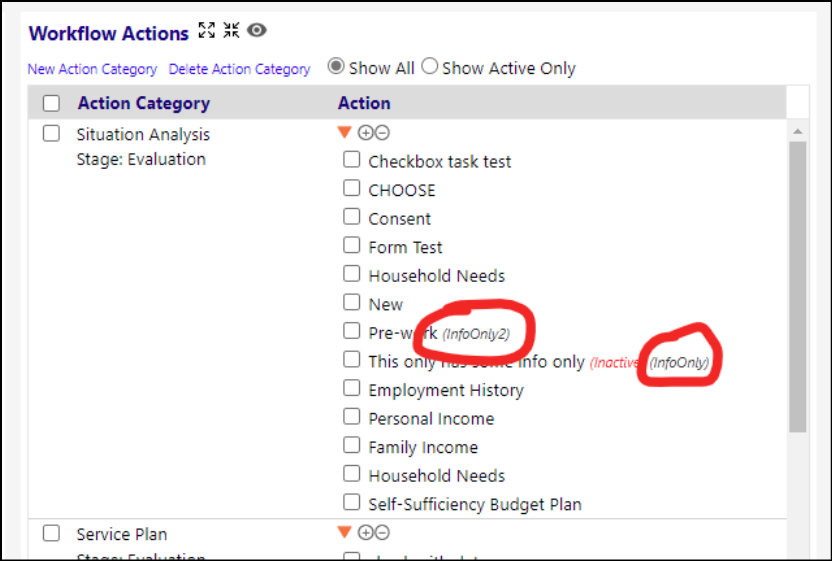
In order to accomodate the need to be able to mark steps in a workflow as completed or set decision values from remote places (e.g.,from a file import, from an API feed from an external system. or from another page such as the provider screen (the initial need), tagging of Workflow steps has been implemented. With tagging, each step in the workflow can be provided with a defined name or tag (tagging will allow users to create a human readable user defined tag such as "AssessmentVisit"). Duplicate names are not allowed, so that each step in the workflow is unique.
Upon clicking save, the system verifies if the name is already being used elsewhere within the current workflow. If it is, the system will not allow the save and will pop up an alert message indicating the 'name is already used".
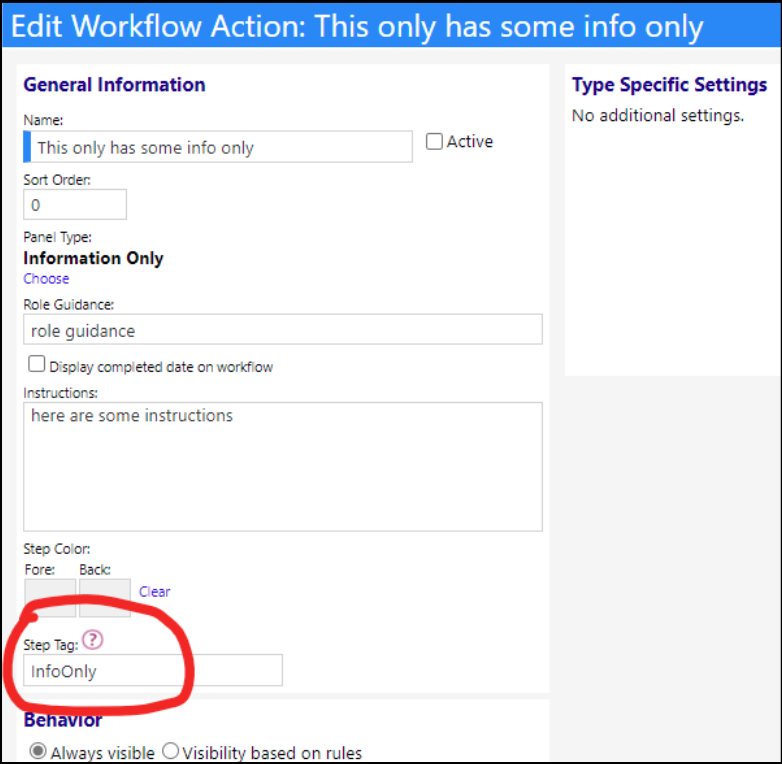
The step tag also shows on the edit workflow screen:

Treatment Plan Completion Setting - Moved from System Level to Program Level
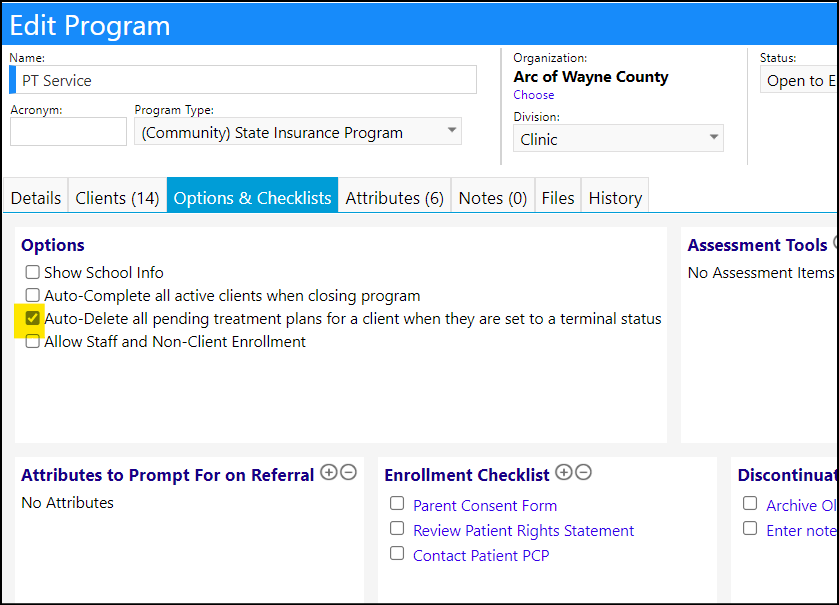
A change was made impacting the ability to automatically deactivate all related open treatment plans when a client completes a particular program. The setting for that has been has been moved from the configuration screen to the program Options & Checklists tab at the program level. This way, instead of setting up a system level behavior, users can choose whether to do that for each program, at the program level.
Change In Treatment Plan Completion Setting Behavior
Previously when a person completed a program and the appropriate options were set, pending plans were deleted but only in the future. Now, all pending ones get deleted - including those in the past.

A new 'Start Over' feature has been added to workflows - the button only appears when the workflow has a decision block in it. It allows someone to start the entire workflow process over, without having to manually uncheck all the widgets and undue all of the entries
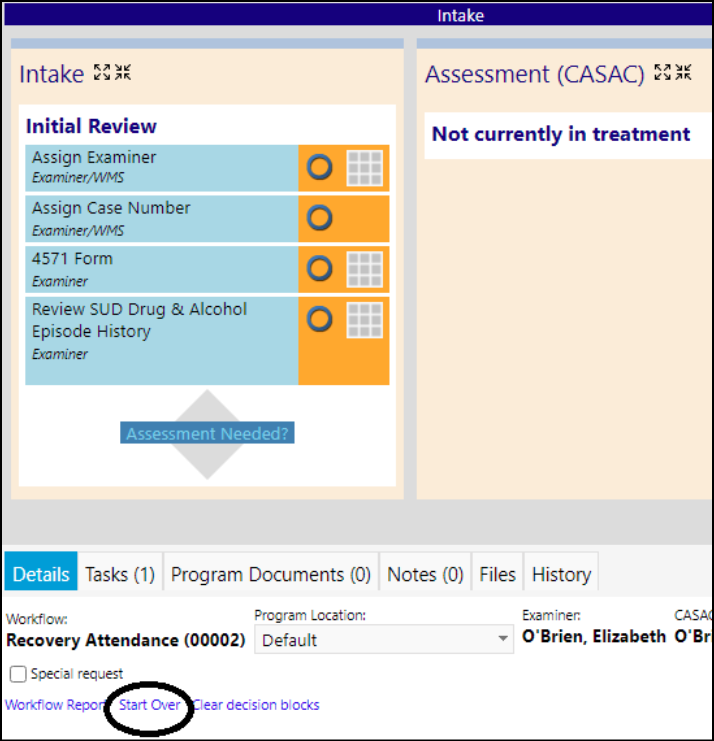 {height="" width=""}.
Program Engagement Screen Enhancement - New and Revised Filters Added
Program activity filters have been refined in the Program Engagements screen (Engagement > Client Events > Program Engagements):
- We have relabeled the date column chooser a general chooser
- We now show an Additional Column selection count
- We have replaced individual column checkboxes by adding them to the Additional Column chooser
- On reasons and programs, we now only show the entries being used
- We have additionally added school and provider organization as optional columns

Provider Portal Enhancements
There is now a new edit page for provider services. It is configured in the Reference Libraries.
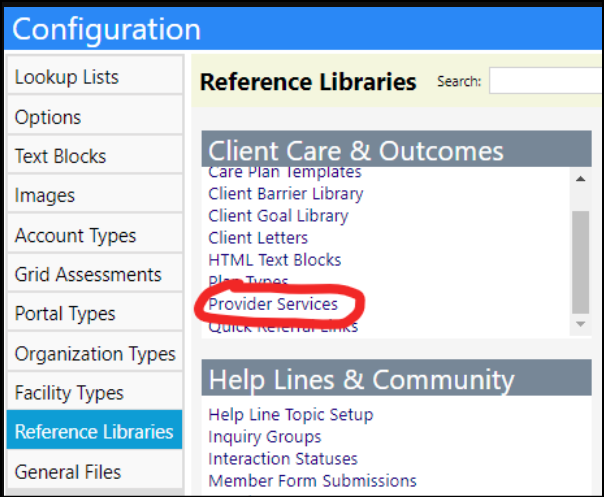
- The services can be added directly into the Partner Portal.
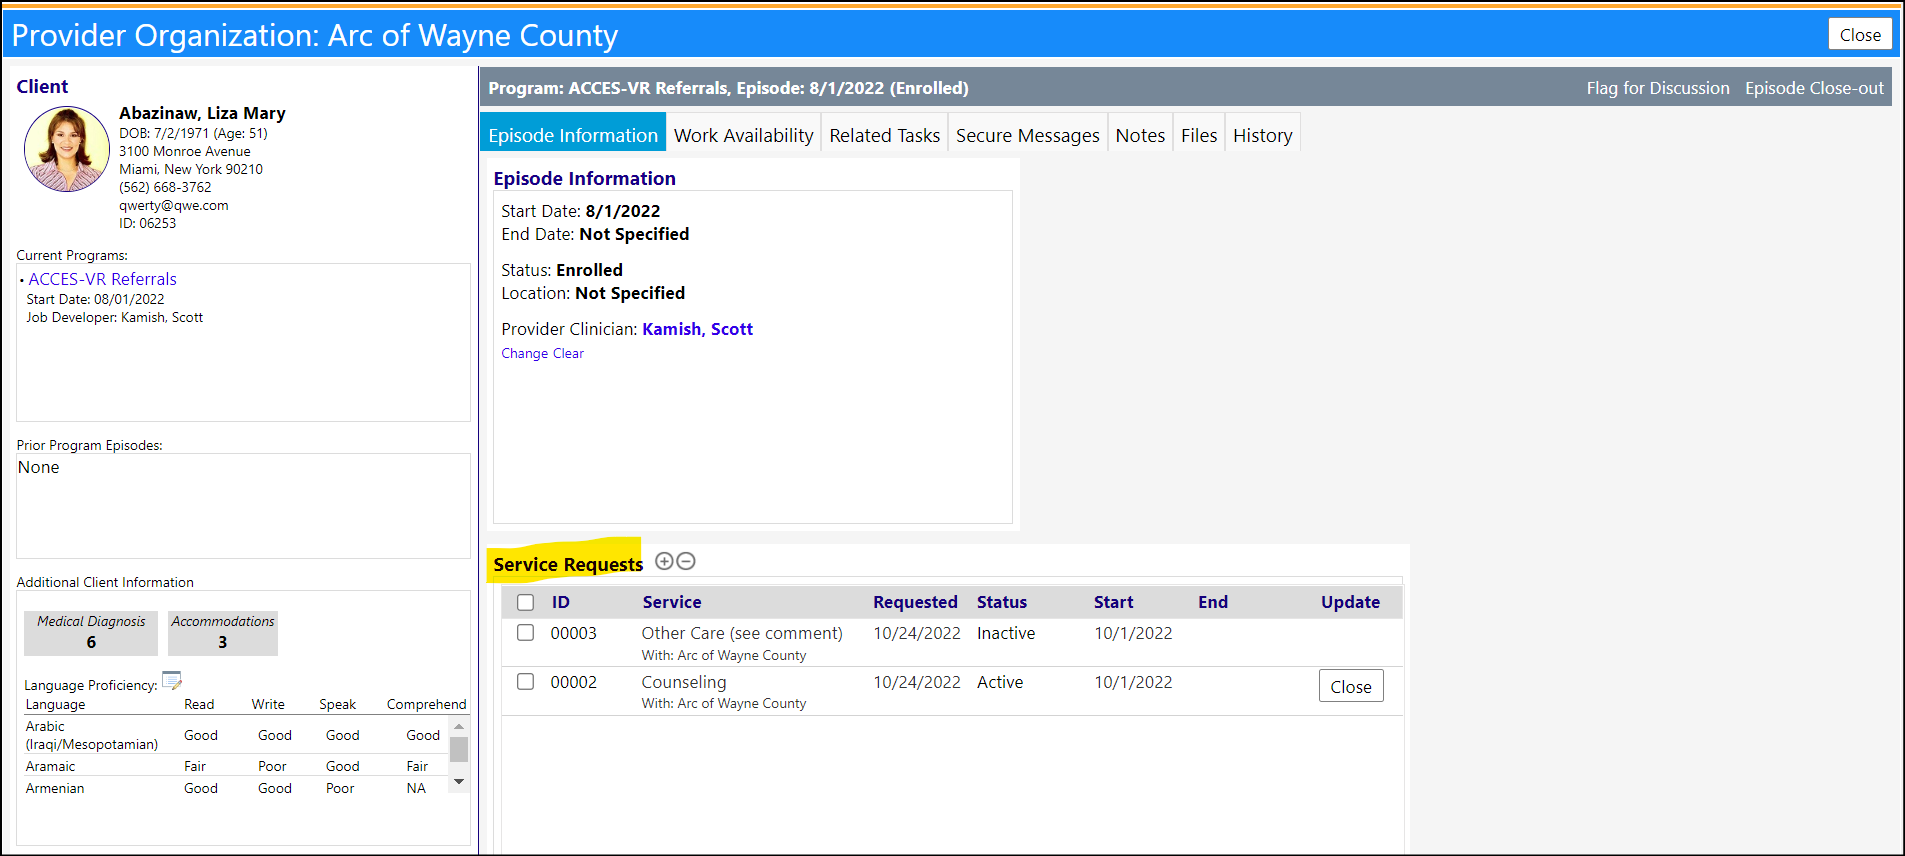
- Clicking on one of the services allows the user to add attributes to a client service.
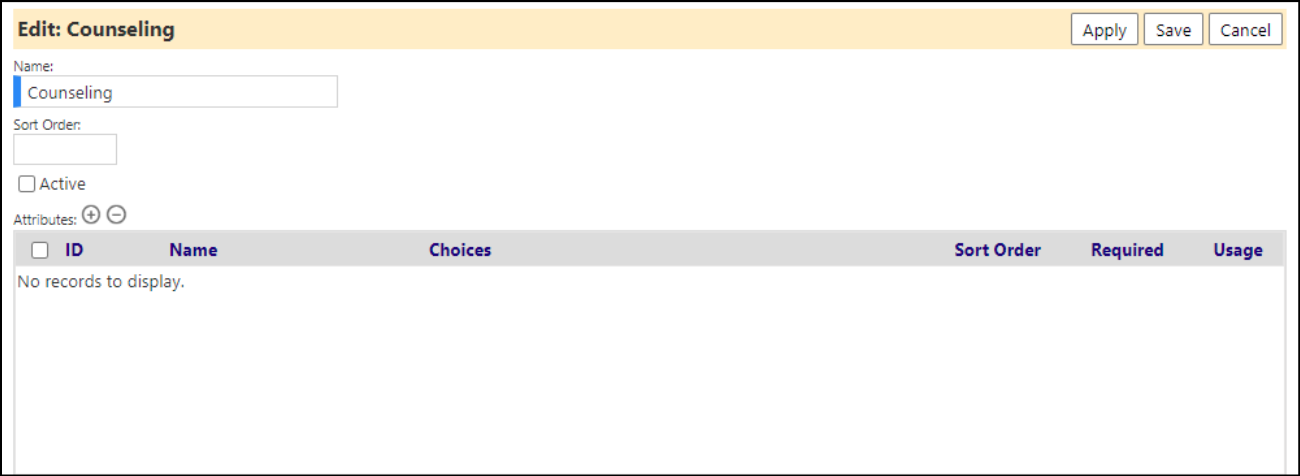
The attribute add/edit window lets users add choices that are '|' (pipe) delimited. This is the same way equipment types and equipment type attributes work currently,
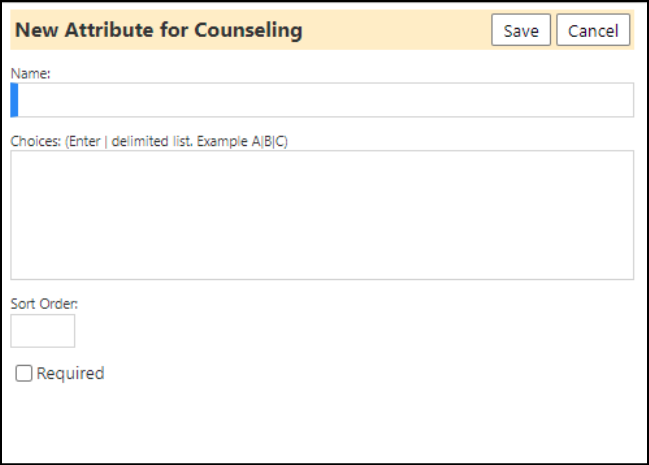
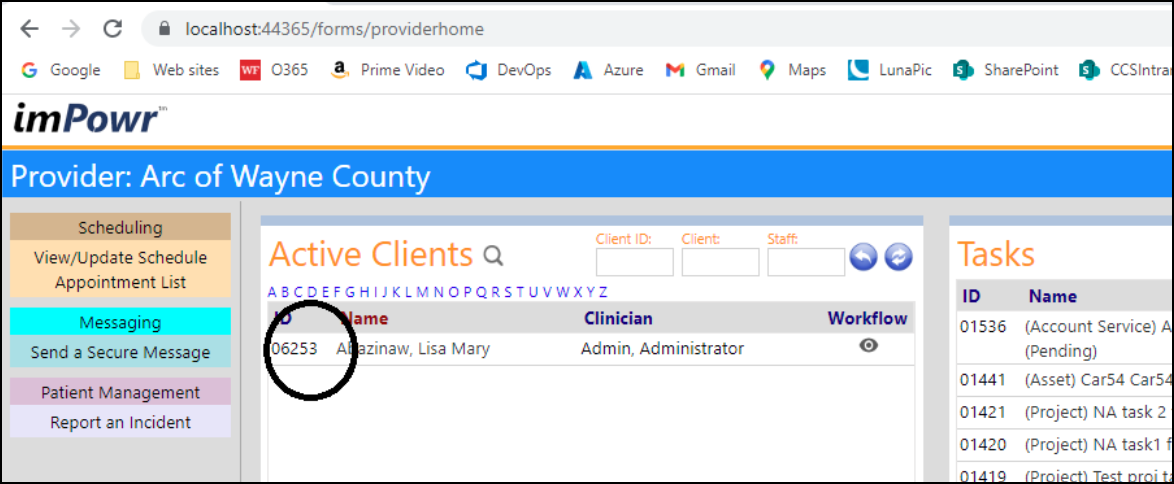
Users access this by clicking on the client's ID in the Provider Portal.
If the provider service the user choose has attributes, those will display on the main section of the page.
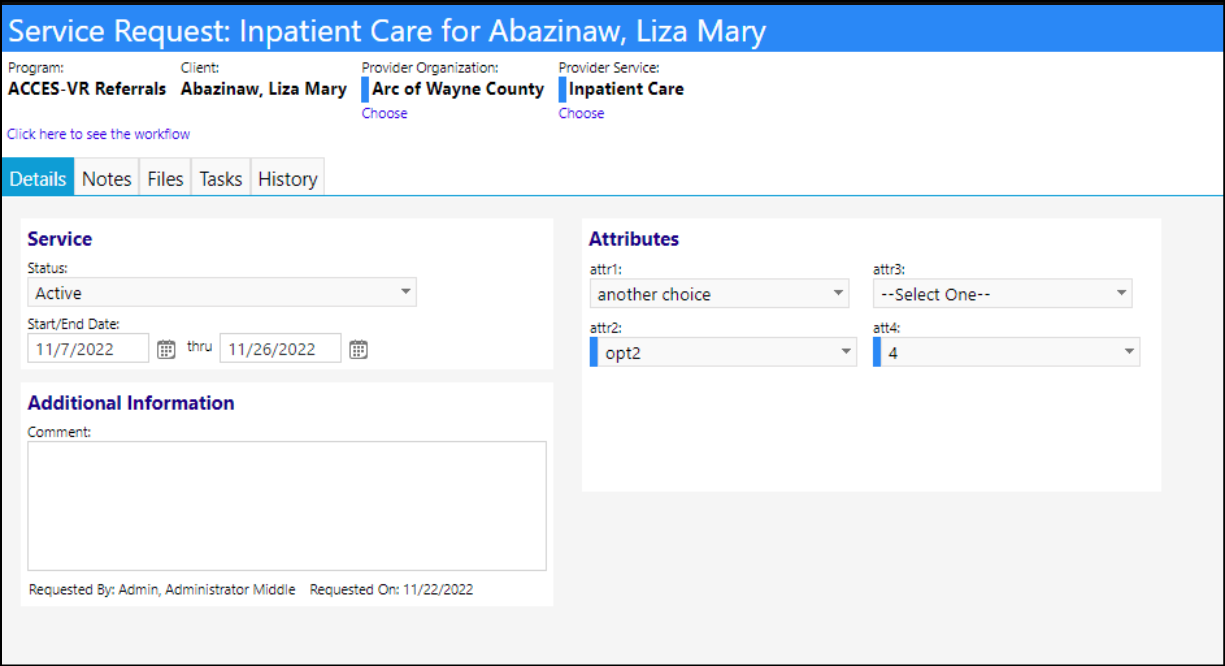
Required attributes are enforced - users cannot save unless every required attribute has a value.
Linking the Provider Portal and a Program Workflow
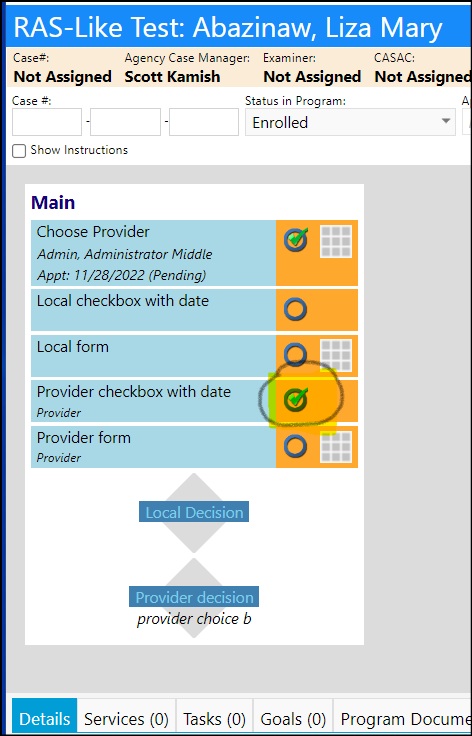
If a widget is assigned to a Provider, it will display in the Provider Portal.
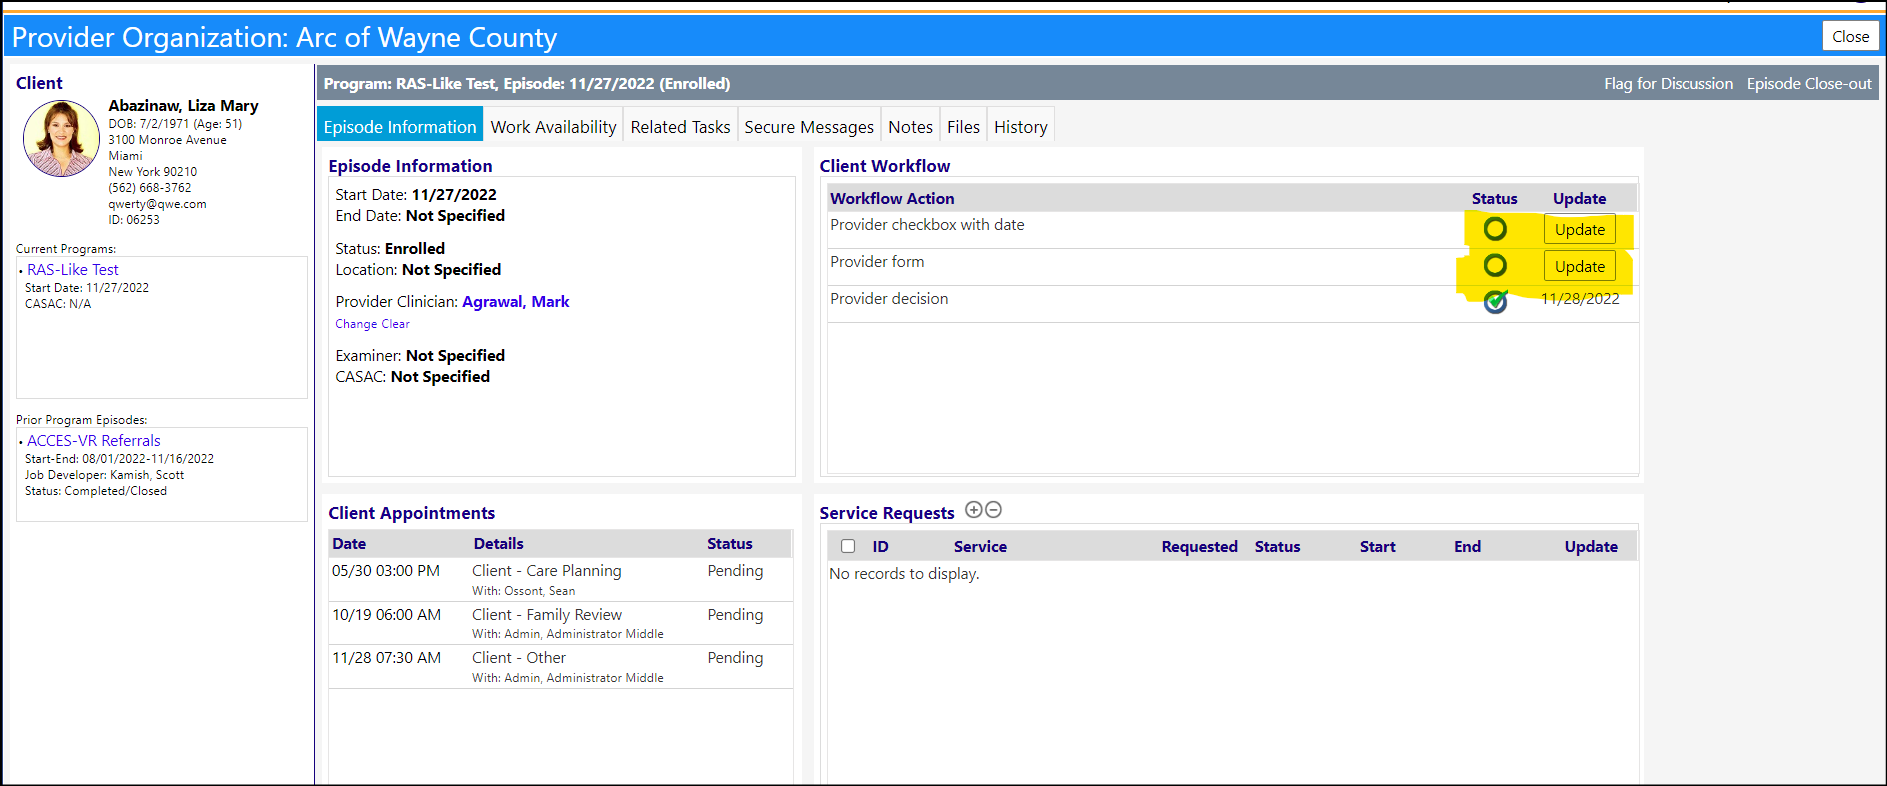
- If the Provider updates the Client Workflow in the Provider Portal, it will update the Program workflow.
Example: Clicking on Update for the Client Workflow:
'Provider checkbox with date', and entering a completion date...

will cause the Program Workflow to be updated...
A new Client-Appointment filter has been added to the provider summary page. The filter defaults to the 'Pending' status. (NOTE: Please refer to the new Staff Availability Calendar information listed below)

New Progress Report Summary Page
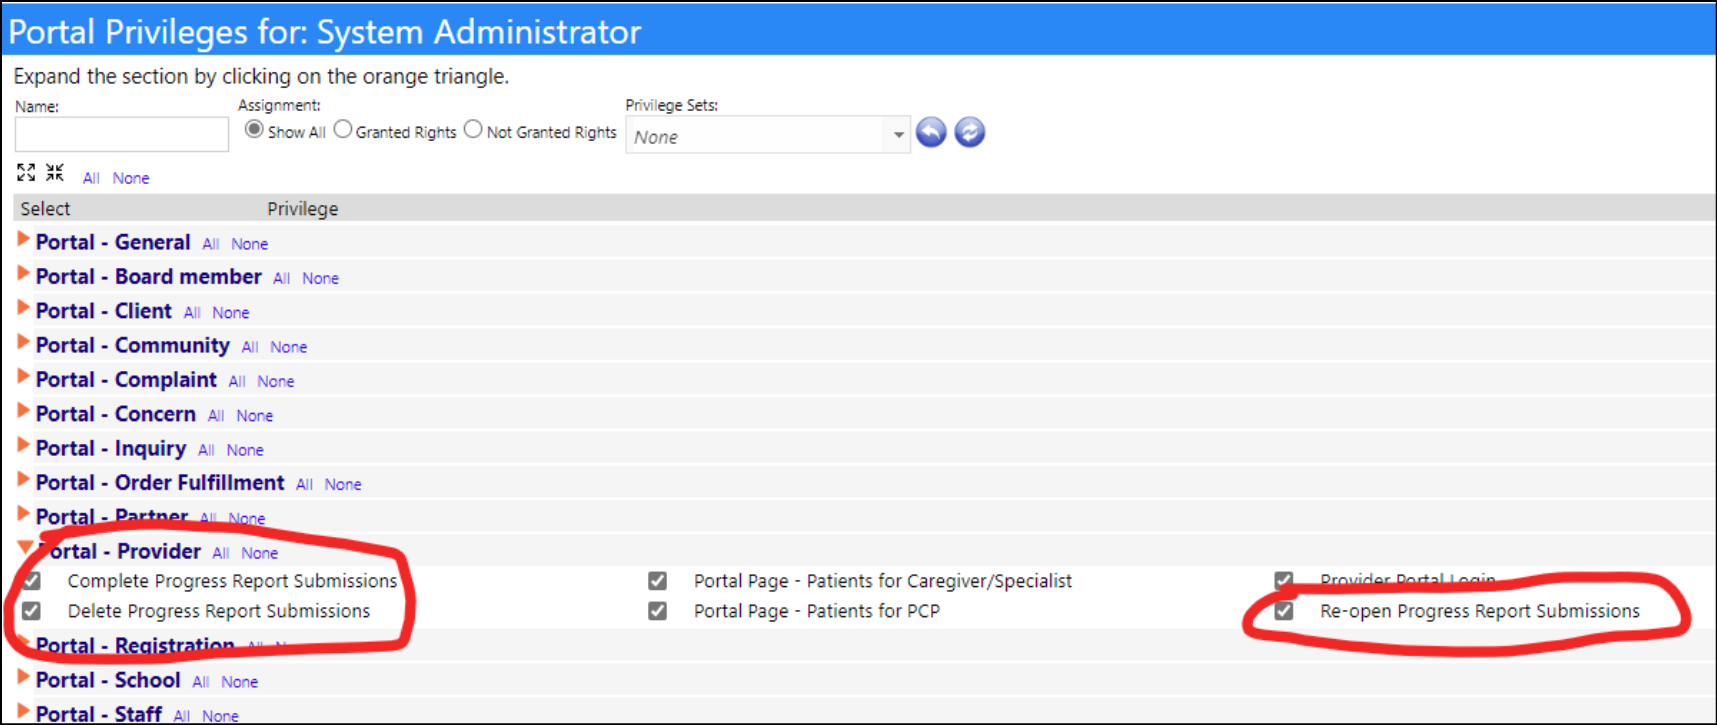
3 new privileges were created for the new Progress Report Summary Page and control some of the new functionality.
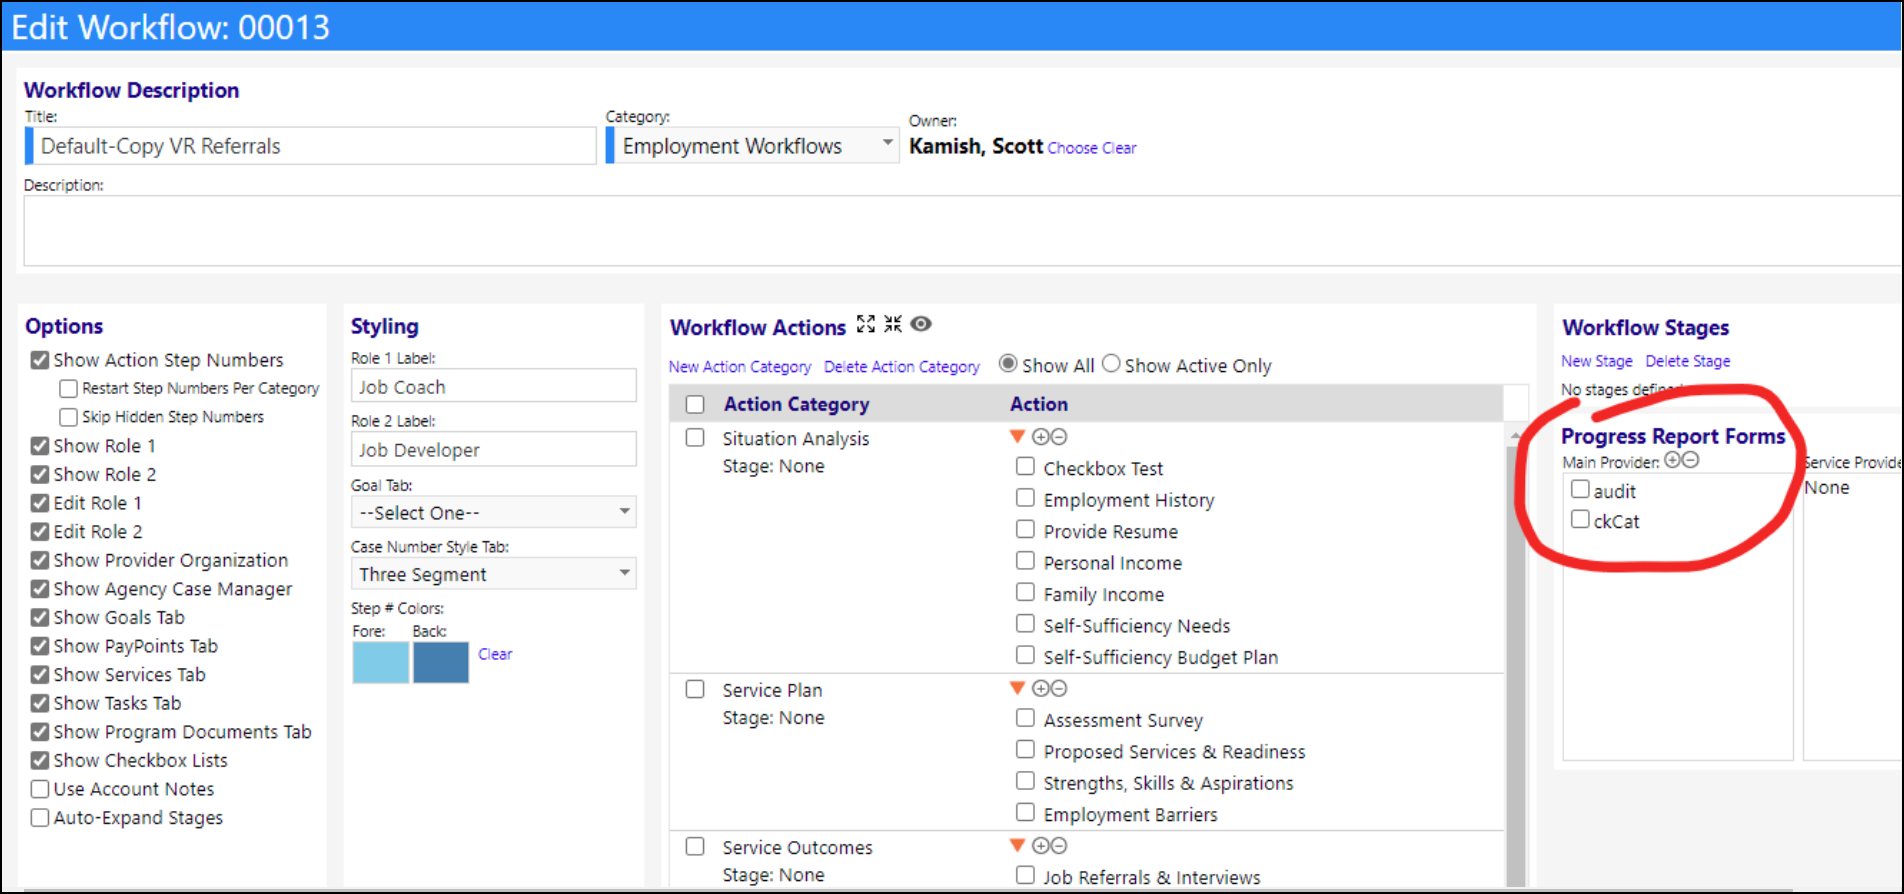
Users must make sure they have forms set up here on the workflow configuration before using this. The Progress Report Forms must be listed under the "main provider".
On the provider summary page now, the progress reports tab is now functional.

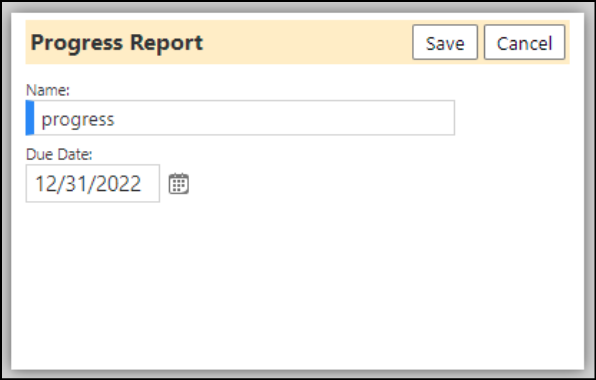
Users can create a new Progress Report, which will let them set a report name and due date.
Creating a new Progress Report will create a row with a status of 'Pending'. Click the form icon on that row to complete the report. If there is only one form defined on the workflow, it'll go right to that form. If there are more than one, the user will get to choose which form to use. If there are none, they'll get a message saying to contact the system admin.

Filling out the form and saving it will put this report into a status of "draft". Users can complete the form by using the "mark as completed" button, which will let them enter a comment before finalizing it.

After it's been completed, clicking the form icon again will display the form in view-only mode.

Users can use the re-open button instead after it was completed to re-open it. This will set the completed form back to "draft" and allow users to edit the form again.

Each time a user completes or re-opens a form, it is logged to the audit trail.
New Regulatory Compliance Security Alerts
Administrators can now set up some key alerts on the Regulatory Compliance page, to alert them of various security related behaviors. Admins have to first enable them from the Regulatory Compliance page, but once they do, they'll function with the settings they are given. When triggered, they will send an email the same way that scheduled notifications do (in the backend, they're just a specialized form of scheduled notifications).

Enhancement to School Portal
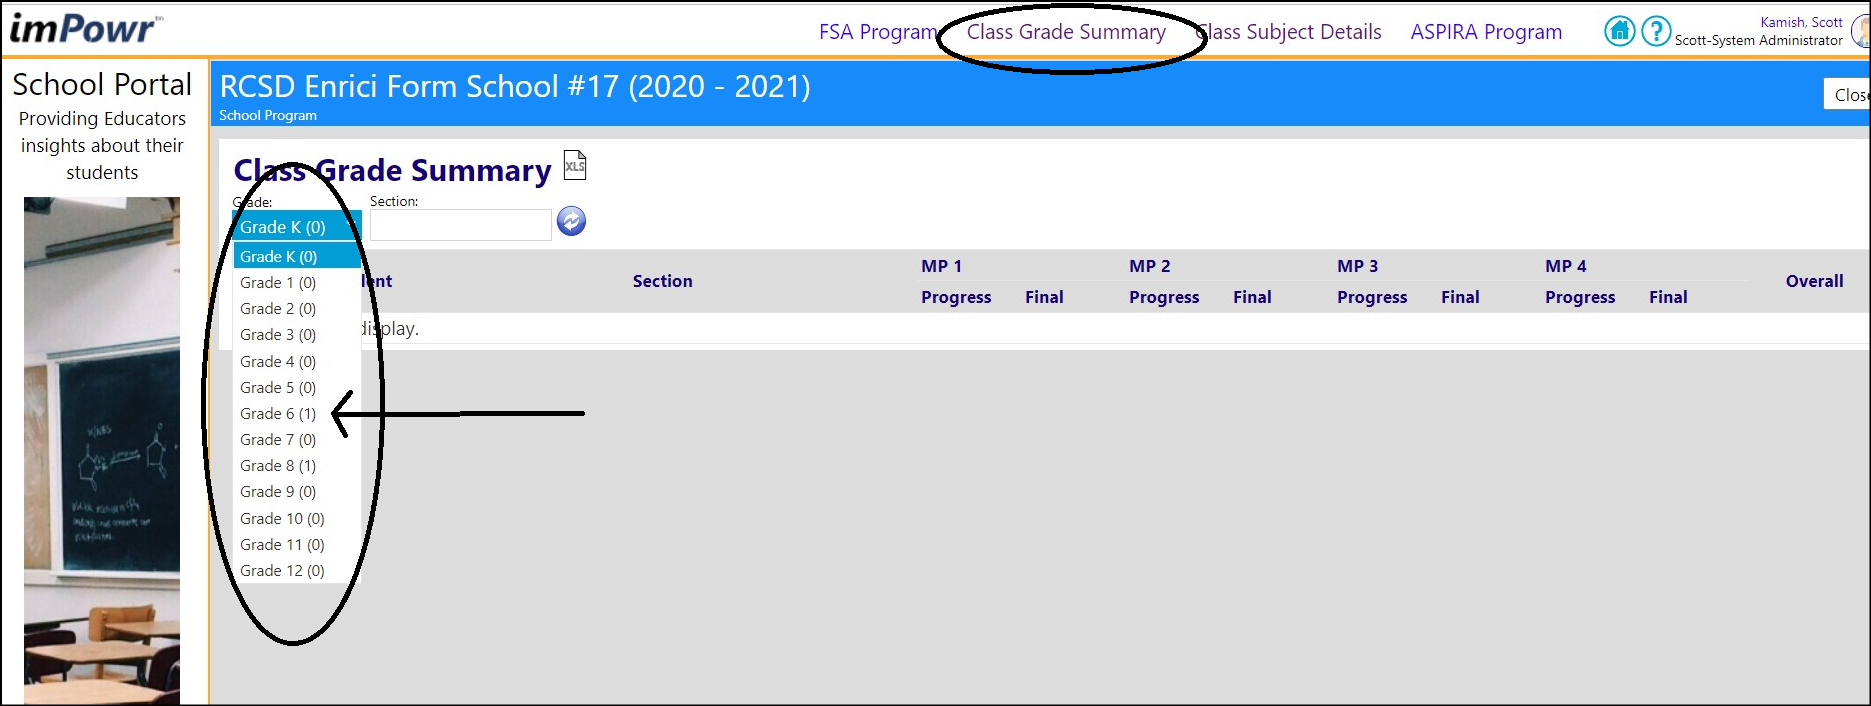
This dropdown list on the class grade summary (school portal) now shows the count of students for each grade.
Secure Messaging Enhancement
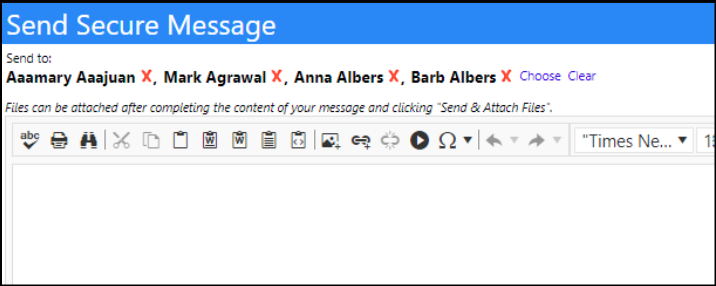
The recipient list for secure messages has changed. When sending a new secure message, each recipient will display with an X next to them - clicking that will remove them from the recipient list. Using "choose" and adding new people to the list will append to the list instead of overwriting the entire list. If someone who is already on the list, they will not be duplicated if the sender tries to add them again. The clear button has not changed and when it is pressed, all recipients are removed from the list.
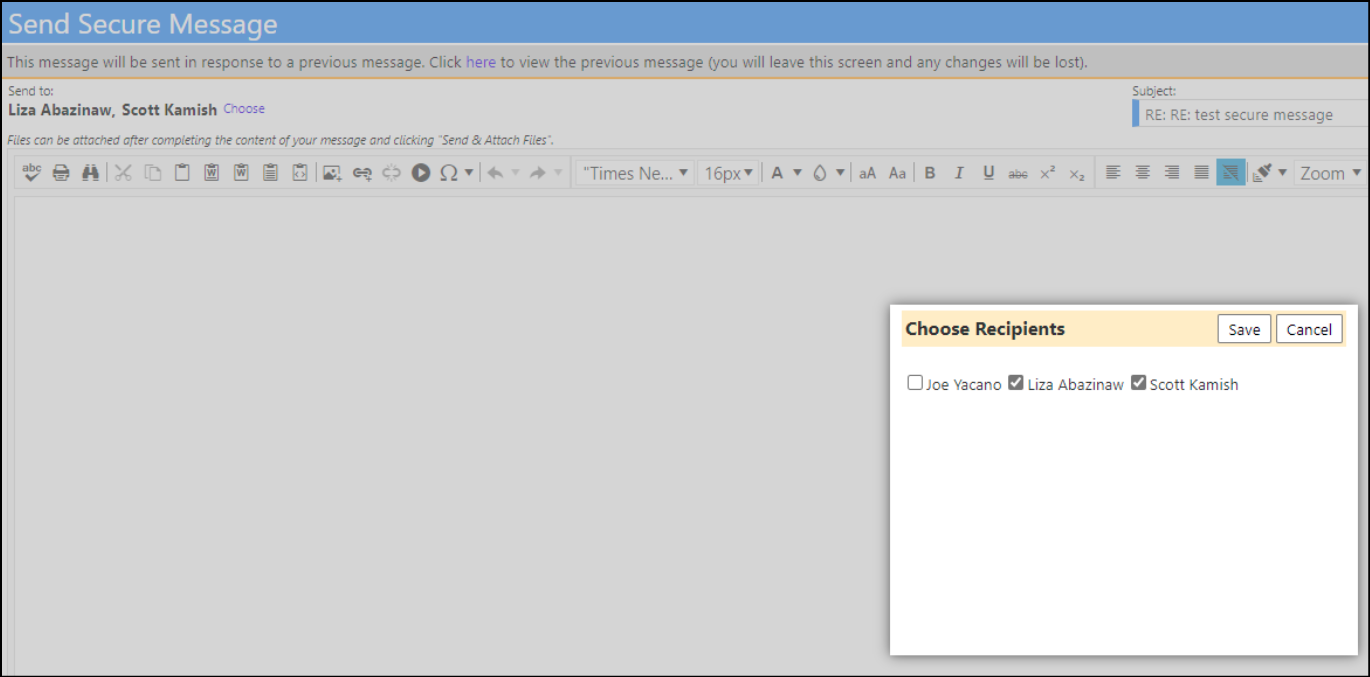
The recipient list still functions the same way it did before when responding to a message. In this "mode", there are no X buttons, and the choose button just gives provides a checkbox list of who to send the message to and who not to send to.
New Staff Availability Calendar
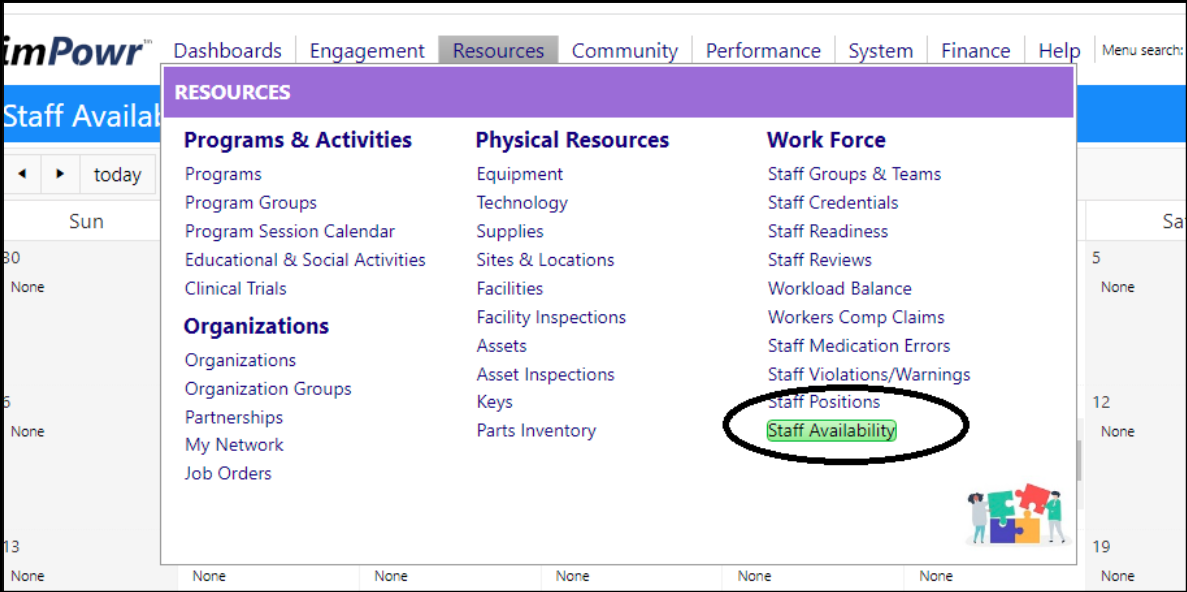
A new Staff Availability menu item is available. The availability is tied to program workflows and is used to designate when a job coach or job developer are available for various client related appointment types. This availability menu is also tied to the Provider Portal. Users must have the appropriate functional rights to access it.
From this calendar, users can identify available time slots for specific types of meetings associated with a program. The calendar can be printed or a copy can be saved as a PDF file.

Clicking on 'Outlook' auto creates a file which can be used to schedule a meeting in the user's Outlook email tool.
