New Self-Help Articles added to imPowr
- Over 510 screens within imPowr now reference various self-help Knowledgebase articles.
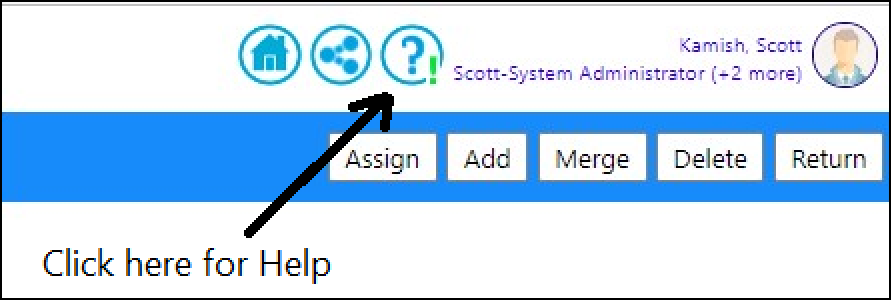
- By clicking on the Help icon on these pages, users can view instructions on how to setup or use various screens or functionality within imPowr.
- Because the imPowr menus have a tendency to change on occasion, and because sometimes custom menus are provided for various account roles, all users should be aware that the screen shots which show the menu for accessing various bits of information, may not reflect what they see on the screen. Users should utilize the Menu Search field to find the appropriate pages.

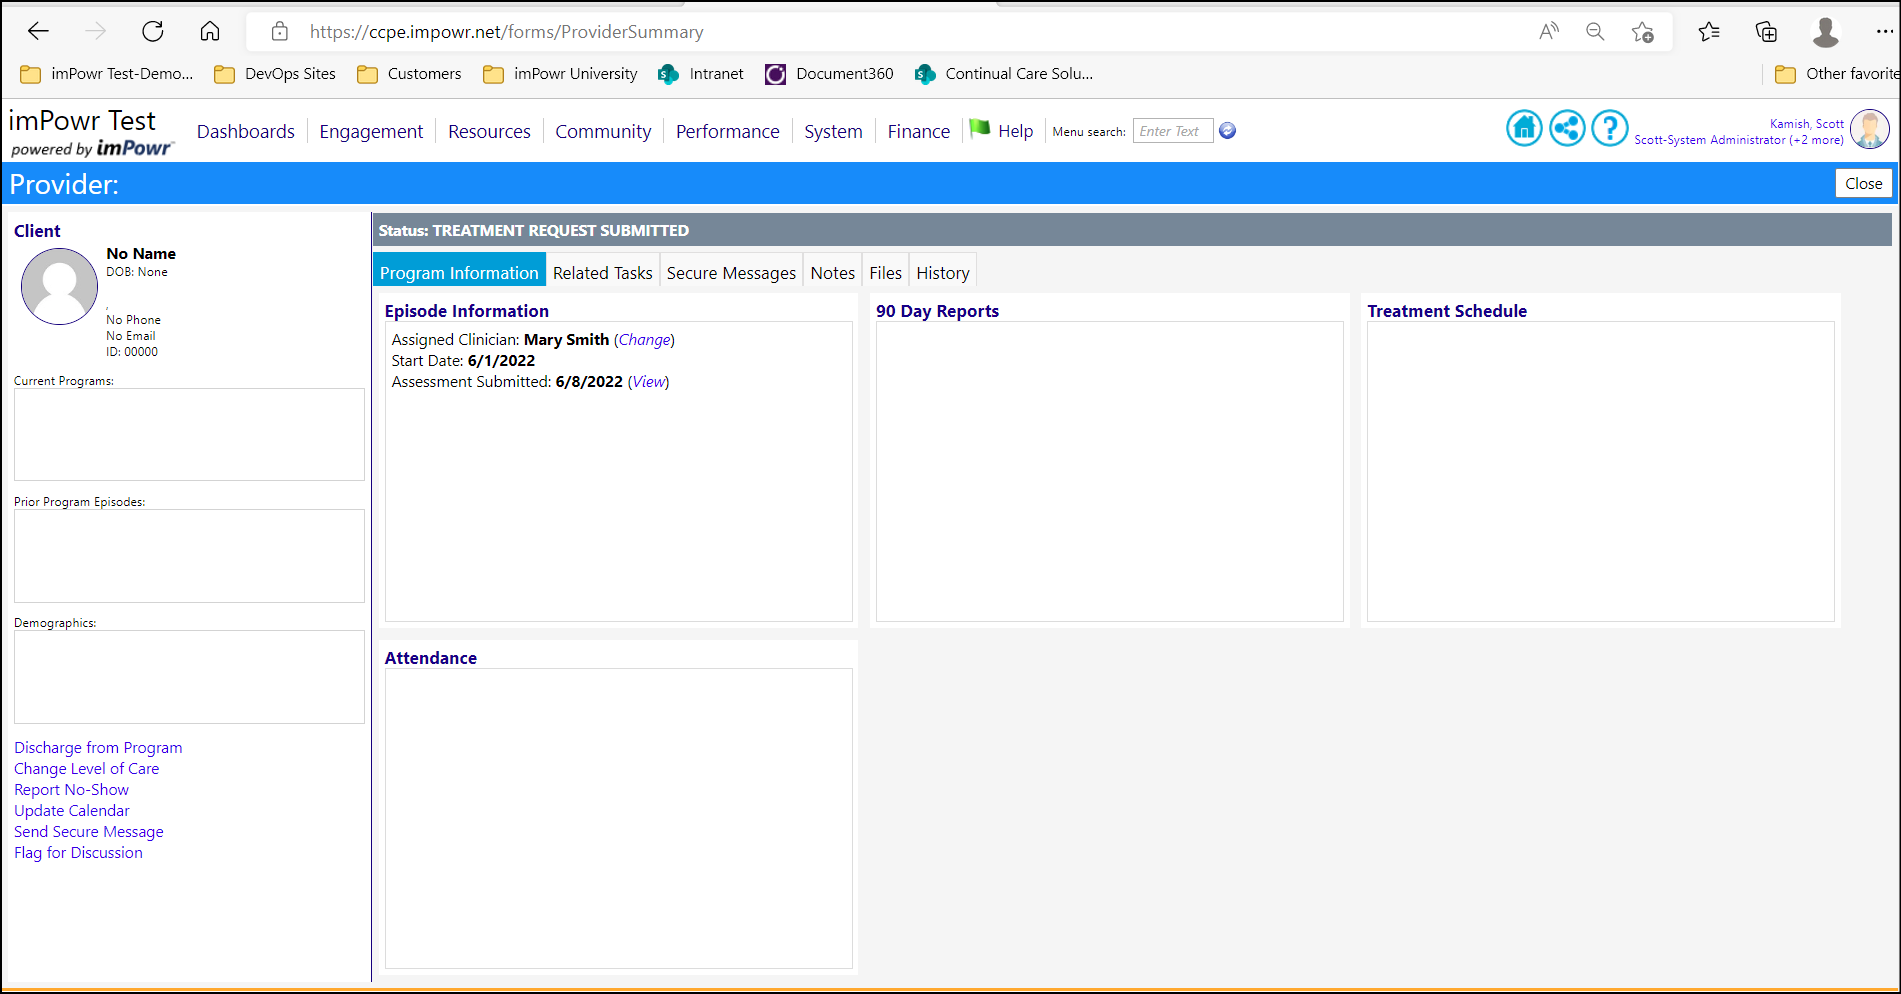
New Account Provider Summary Page
- A new Account Provider Summary Page has been created. More details will be provided as soon as development has been completed.
Applicant Portal Enhancement - Option for Multiple Language Application Forms
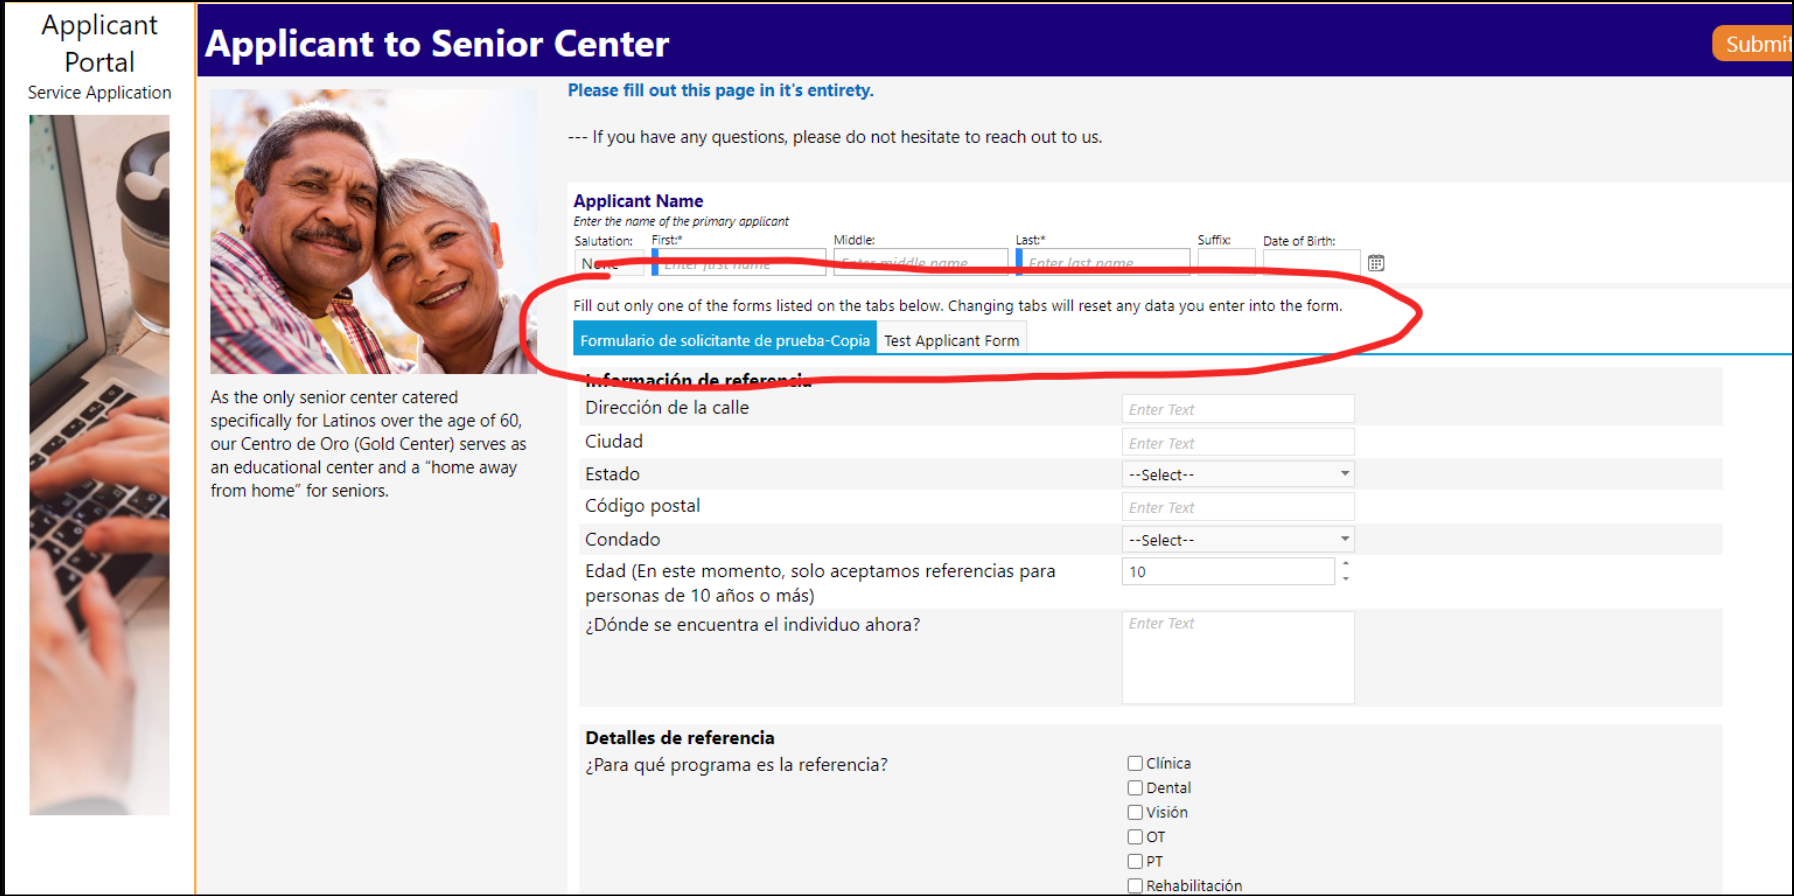
- Applicants now can have a multi-lingual option to apply for an Agency.
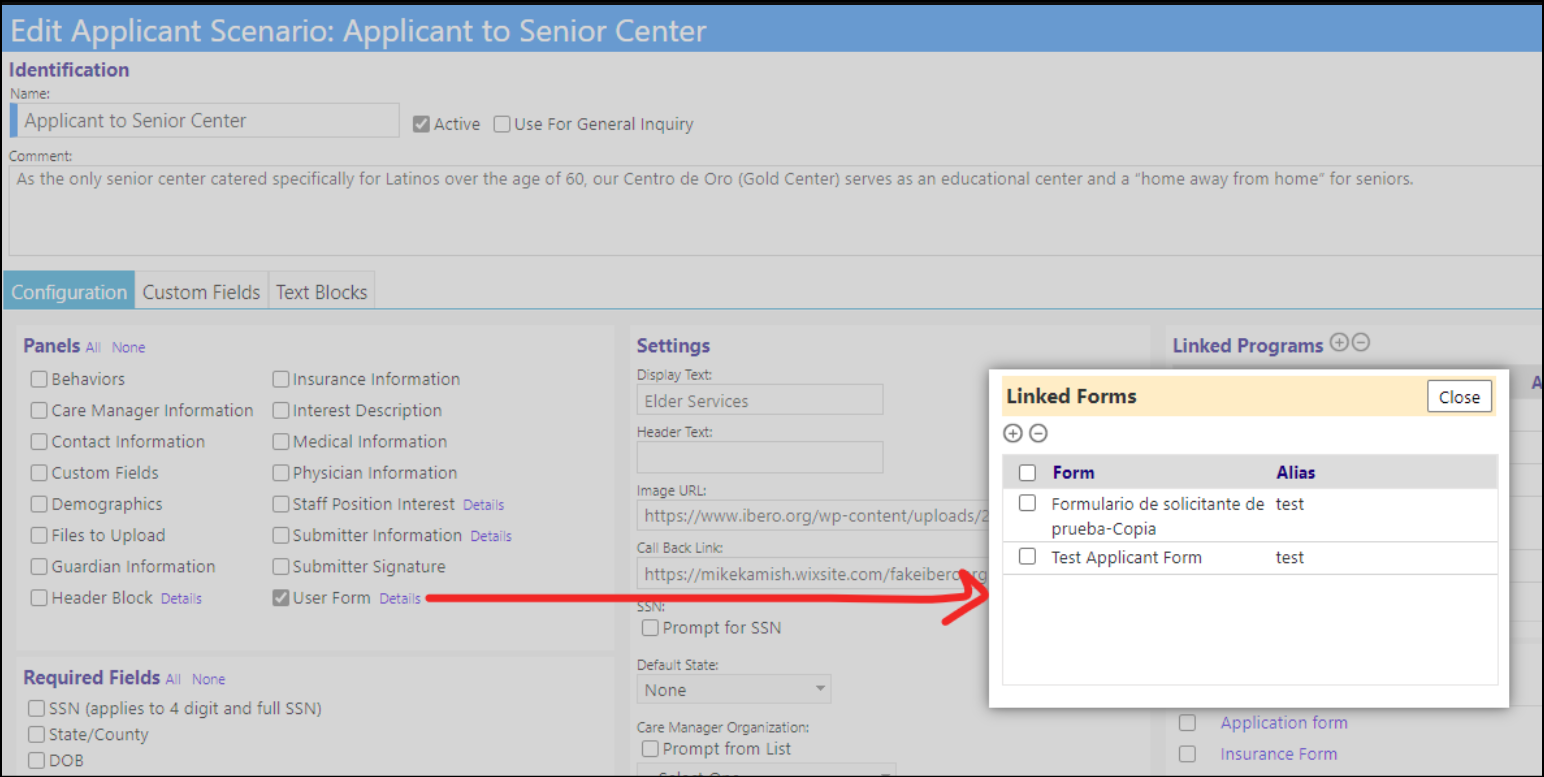
- When configuring the applicant portal, users can now attach more than one form (configuration > portal types > applicant portal > additional settings > click on one) for the setup of a specific type of application (example, General Inquiry, Application to Senior Center, etc.):
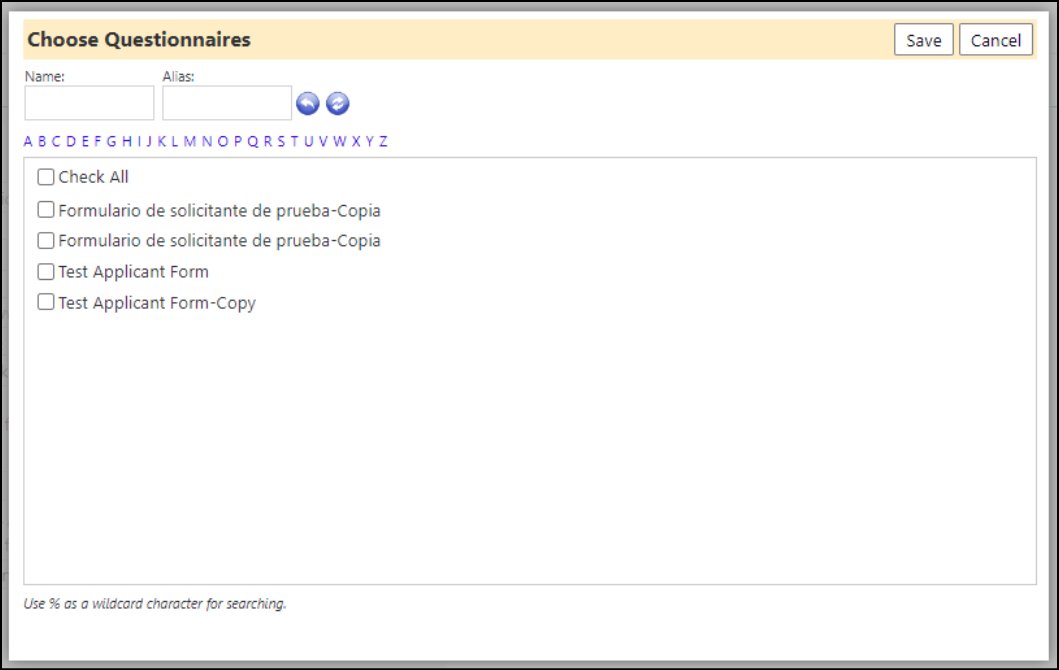
- Users can click the plus button to add new forms (must be the "applicant form" type in the form library). This chooser also has a filter for Alias. A use case may be: the agency has an application form in English that they want translated, so they give it an alias. Then they translate the form to Spanish, and the entire form gets copied and translated, but it keeps the same alias they gave to the original form. When they search on that alias, so they can select the application forms they want made available to users on the Application Portal, they can identify every version of that same form, all in different languages and with different names.
- With multiple forms added and the "user form" checkbox checked, when a user goes to the applicant portal and selects their desired application, they'll now see tabs above the form (for the type of application that was setup) - providing them with an option to choose the language they want to fill the form out with. For example, the user can fill out the English form if that's their main language, or the Spanish form. When they submit the portal, only the form they chose will get saved to the new applicant record that gets created.
New Care Manager Portal
- The Researcher Portal has been refactored as the Care Manager Portal, so Care Managers can submit and track care plans, send and receive secure messages, respond to tasks, and track their clients.
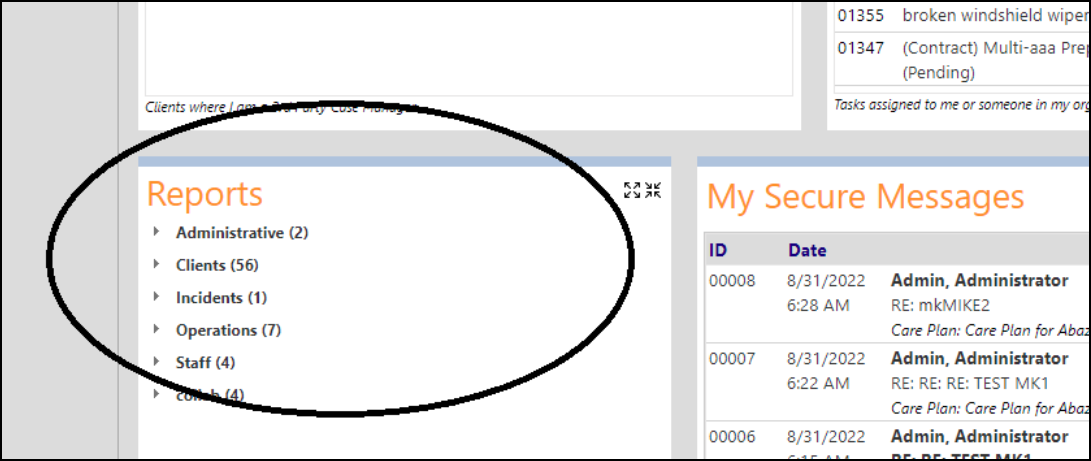
- A Reports section now displays on the Care Manager Portal.
Care Plan Enhancements - Multiple Changes
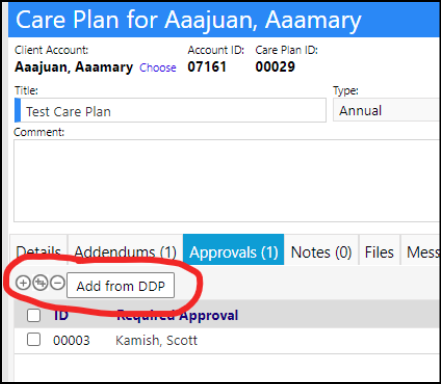
- When identifying the approvers for a Care/Life Plan, users can now click on a button to be able to select the Program Director names from any programs that the client has a DDP for.
- The multi-add button brings up a staff chooser, where multiple staff members can be selected and be added as approvers without having to use the plus button multiple times.
- The Add from DDP button brings up a new popup.
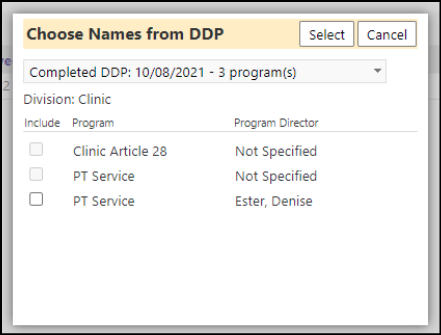
- The dropdown will include a list of all the client's DDPs, and the list of programs they are linked to. Each program will display its associated program director. Any program without a director specified will have the checkbox greyed out.
- Select the checkboxes, then hit the "select" button to add those program directors to the list of approvers.
- If no DDPs are found when the button is clicked, it'll just show a message saying they have no DDPs.
- Users can now add a Staff Team or Organization as a Care Plan approver. The system will capture the name of the first person from that team or organization who approves the plan.
- After ensuring the individual is part of the team, add the team as an approver on the Annual Care Plans, in Configuration.
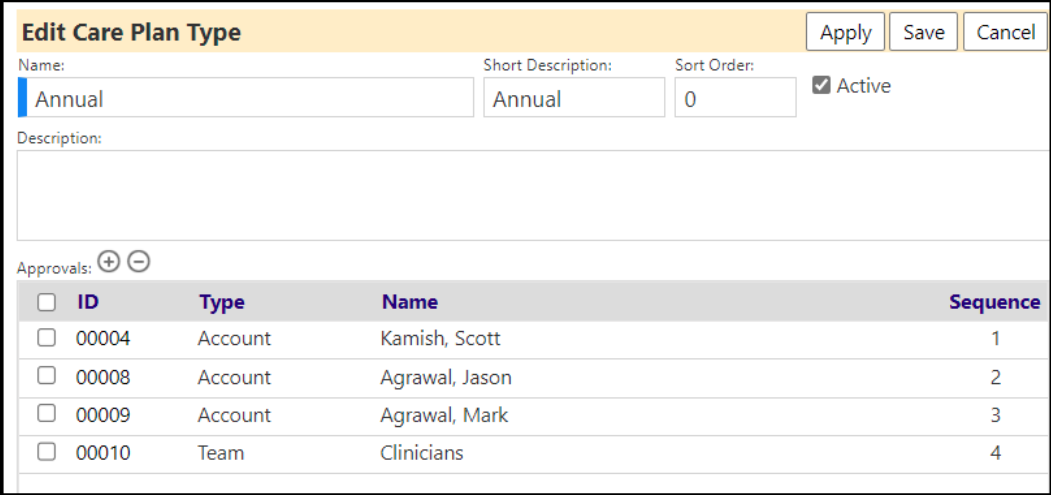
* When the Care Plan is created, if membesr of that team, will be provided with an option to approve the plan.

* Upon submittal of the approval, the system will capture the name of the first person from that team or organization that approved the Care Plan.

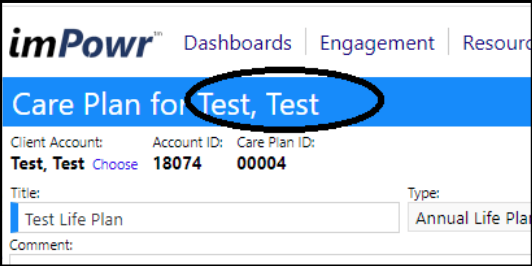
- The Client's name is now a link back to their account profile.
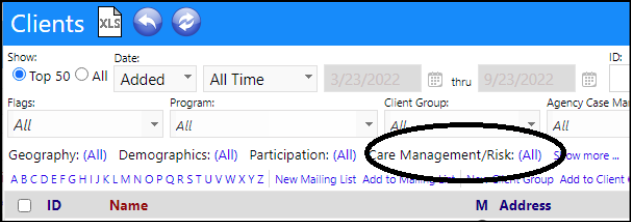
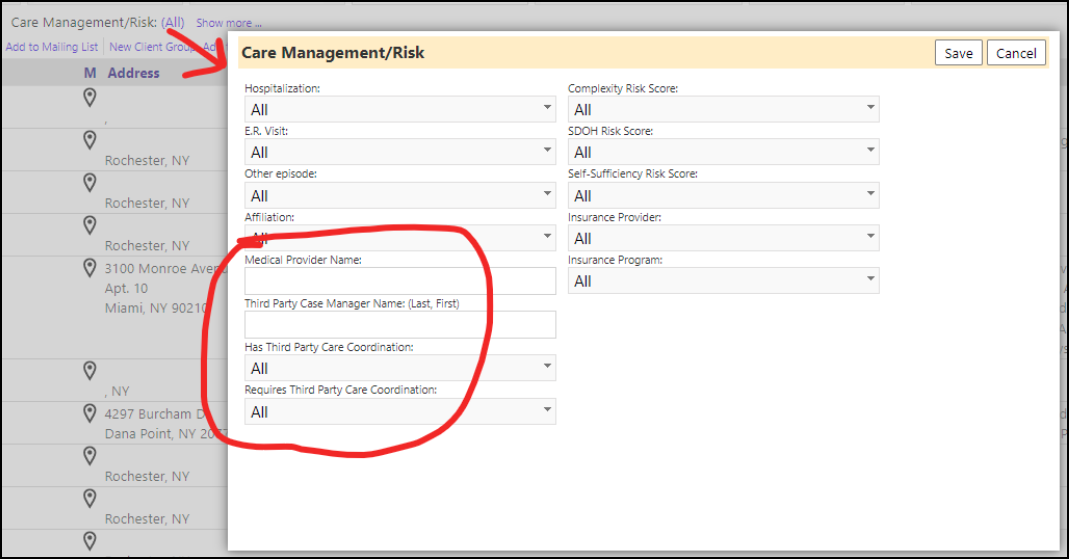
Enhancement to Client List - Case Manager Columns and Filters
- Optional Case Manager Columns and filters have been added to the Client List.

Entrepreneurial Tool Enhancement - Multiple Changes
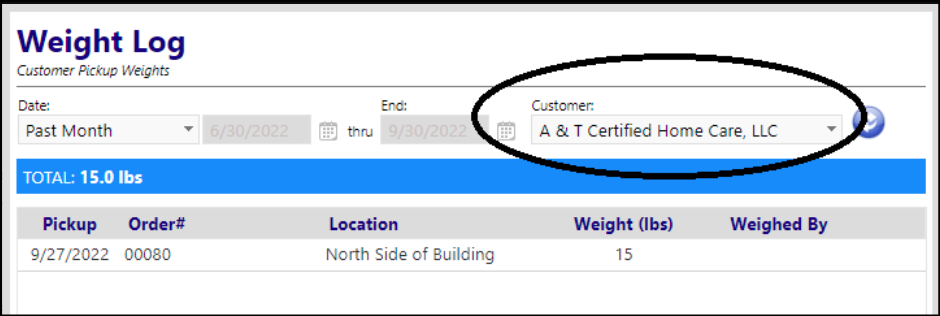
- A change was made to the Weight Log to make it customer specific, rather than only display weights for My Organization.
- Weights are now also broken out by the customer location.
- Users can display view the pre and post processing checklist and comment entries in their order processing, at any time by clicking on the 'eye'.
- In order to make them visible on the screen, users must enable the options for them to show on the order page.
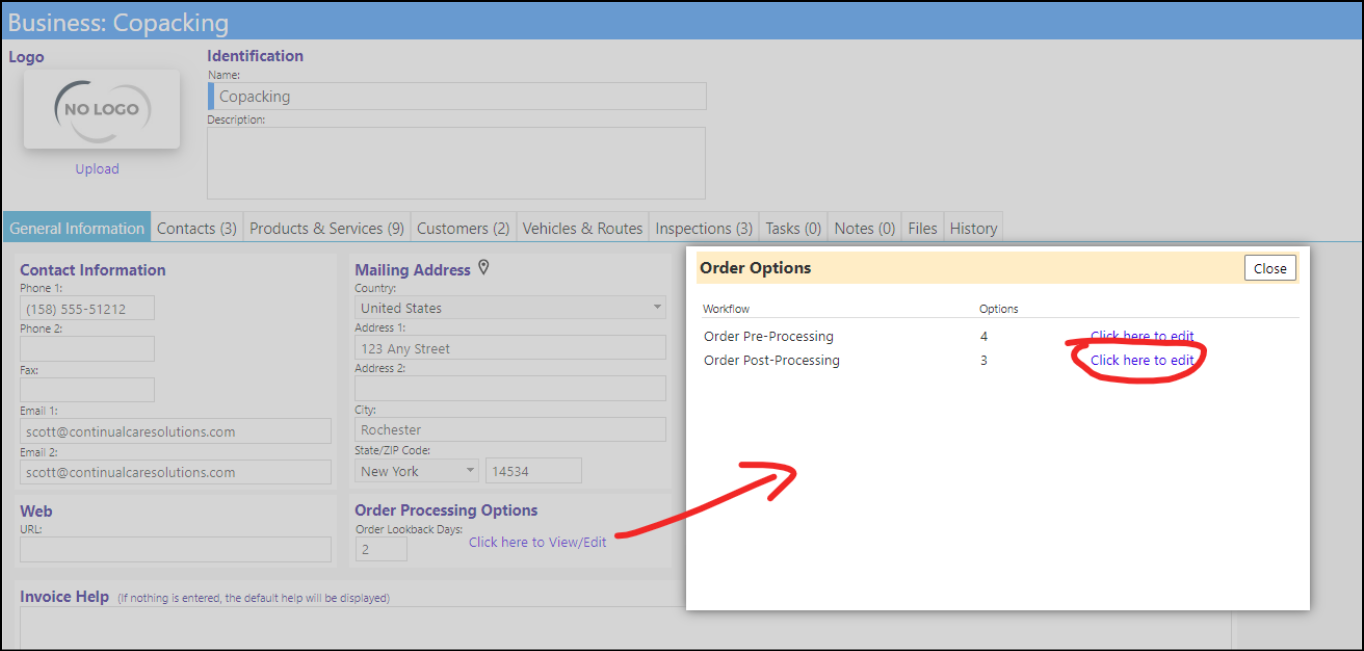
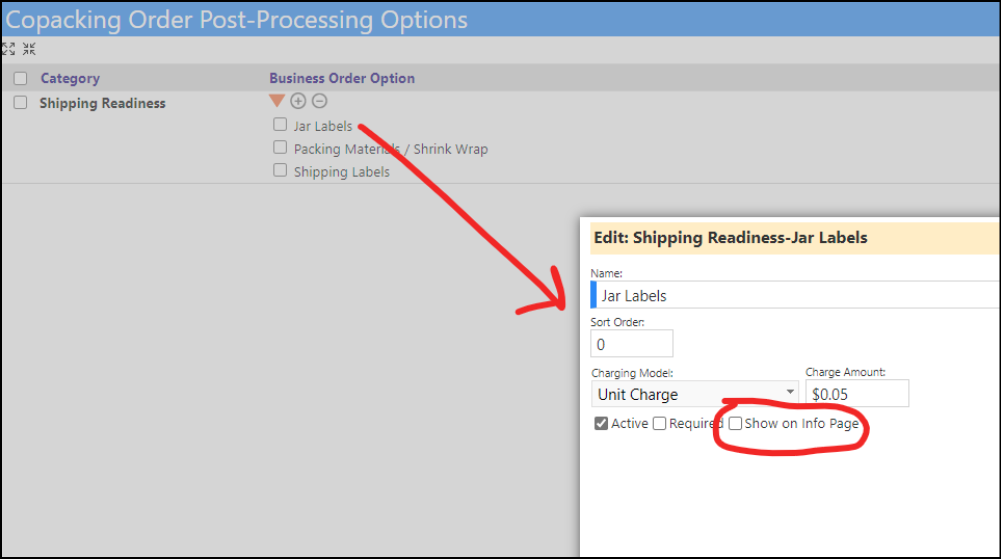
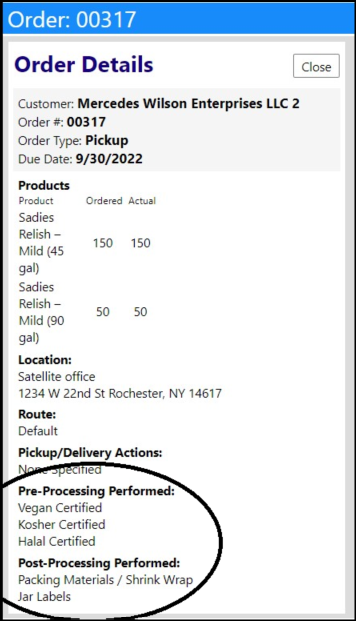
- If an agency has an order for a business that has the order processing workflow enabled, on the order processing section, there is a new option for confirming actual quantities (defaults to true). With this option, agencies can now choose to optionally display the products and actuals in the Order Processing Details panel for each order, a form, or both.
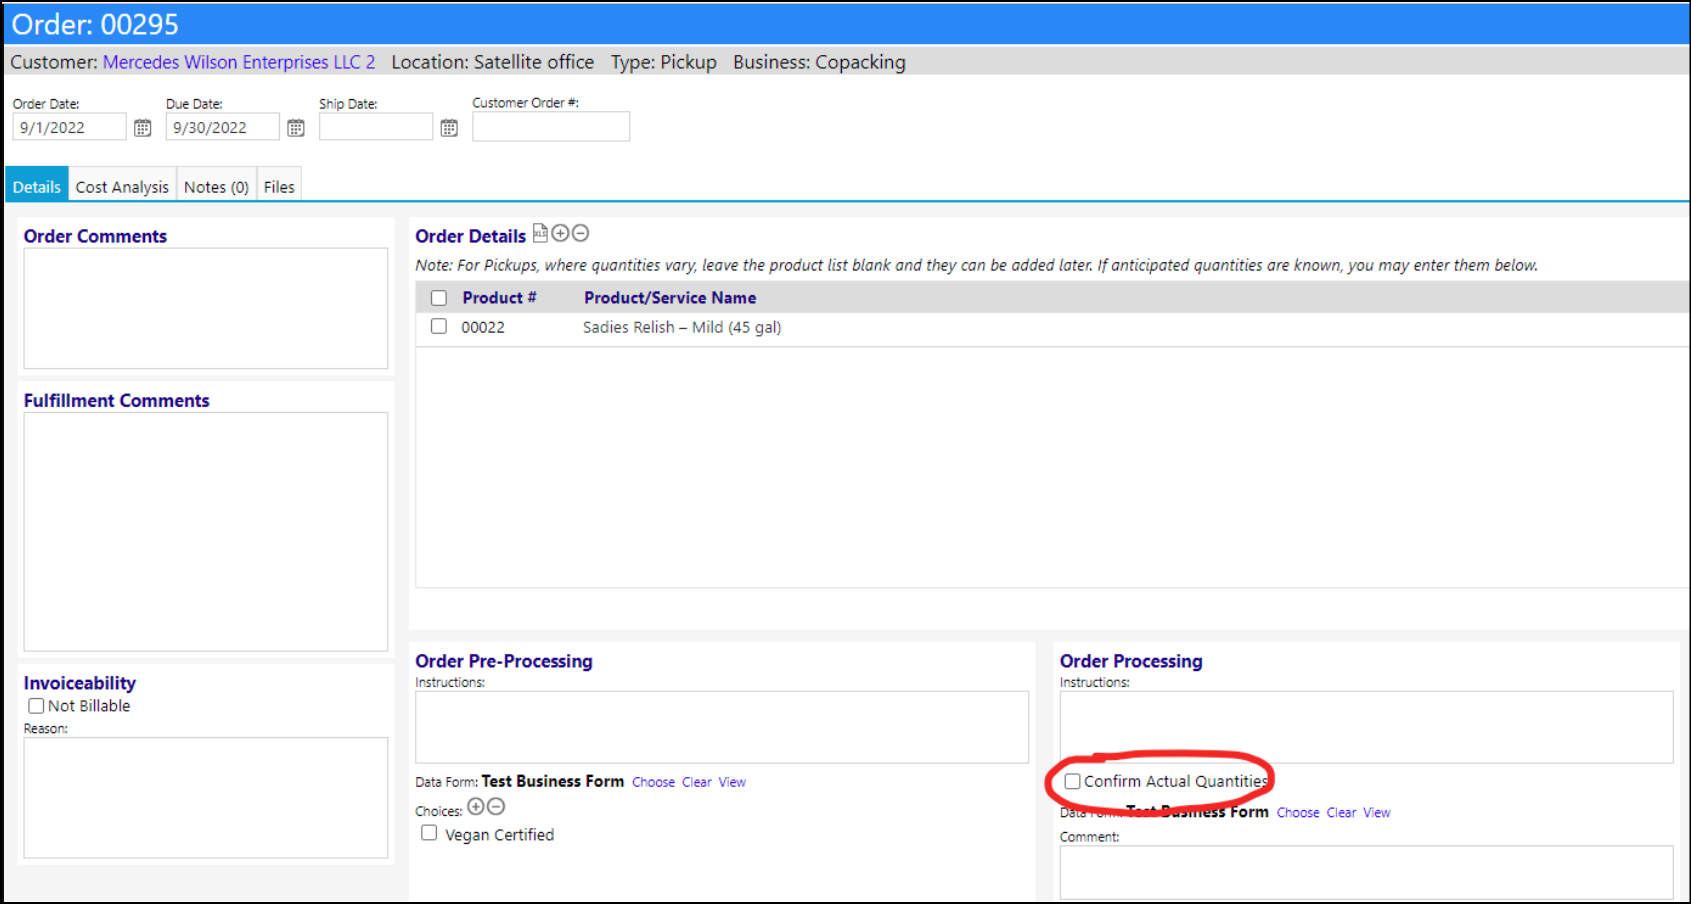
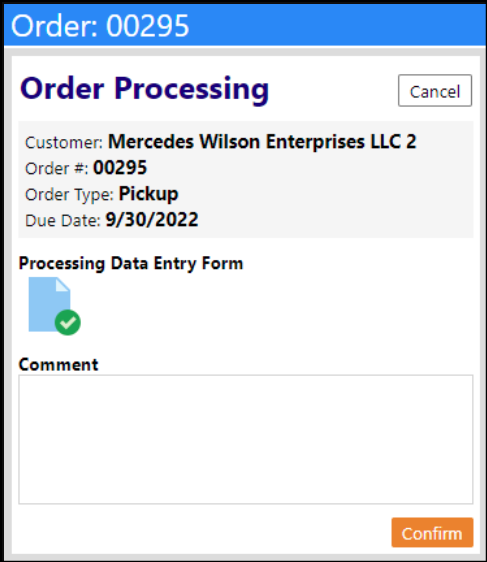
- If this option is turned off, when processing the order, the list of products and quantities will not show.
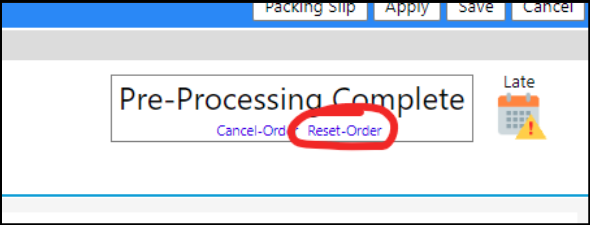
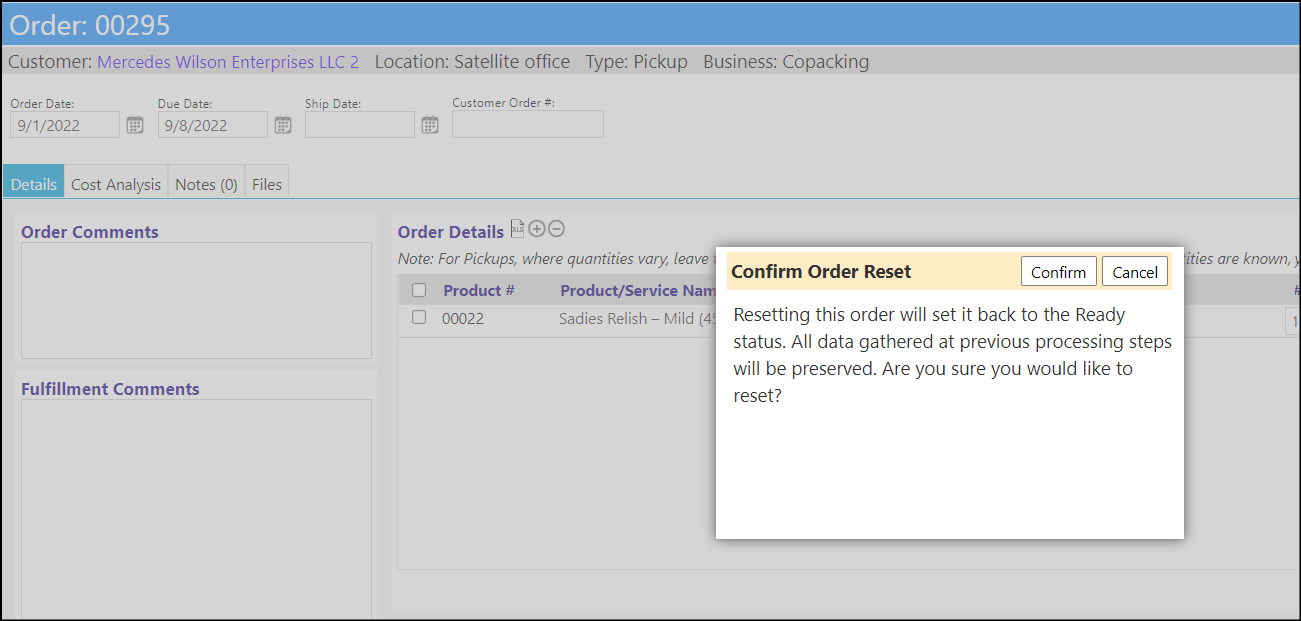
- Right now when an order is preprocessed, processed or postprocessed, if a mistake has been made and the user would like to redo parts of the process, the only choice they get is to continue or to cancel the order processing. A new option to "Reset Order" has now been added to reset the order.
- Any order in the pre-processing complete or processing complete status can be reset, which sets the order processing status back to "Ready to Process". (The prior checklist options would be retained.)

Notification Policy Enhancement - Insurance Related Notification Policies
- A new audit notification policy entity event trigger, "Insurance", has been added. This kind of notification can be used when additions or changes have been made to a client's insurance policy, such as if a Medicare policy has been added or removed.
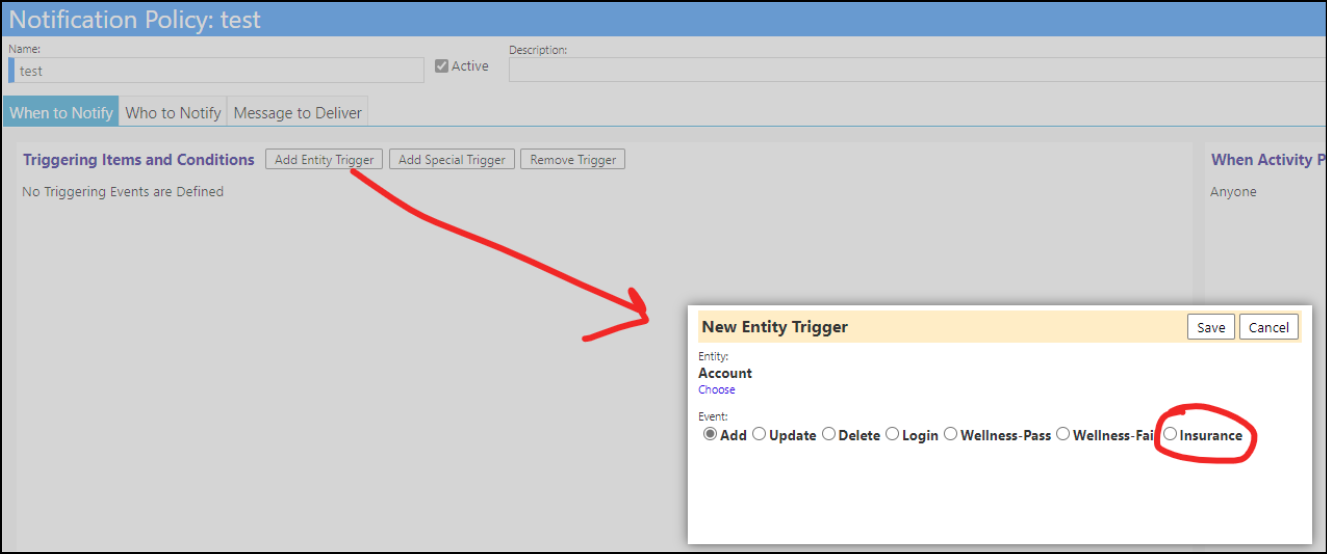
- Selecting the event "Insurance" will bring up a few extra options:
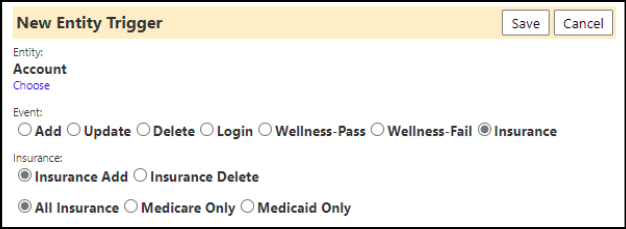
- For example,a notification that notifies someone if any clients have medicare added to their profile can be created. The add/delete for insurance happens here:
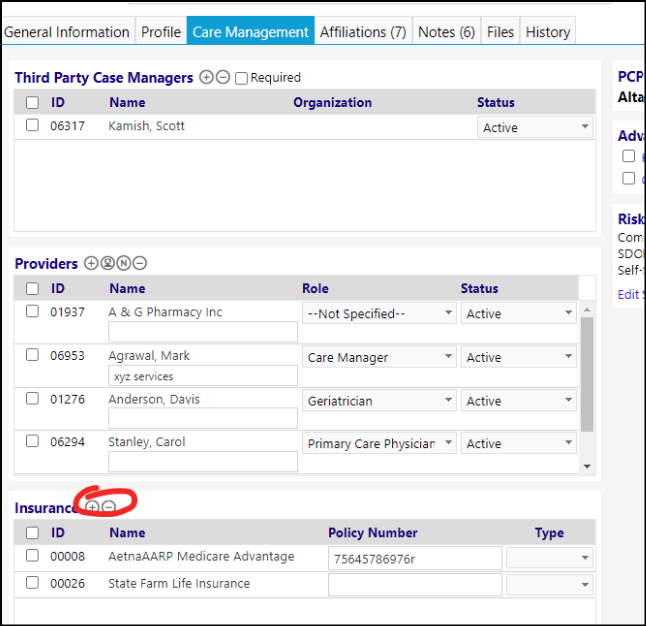
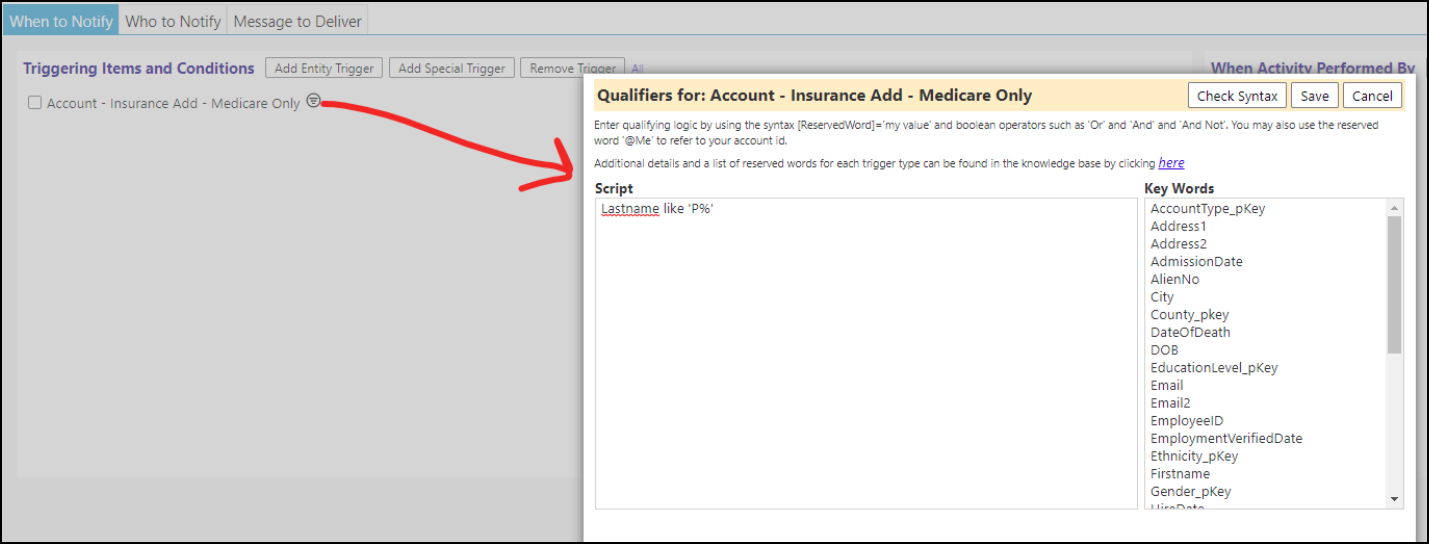
- Insurance can also be added to an account from the intake form (when the account is being created). Using qualifiers will make this new notification option more useful. Like in this image, recipients of the notification can get a notification when any client whose last name starts with the letter P goes on medicare (assuming that person only works with people with a last name starting with P).
Enhancement to Program Workflows - Multiple Changes
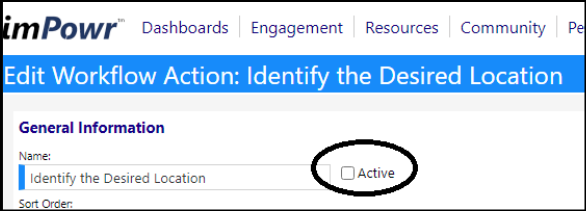
- Over time, a user may want to add or remove an action from a workflow. Prior to this change, we allowed a user to add a new step to a workflow that is being used ...but if they deleted a step, all the data for that step also gets deleted. With this new change, whenever the user wants to retain any previously submitted data for the step they want to delete, they can now do that by setting the workflow step to "inactive".
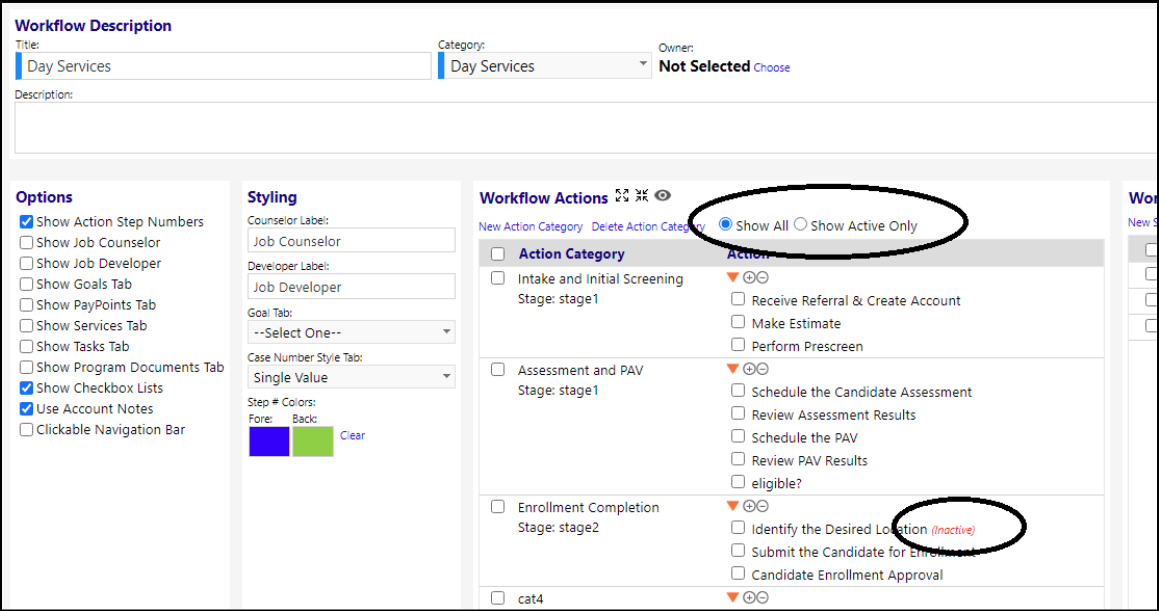
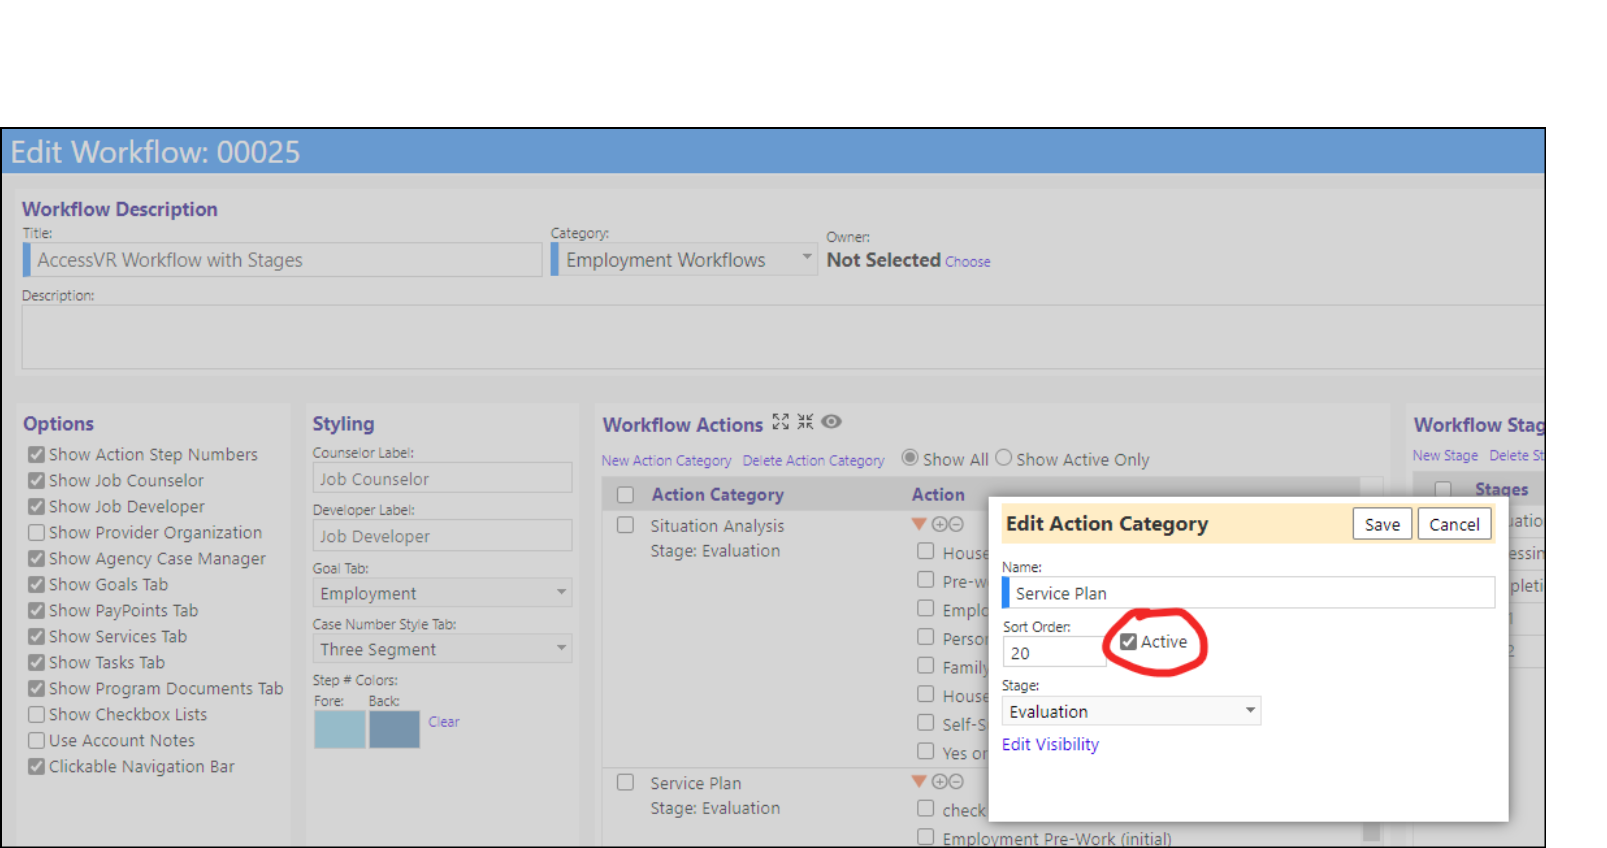
- Similar to Actions, Workflow Action Categories can now also be set to Active or be made Inactive. If they are set to Inactive, they will no longer display as part of the workflow.
- Agency Case Managers can now optionally be added to Program Workflows. If the Agency Case Manager is on the Account Profile, their name will also display in the Program Workflow.

- Users can now select new foreground and background color options for workflow stages. The foreground color defaults to navy and the background color now defaults to whitesmoke. Clicking in a box will bring up the color palet for the colors to be selected from.
- Pressing the clear button will set them to transparent.
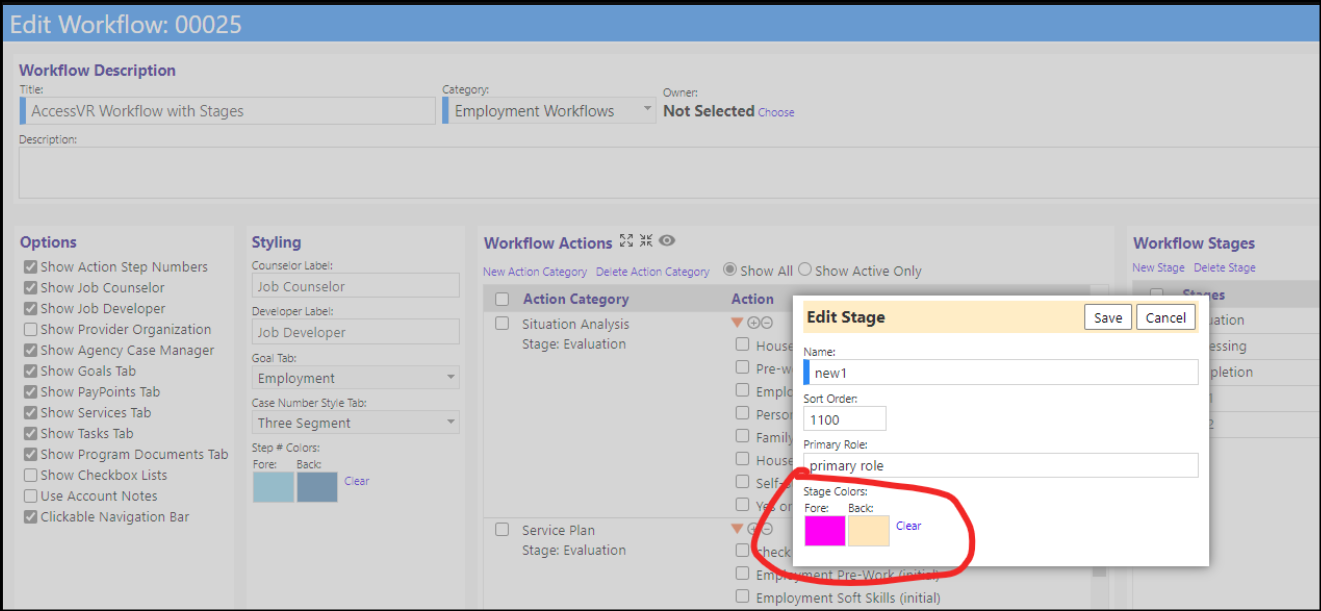
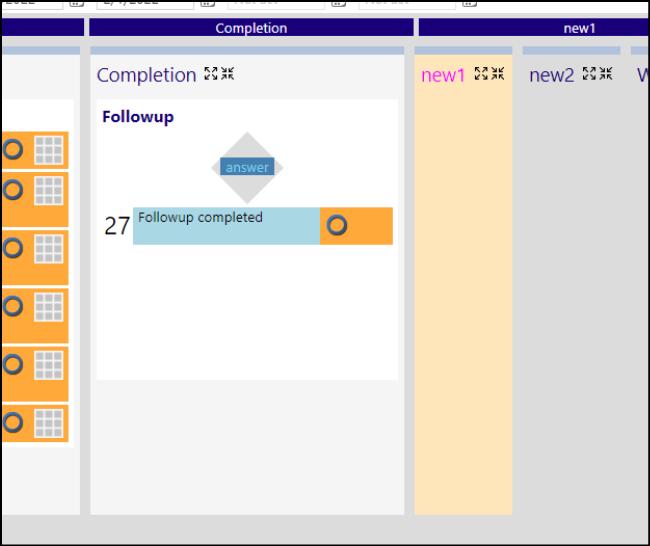
Some additional Program Workflow Stage changes have been implemented:
- Workflow stages will be hidden if they have no content. If a decision is made that makes content on a different stage visible, completing the decision will make the stage display
- Clicking on buttons will remember the horizontal scroll position of the workflow (so clicking on things won't keep sending the user all the way to the left side of the workflow)
- If a stage is made visible after making a decision, it will automatically get expanded
- If a stage is made visible after making a decision, and that decision is further to the right, the system will automatically scroll the display to bring that new stage into view
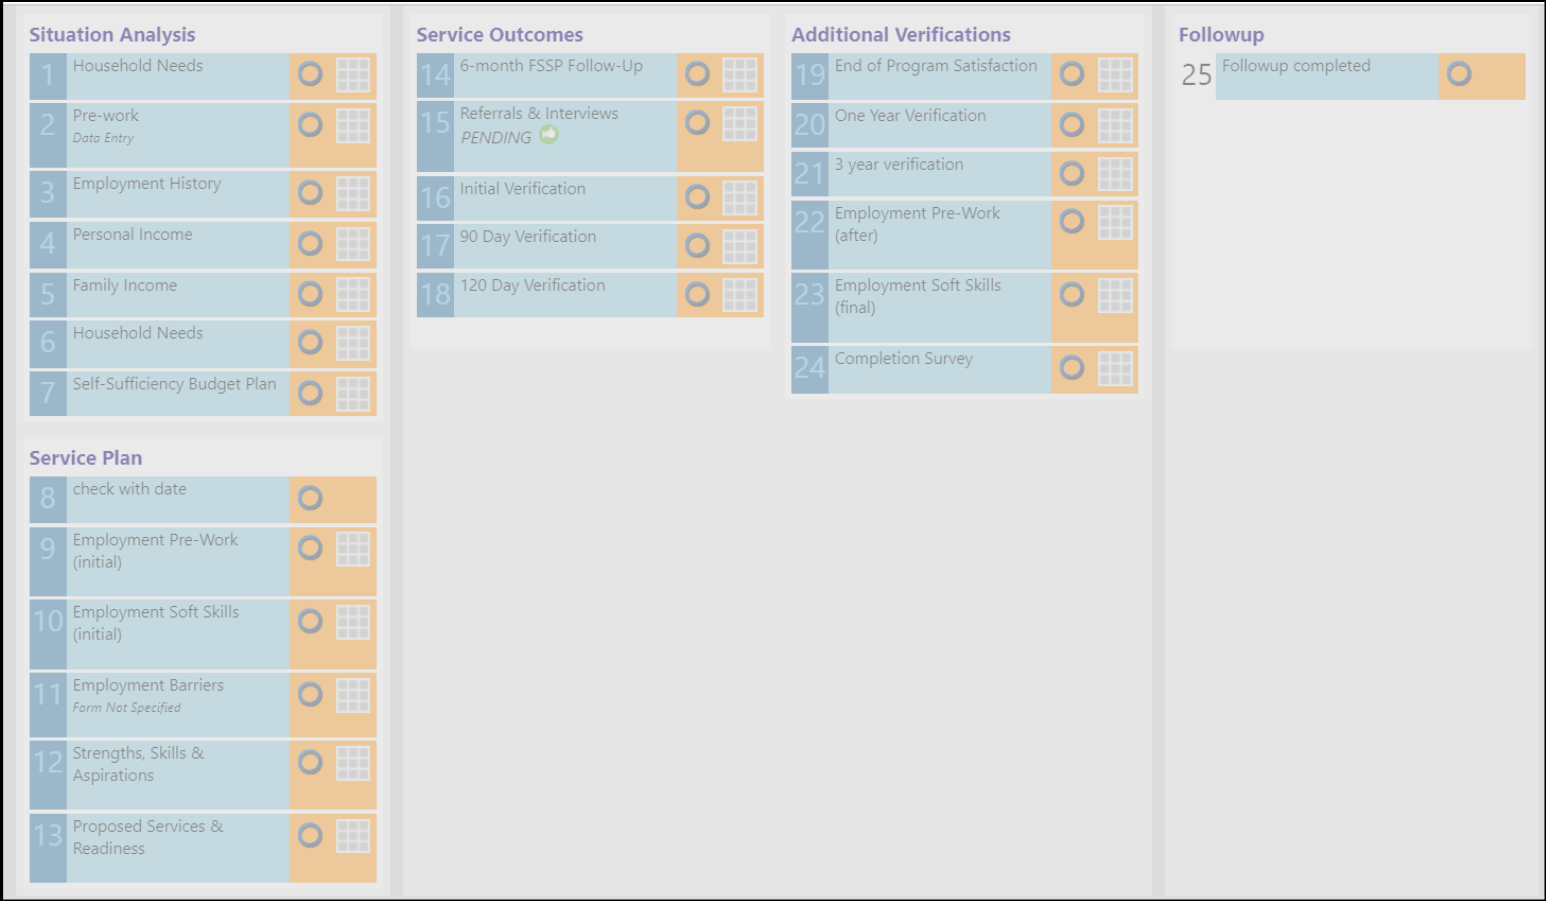
- Workflow stages can be Single or Multi-Column.
- Edit the Workflow Stage and Select Single or Multi-Column.
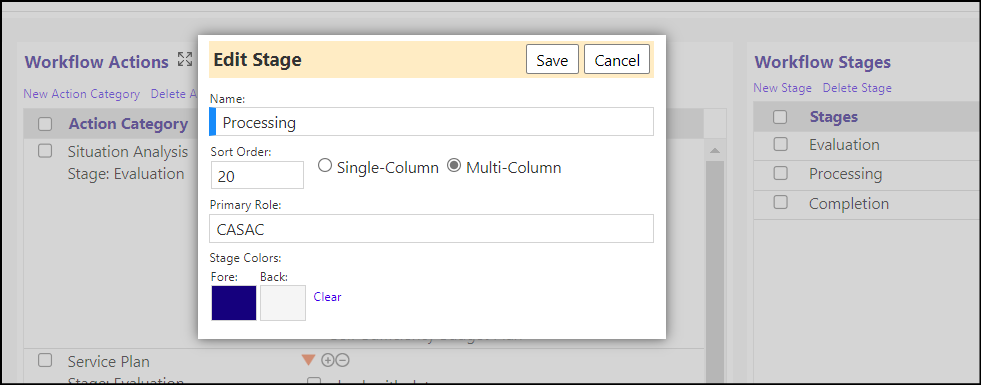
* An example of the difference between Single and Multi-Column are as follows. The first stage is single column, the second is multi-column:
- Removing one decision from a workflow will now remove all the decisions made after that one.
- Clicking on a decision that was already made lets you remove them. Example: Removing the "answer" decision also remove sthe "test decision" to the right, but not the "yes or no" at the left side of that decision.

- Decisions can now be made conditional. When editing the visibility of workflow categories or actions, when a user tries to add a row, a new window pops up.
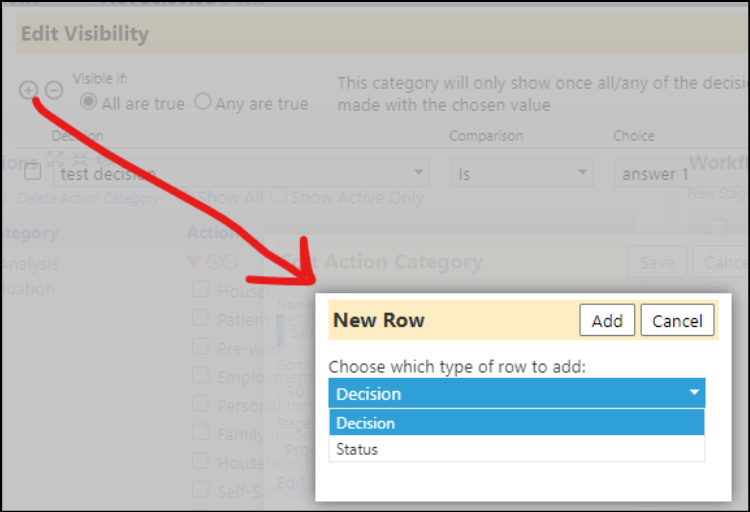
- Choosing decision will have the row function how it used to - it lets the user choose a decision, and a choice. But choosing status lets the user control the visibility of things on the workflow conditionally based on what the current status of the account program is.

- In the above example, the workflow category will only show once the "test decision" decison has been answered with "answer 1", and the current status of the account program is enrolled.
- Making decisions on a workflow now get audited. The system will also log a message if a decision is removed and will indicate which decision was removed.


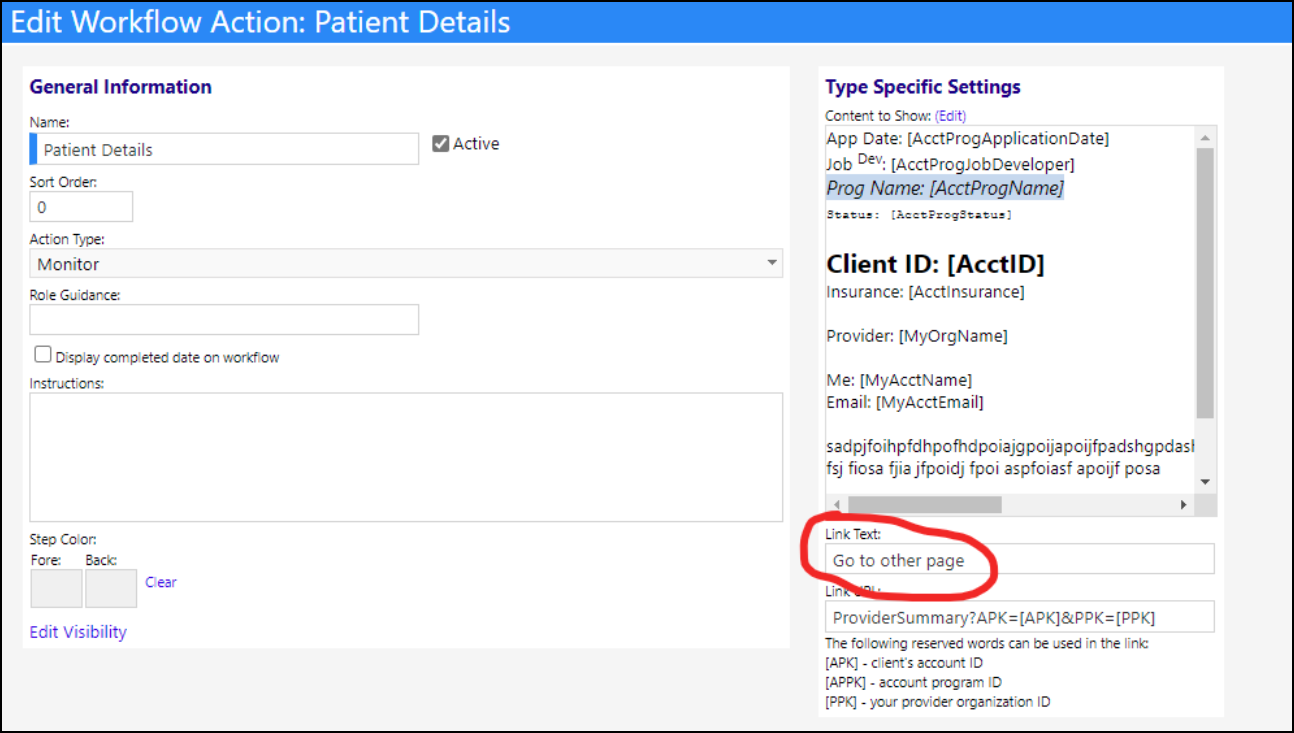
- A new action called "Monitor" has been added. This new action type can be used for treatment, and it will have a different visual layout and user defined content and behavior that only program workflow widgets.
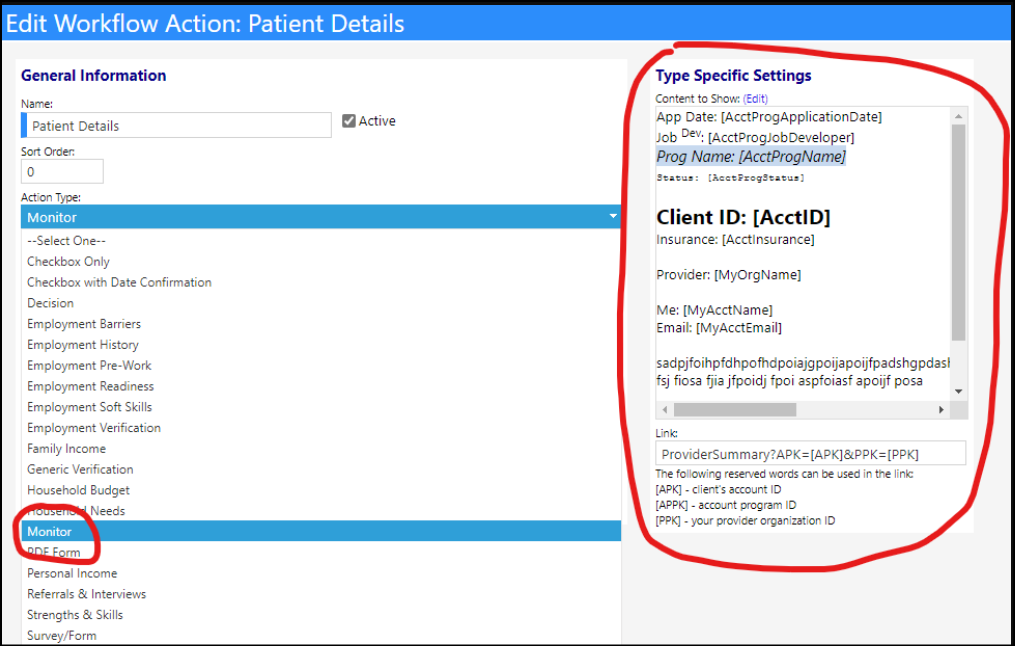
- This lets users specify some HTML text and a link. Use the edit link above the block of HTML to go to the HTML edit page, where several reserved words can also be used. The link field also supports 3 small reserved words, so in the above example, clicking the link will send the user to the ProviderSummary page for this client and my provider organization.
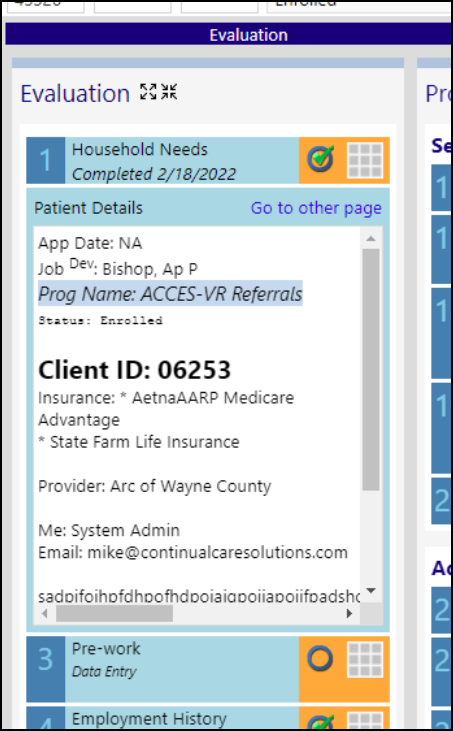
This is how it shows on the workflow:
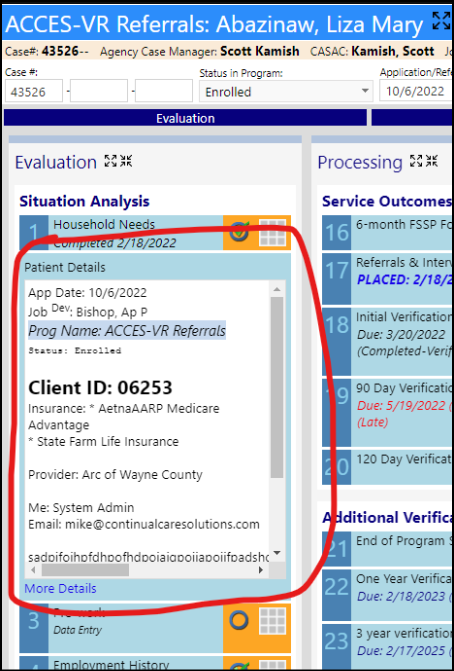
- The "more details" link will only show if you specify anything in the link field.
- Account program reserved words now properly say "NA" when there is no data. The comment reserved word says "None" if there is no comment.
- There is a new option on categories to hide the category name (defaults to yes).
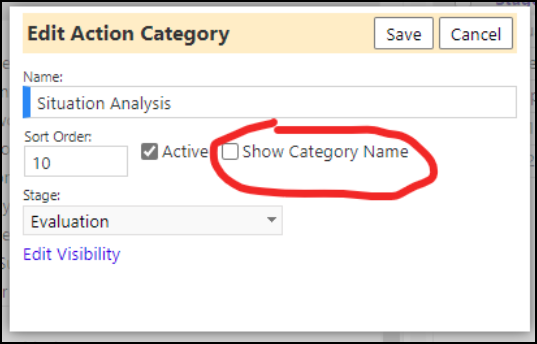
- When configuring a monitor step, users can now change the text that displays on the link. Instead of "More Details", it can be whatever they want. If the user leaves this field empty, the link will not show:
- The link on monitor steps now show at the top (this screenshot also demonstrates the category name being hidden):
Enhancement to Provider Portal - Multiple Changes
- On the provider summary page, users can now flag a client for discussion.
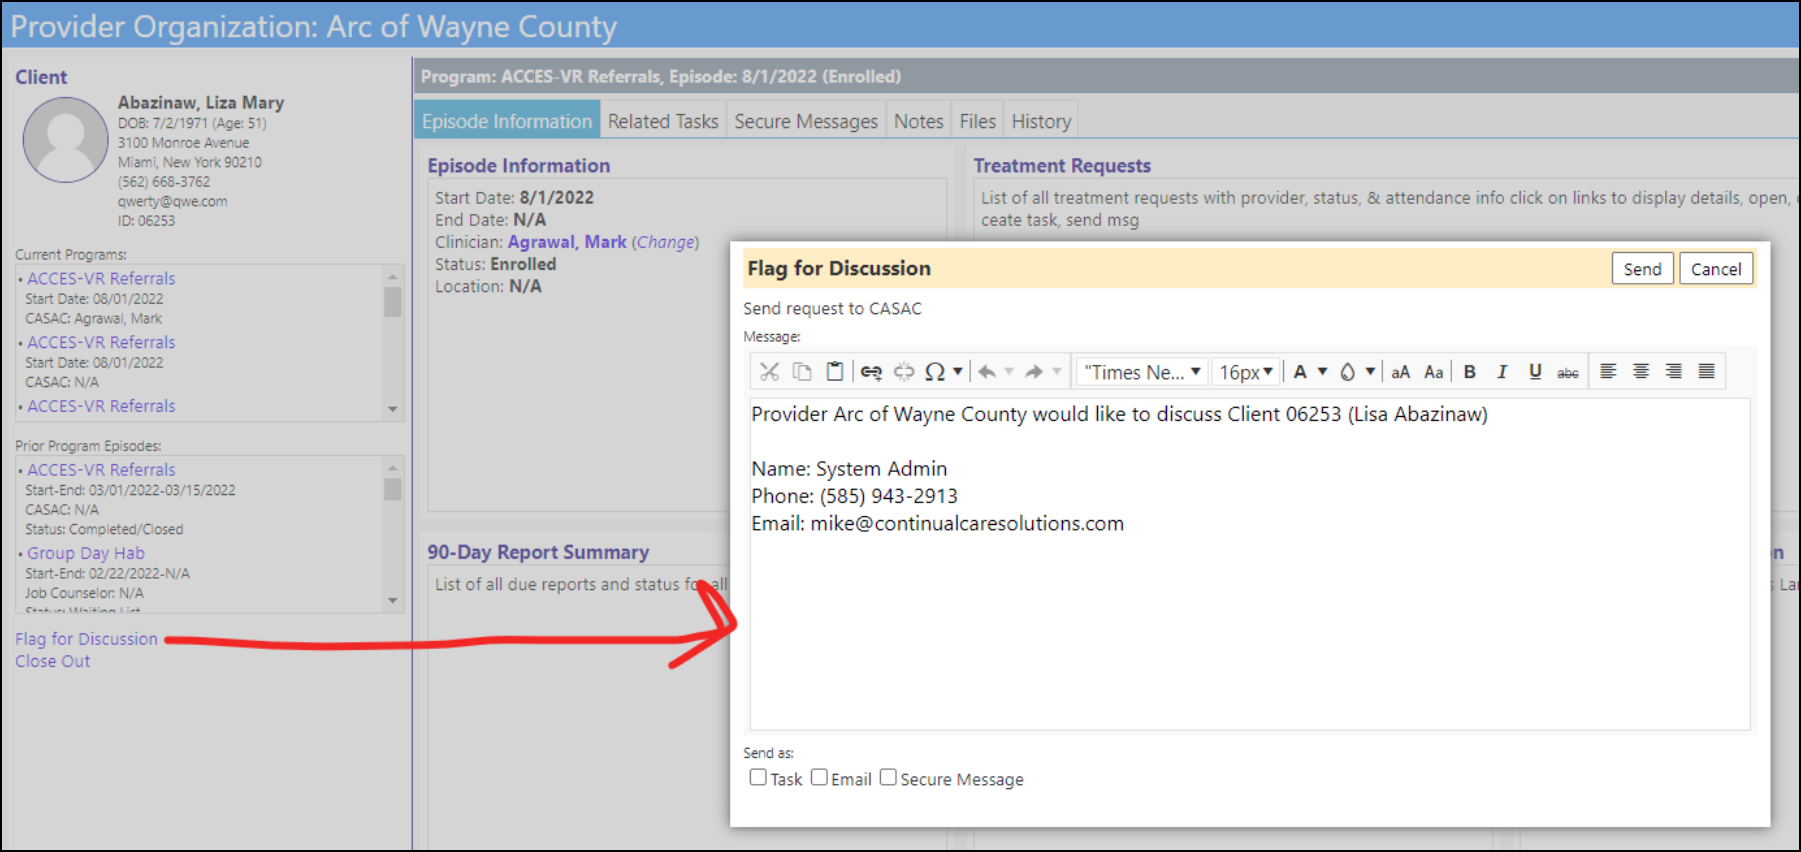
- The message auto-fills, but can be modified, then users can choose any combination of sending the message as a task, a regular email, or a secure message. If the user chooses the task or secure message, the resulting entities that get created will be attached to the account program currently being displayed. So if the user goes to the related tasks or secure messages tab on this page, they'll see what was created.
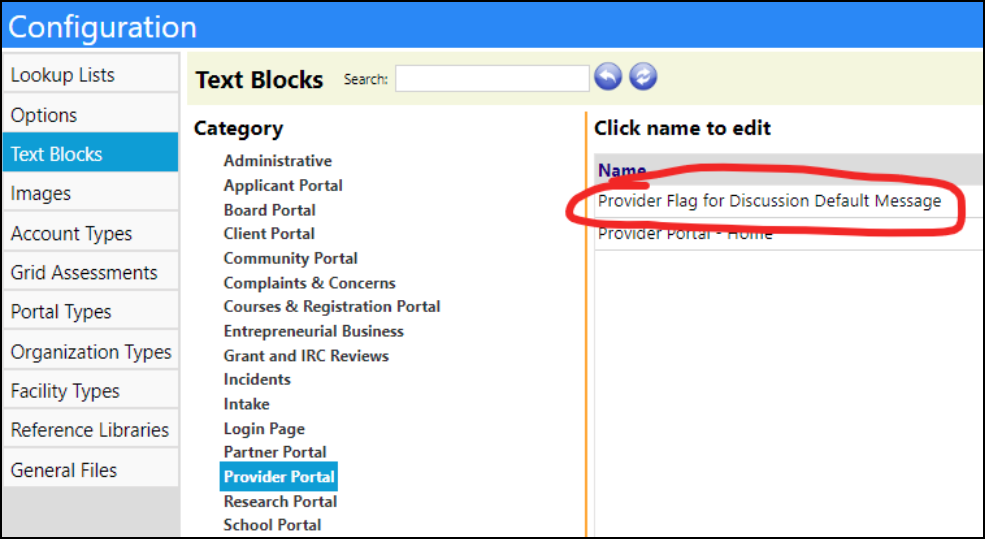
- The default message can be modified in the Configuration Text Blocks.
- A new search option has been added to the Provider Portal home page for their active clients. (Note: for reference purposes, the Episode ID is the account-program primary key.)
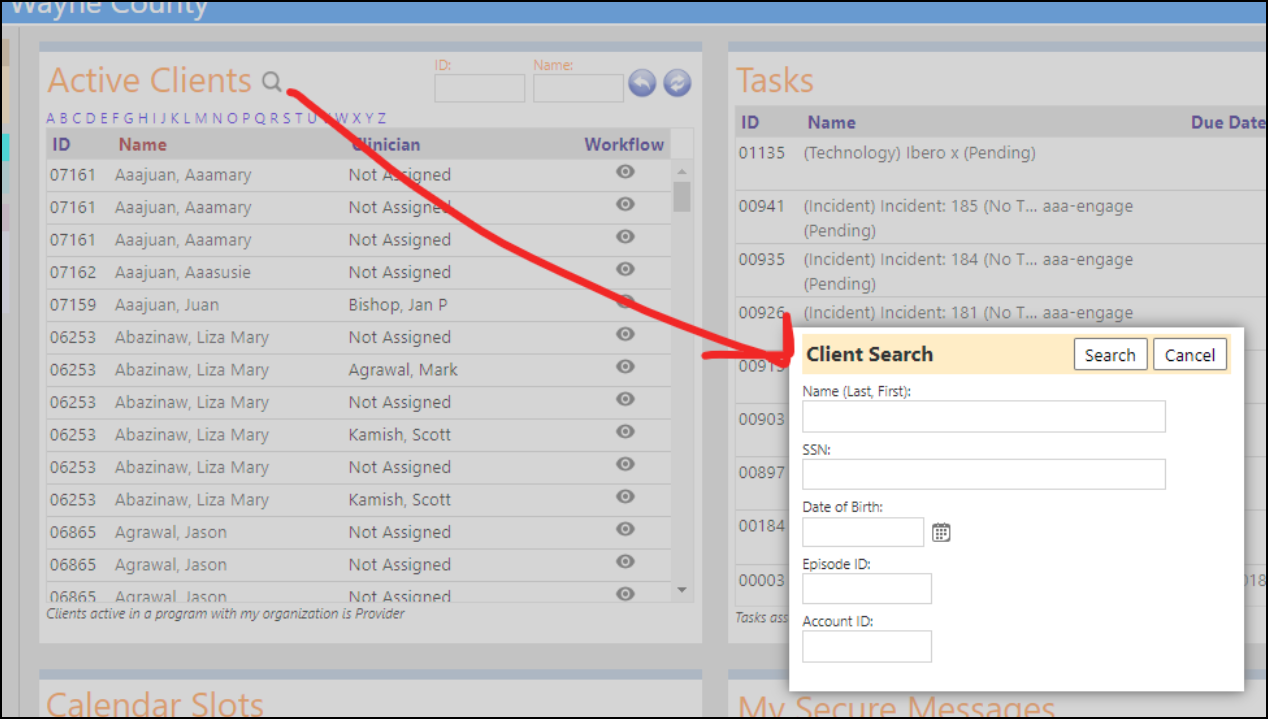
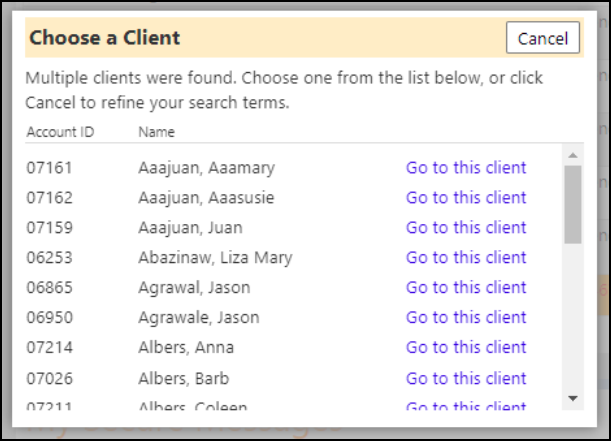
- If a user does not enter any search criteria, the search window will just show a list of all the provider's active clients. If there are no matches, it'll provide a message and tell the user to refine the search. If there is exactly one match, it'll take the user directly to that client's summary page. If there are multiple matches, the user will get a list like this:
Workorder Enhancement - Restricting Viewing of Workorder Related Tasks
-
Some agencies want to be able to restrict some people in a particular role from being able to see tasks submitted by other people, because the files on these tasks may contain sensitive information. A new privilege type was added to "workorder tasks" which will allow agencies to control which tasks a user can see. If a user has the appropriate task privilege for specific requests, then they'll be able to see and edit those requests, otherwise they won't be unable to view them.
-
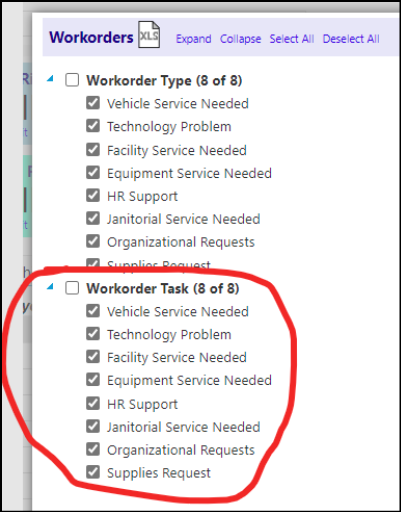
As setup in Account Roles, under Workorders:
-
Workorder privileges are split into two lists. The "workorder type" list determines which workorders users can submit through the service request page. The "workorder task" list determines which tasks users can view.
-
From the service request page, users can see a list of their own submitted tasks - the workorder task privileges don't apply to this view, since users can always be able to see a task they submitted, even if they don't have the privilege for that workorder type.
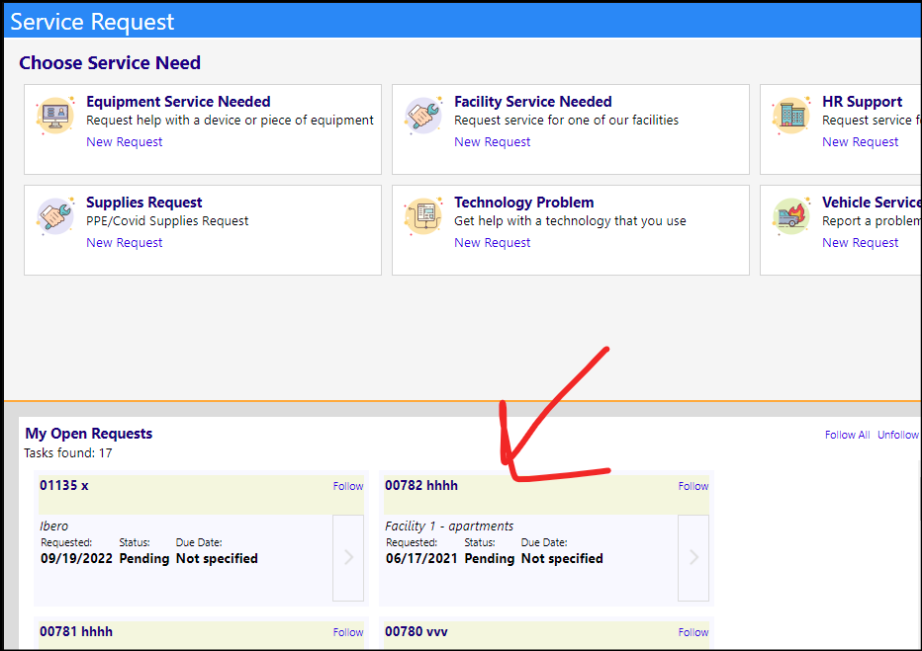
- But if a user is not on the task list, they can only see tasks that either were not created from a workorder type, or are from a workorder type that they have the privileges to see. So if, for example, a person can submit HR related workorders, and the workorder task privilege for "HR support" is unchecked, they'd still be able to submit an HR support request, and they'd be able to view their own HR support requests, but they would not be able to view any HR support requests submitted by other people.
- The privileges don't apply directly to what the task is associated with, they instead apply to how the task was created. The database keeps track of if a task was submitted by the service request page or not, and that is what's used by these new privileges. If a task wasn't submitted by a workorder, a user just needs the task edit entity right to see them, the same as before.
- To make it easier to implement, Continual Care will be running a script to initialize the workorder task privileges to be the same as the workorder type privileges (so any user who can submit a particular workorder type will also be given the new privilege to view their tasks.