Navigate to Equipment in the Physical Resources section of the Resources menu.
- You will be presented with the following equipment options:
- “Copy” an existing entry (great time saver)
- Create “Labels’
- “Add New” equipment
- “Delete” an entry
- “Return” to the previous page
- Using the filters, you can limit what you see on the page
- You can also check off the fields you want to see in the table offered.
To move a piece of equipment from the Warehouse to a new site or location...
- Filter on the site and location and refresh your screen.

- After refreshing, locate the equipment and click the ID number.
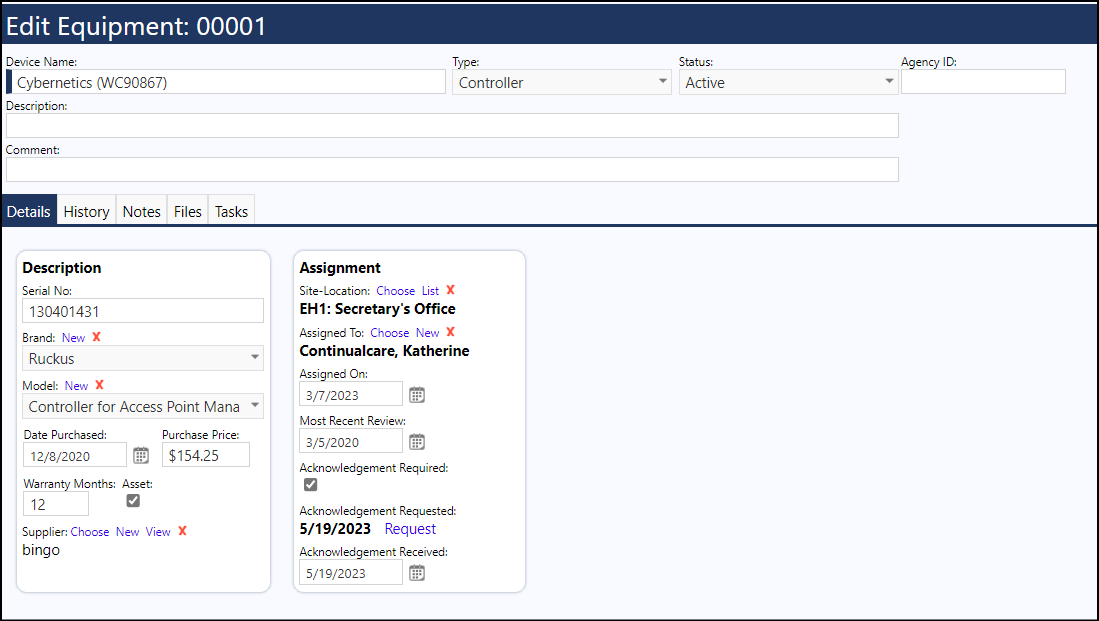
- When the Equipment’s page opens, choose a new site and location in the
Assignment panel.
You must always select a location within a site.
You can view the Sites and Locations by clicking “List”. You will see the Site in the left column and the Location at that site in the right column.
To select the new site and location, click “Choose” and select the site from the drop down. Because the display only shows a maximum of 50 rows, you may have to use a wildcard to locate the appropriate site or location.
- Set your new site and location by clicking on the new Site/Location and clicking select.
- When you are directed back to the Equipment page, “Save” your changes. The piece of equipment is 'moved' to the new Site/Location.
To Add a New piece of Equipment...
- Click the 'Add New' button on the header of the page.
- Enter Device Name, select the Type, set your status.
(If your equipment device type is not displayed in the list, please contact your system administrator so they can add it for you.)
Status options include Active, Damaged / Broken, Decommissioned, Maintenance Hold, Missing, and Out for Repairs.
- Click Apply (more options will appear below).

-
Enter the Serial number, and select the Brand and Model from the drop down. (Brands are driven by the equipment Type. If you forget to select a Type, the system will prompt you to select a type. If your equipment device make or model is not displayed in the list, please contact your system administrator so they can add it for you.)
a. If the brand does not appear, click New, enter the name and Save. The system
will add the Make or Brand to the list for you to choose from.
b. Once you save your New Make, click Apply on the Equipment page. Now go
back to the Brand drop down to select the Make you just entered. With all New
Makes, you will need to enter a “New” Model number. Click “New”, enter the
model number, click Save and Apply, then select the Model number. -
Enter a purchase date, price and warranty in months.
-
Choose the Supplier from the list. If the Supplier does not appear in the list, click New and add the Supplier.
-
Complete the Assignment section for the Site and Location.
-
Complete the remaining fields if required and save your changes.