This article will explain some ways to notify others about an incident.
The life cycle of an incident involves:
- Creating a new incident.
- Completing the various “steps” that are part of the incident workflow.
- Optionally reviewing the incident.
- Closing out the incident.
Any one of these activities can trigger notifications to one or more people.
imPowr provides enormous flexibility in defining which activities trigger
notifications and how.
When defining a notification strategy, one must consider:
Who
Are we to notify a specific person (“Bill”) or choose who to notify based on
the incident type (“a Fall”) or a specific role (“the Department Nurse”)?
When
Do we trigger a notification when the event is initially created, when a step
is completed, or when the status is changed?
Scope
Does the system only notify for a specific event type or for all events? Or
perhaps, do we only want to notify for events associated with a specific
client or group of clients, or clients within a specific program?
This article will describe the strategy for notifying – but as you review
this, keep in mind that virtually any strategy can be built, so please contact
your imPowr support person for additional help if you need another approach.
-
Case 1: When the people you want to notify are known in advance (i.e., individual based notifications):
-
You can notify any person or group of people when an incident of any type is added or is updated.
-
You can notify any person or group of people when an incident occurs and can pick the person based on:
- The incident types.
- The location where the incident occurred.
- The name of the victim.
-
If you use the “advanced qualifiers” in the imPowr Notification Policies, you can build virtually any business rule. For example, notify someone different based on the age of the victim, or if the victim had a prior incident or not, or if the victim is of a particular race or ethnicity.
-
Individual notifications: Follow Feature
When an incident is created, any user can choose to “follow” it. Go the
incident list and choose the incident you wish to follow. When the detail page
appears, click ‘Follow’.
You will get email notifications whenever the incident status or profile data
is updated.

Individual notifications: Audit Notifications
Audit notifications can be used for triggering notifications based on more
general, non-role-based purposes. These are incredibly flexible, and you can
look at pretty much anything in the system
For example:
- Send a notification whenever an incident is created of any type (or of a specific type).
- Send a notification if an incident happens on a Tuesday after 3pm.
- Send a notification if an incident occurs in a particular location or involving a specific person.
- When a certain notification is updated.
- When a certain attribute of a notification is changed.
- Etc.
To set up notifications of these types, go to the Notification policies in the
IT Management section of the System menu.

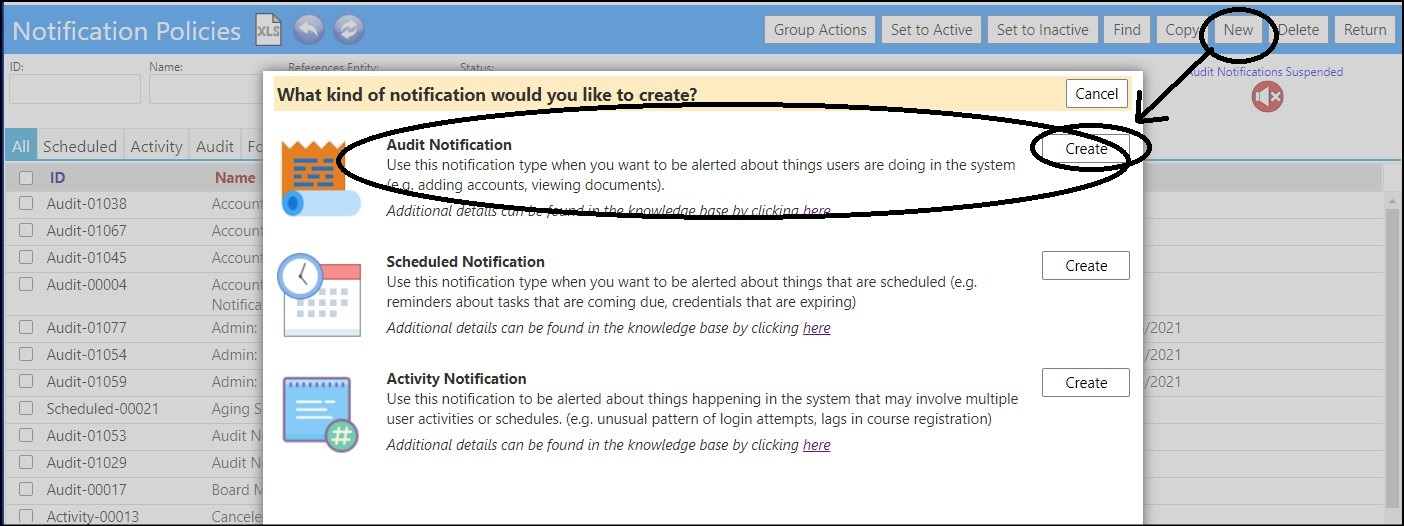
- Click New.
A window will pop open, asking what kind of Notification Policy you would like
to create.
- Click Create for an “Audit Notification”.
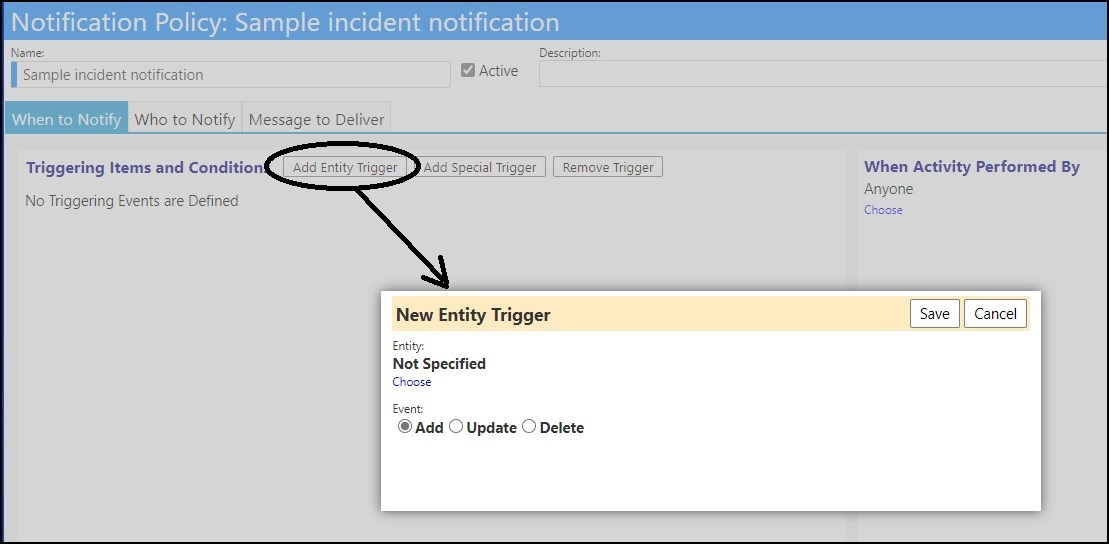
- Once in the audit notification detail, give it a name and click “Apply” to “wake up” the form.
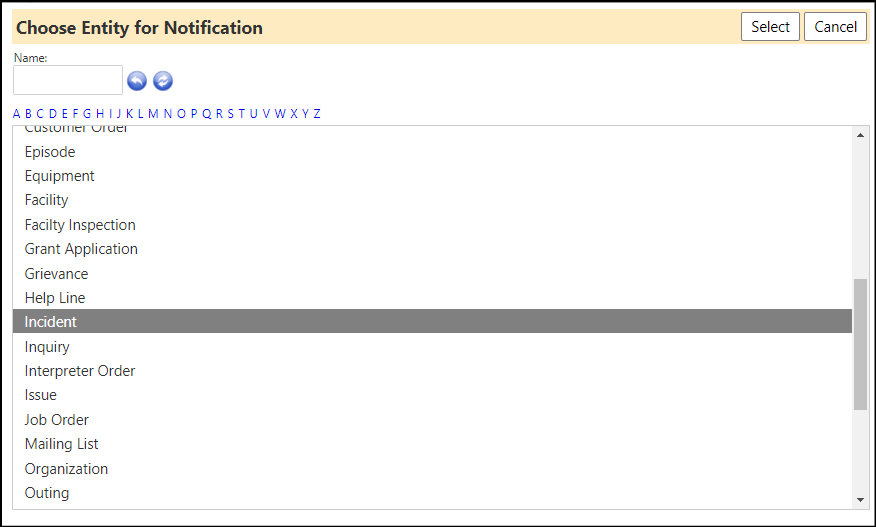
- Click “Add Entity Trigger” to choose an entity, choose “Incident” as the triggering entity, select “Add” as the event, and click ‘save’ on the popup.
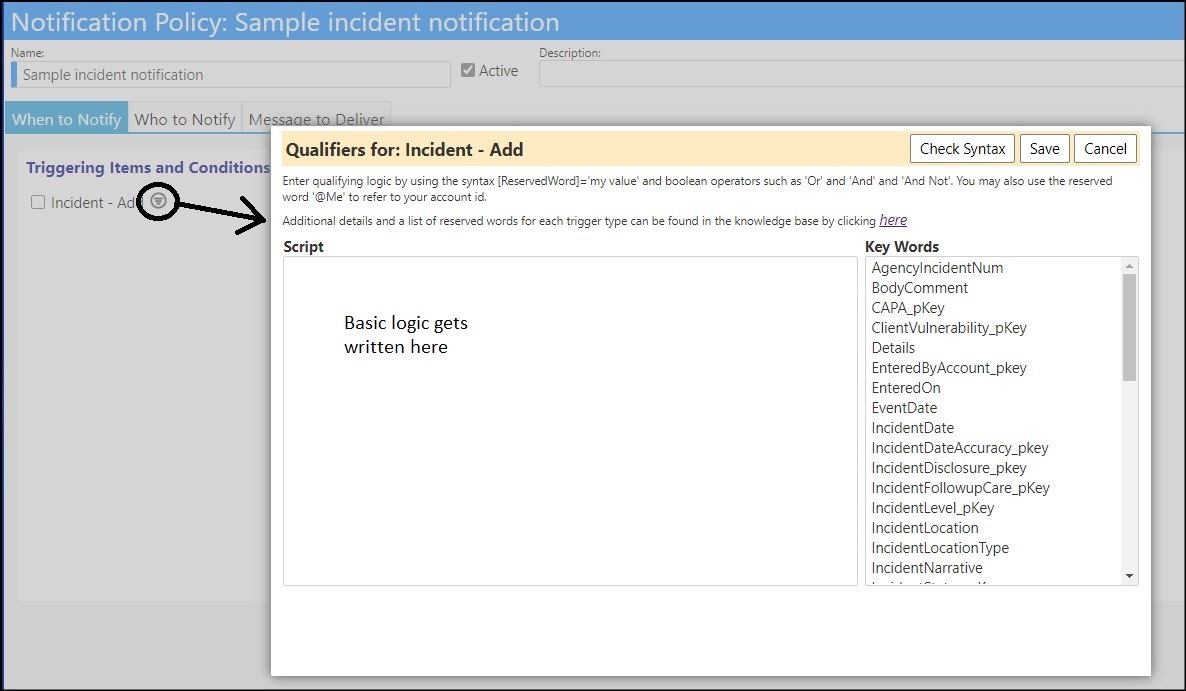
A little icon appears beside the word entity. You can OPTIONALLY use that to
set any very specific rules using any of the reserved words shown. Our team
will help you get started. Or leave the business logic blank and you will be
notified of ANY new incident.
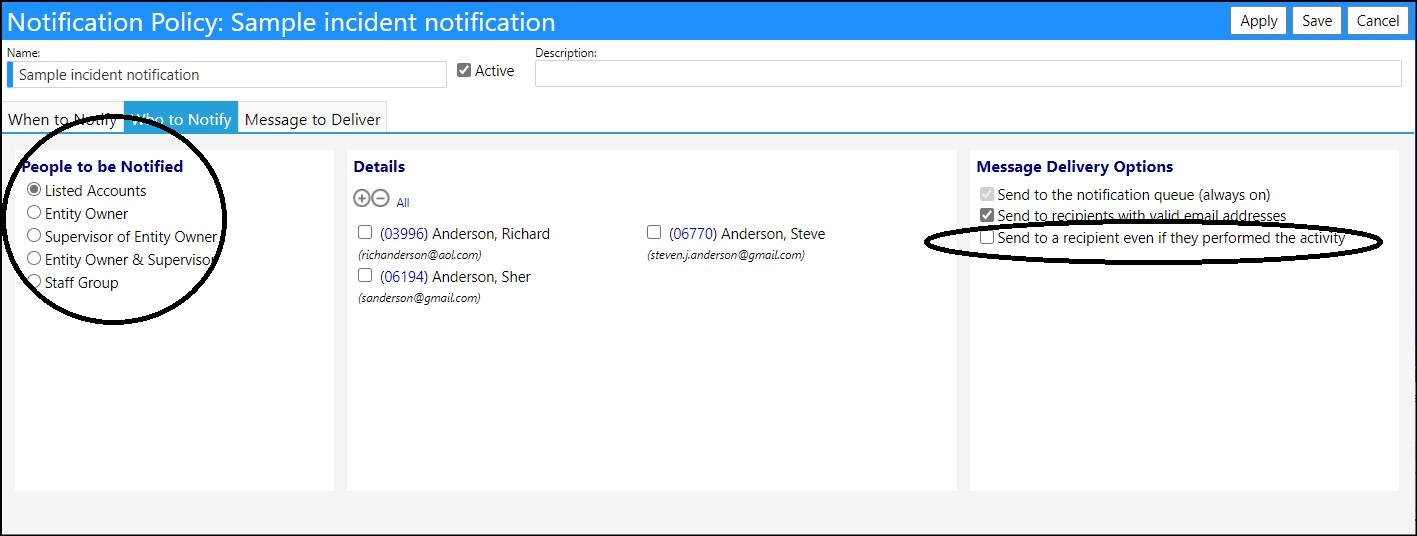
Once the “trigger” is set up, go to the second tab and list who will get the
notification.
- Click the radio button to choose the person or people to be notified.
Note the little checkbox on the right. If you are testing the system and wish
to perform tasks and notify yourself, be sure to check that box.
The default is to NOT send notifications to the person who did the activity.
But you can force the system to do so by checking that box.
The final tab is to set the message you wish to send. Note that you can use
reserved words, like “mail merge” to create a unique message.
-
Case 2: When the people you want to notify need to be selected (i.e., role based notifications):
- You can notify a Program Nurse and/or Program Director based on the program the victim is in
- You can notify a Division/Department Nurse and/or Division/Department Director based on the program the victim is in
- You can notify one or more people associated with a location depending on the location where the incident took place (this is a new feature)
- You can notify a QA person depending on the incident type
- You can notify a Clinical Team member based on the incident type
- You can notify an investigator or ‘program lead investigator’ that has been identified for the incident
With all the above we covered a lot of possible needs – but, if we missed a
use case – let us know and we’ll help you set it up.
Role Based Notifications
Role based step 1: Identify people assigned to various roles
Default roles related to incident
To notify based on roles, we must first associate people with various default
system roles that we may wish to notify.
For this article we will configure a:
- Clinical Team Member – a person with expertise based on the incident type.
- Program Nurse – a person familiar with the client and their various unique needs.
- Program Director – the manager of the program in which the client is involved, and the person typically engaged with the task of responding to family questions and concerns.
- Program QA Team member – a person on the QA team responsible for triaging and managing response to a new incident for a specific program
- Agency QA Team member – the person on the QA team with overall responsibility for triaging and managing response to a new incident.
Configure Clinical Team Member
A Clinical Team Member can be identified for each incident type. To define the
clinical team member, find the list of “Incident Response Workflows”.
Incident Response Workflows can be found in the Planning section of the
System menu.

- Click Incident Response Workflows.
A list of incident types will appear.

- Click one of the incident types to display the “incident type” profile.
- Select the clinical team member.
The example below shows a the spot you would enter a clinical team member for
an “Abuse, Neglect, and/or Exploitation” type of incident.

Optionally Configure Program Nurse, Director, and QA Team member
In imPowr, programs (some agencies refer to these as “services”) roll up into
“divisions” (some agencies refer to these as “departments”).
When identifying a Nurse or a Director we can do that at the program level or
the division level. When the notification is to be generated, the system will
first check to see if there is a program nurse. If found, it will notify them.
If not, it will check to see if there is a department nurse and if available,
notify them. The user creating the incident will be informed of who is
expected to be notified as will be described later in this document.
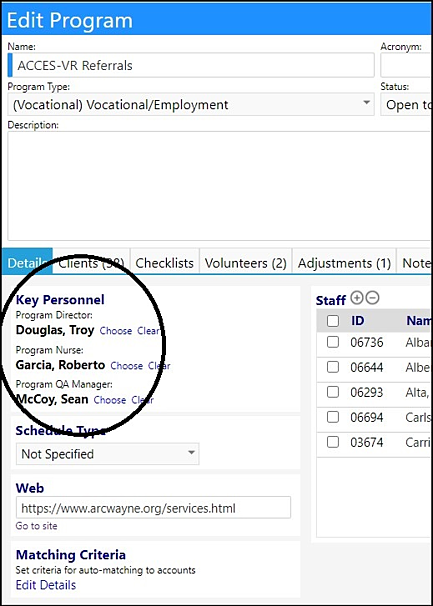
- To set program roles, go to the program list and choose a program.

When the program profile appears, select “Edit” and then find the “Key
Personnel”.
- Choose the program nurse and program director there.
Optionally Configure Division Nurse, Director
To configure division level roles, on the menu find the entry for “My
Organization”.
- Click “My Organization” to display the profile for your organization.
Go into Edit mode and on there, find a list of divisions.
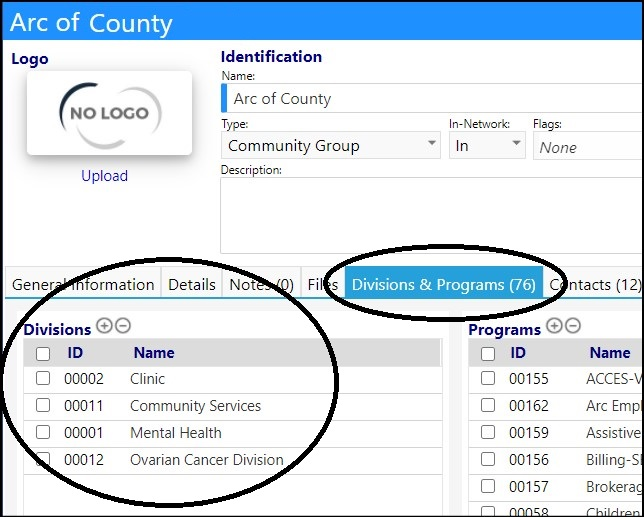
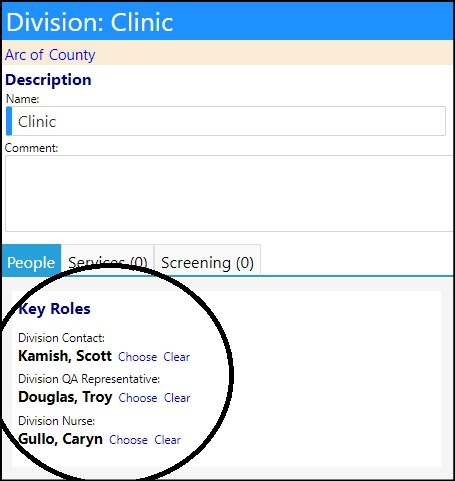
- Click the division ID to display the division profile.
On the division profile, you can enter division level personnel.
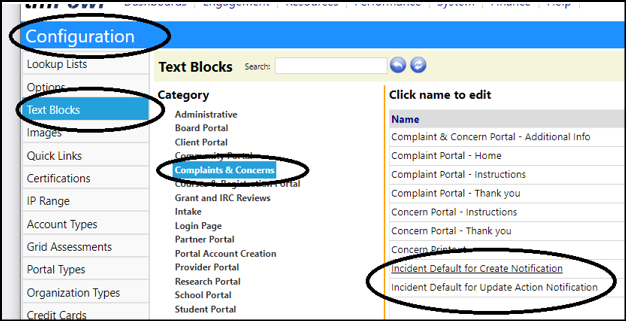
Role based step 2: Configure a Default Message
On the configuration page, in the text block section, you can define a default
message to be sent as the body of the notification email. For privacy reasons,
we keep these very simple and typically advise the recipient to log into
imPowr to see the details
Role based step 3: Configure “On create” notifications for an Incident Type
The next step is to identify which roles get notified when an incident occurs.
This is done for each incident type, as certain incidents require a lot of
notification and some little.
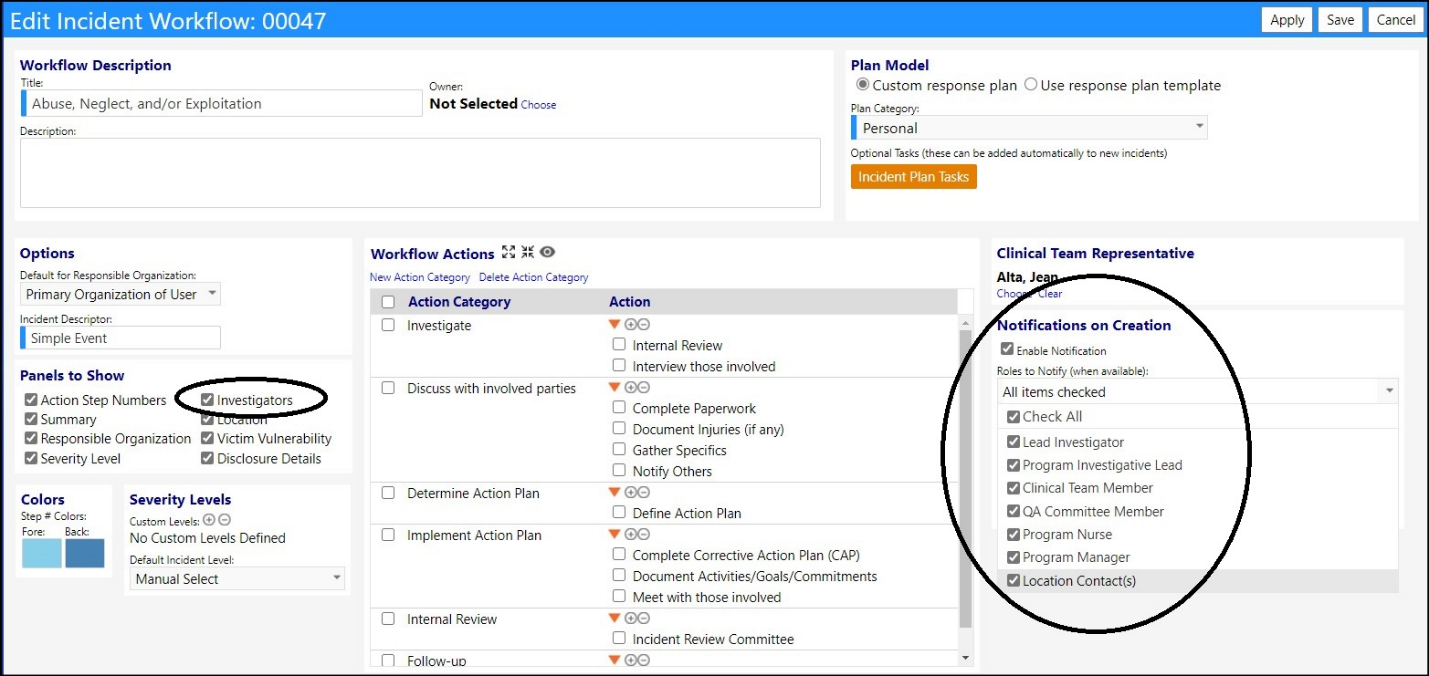
Star on the menu item “incident response plans” and display a list of incident
types. Choose the incident type to get to the incident details.
Check the roles that you wish to notify:
We will not know which people these represent until the incident is created,
at which time we will identify them based on the roles you assigned in Step 1.
NOTE: The Lead investigator and Program Investigative lead are optional
choices when creating a new incident. Not all incident types will have those
two roles. You can turn that feature on or off by selecting the “Investigator”
option on the left of this same screen.
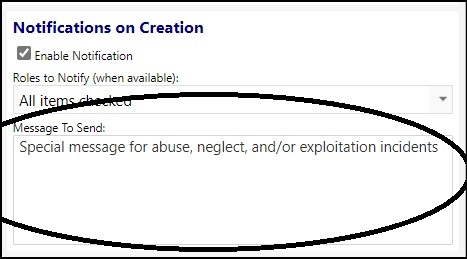
You may define an incident specific message that “overrides” the default
message.
Role based step 4: Testing
You can try out your configuration without sending the actual emails.
Access Incidents from the Compliance section of the Performance menu.

Go to the incident list and select “New Incident”.

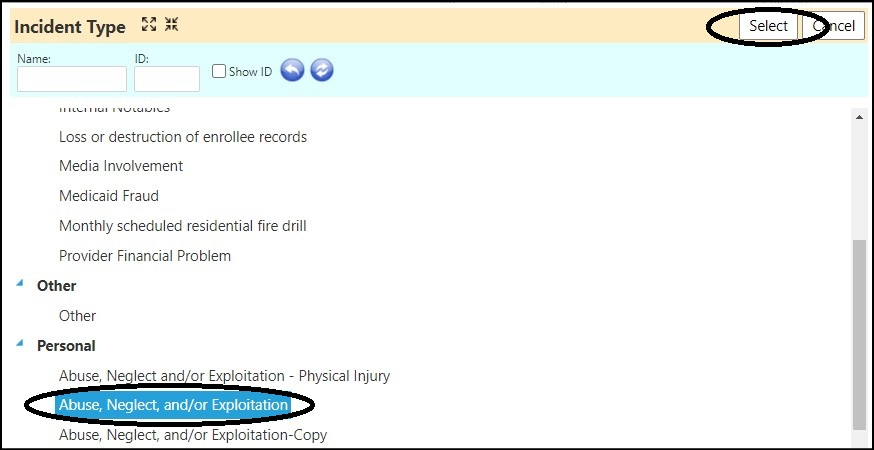
Select an incident type
The workflow screen appears (will vary depending on your incident plan)
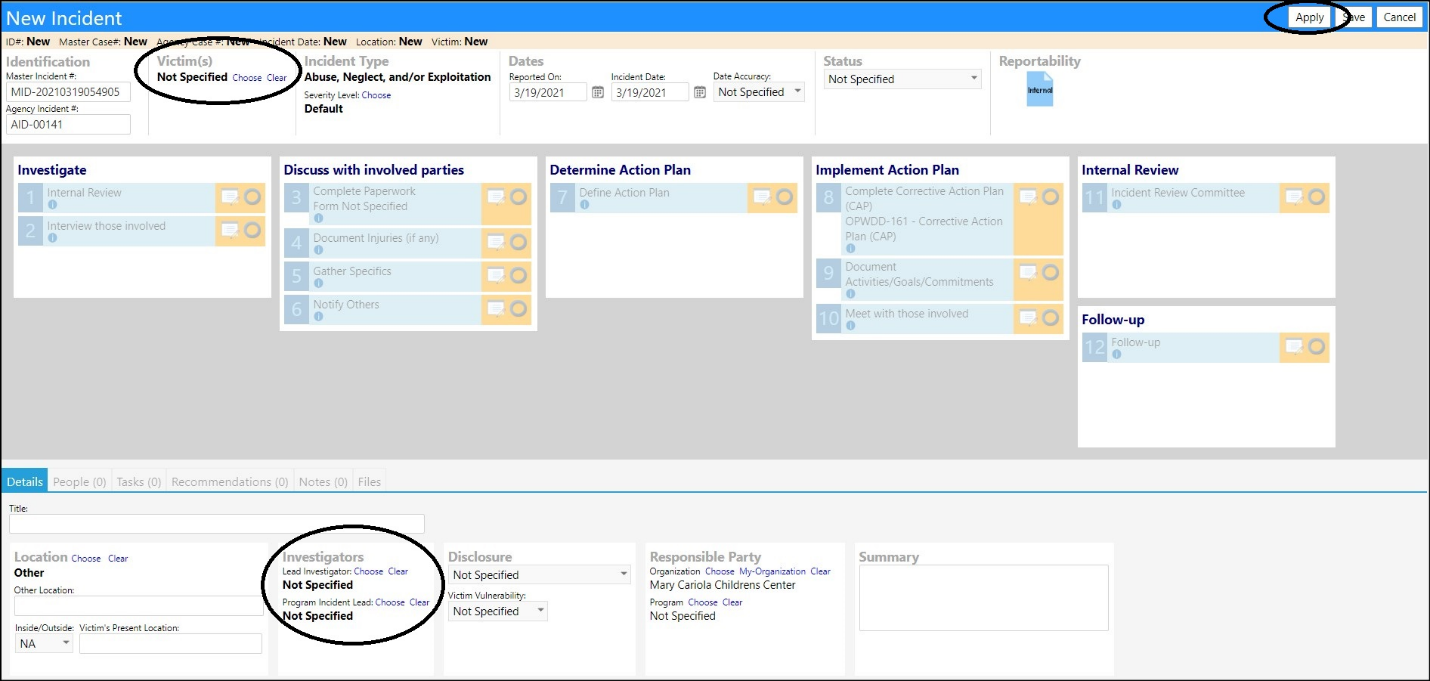
Optionally choose the victim. You will notice that under the victim name it will indicate the program he/she is in, or “multiple programs” if they are in several.
Optionally choose investigators (if your plan is set for that option)
Click ‘Apply’. A special confirmation screen will appear that we will cancel, so no need to worry that a real incident will be created. Note the 5 comments below.
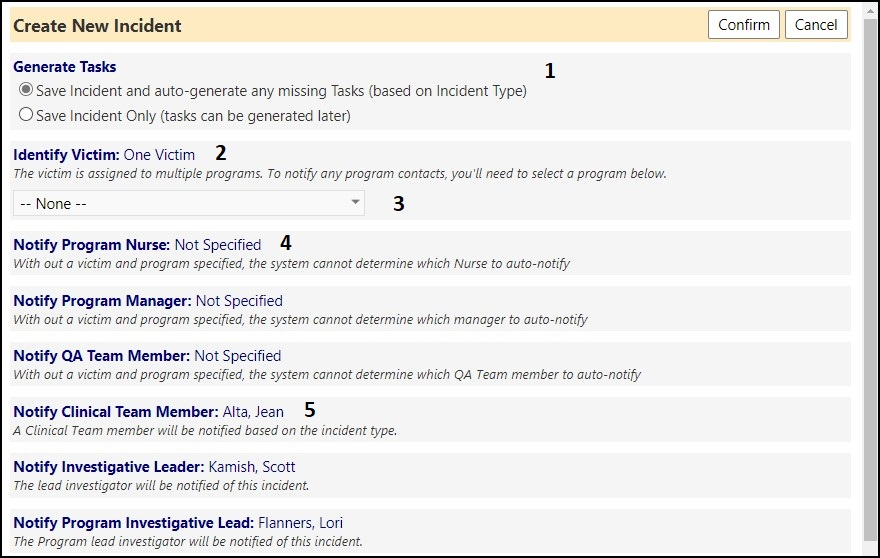
- If your response plan has auto-generated tasks, you will be given the option of creating tasks now or later. Typically, people create them when the incident is created.
- The system supports incidents with one victim or groups of victims. For most users, incidents will typically have one victim.
- If the victim is in multiple programs, a selection list will appear, and we need to identify the program of interest. If they are in one program this will be automatic.
- Once the program is known, the program staff will fill in by name.
- Other roles will fill in by name based on the incident type.
The user would then click ‘confirm’ to create the incident and send the
notifications. In this test-scenario we will click ‘Cancel’.
Role based step 5: Notifications for completed steps
To configure the system to send notification for completion of specific steps,
we once again return to the incident plan set up screen.
- Click on the step of interest.
In this case we will click on the “Recommendation” step.
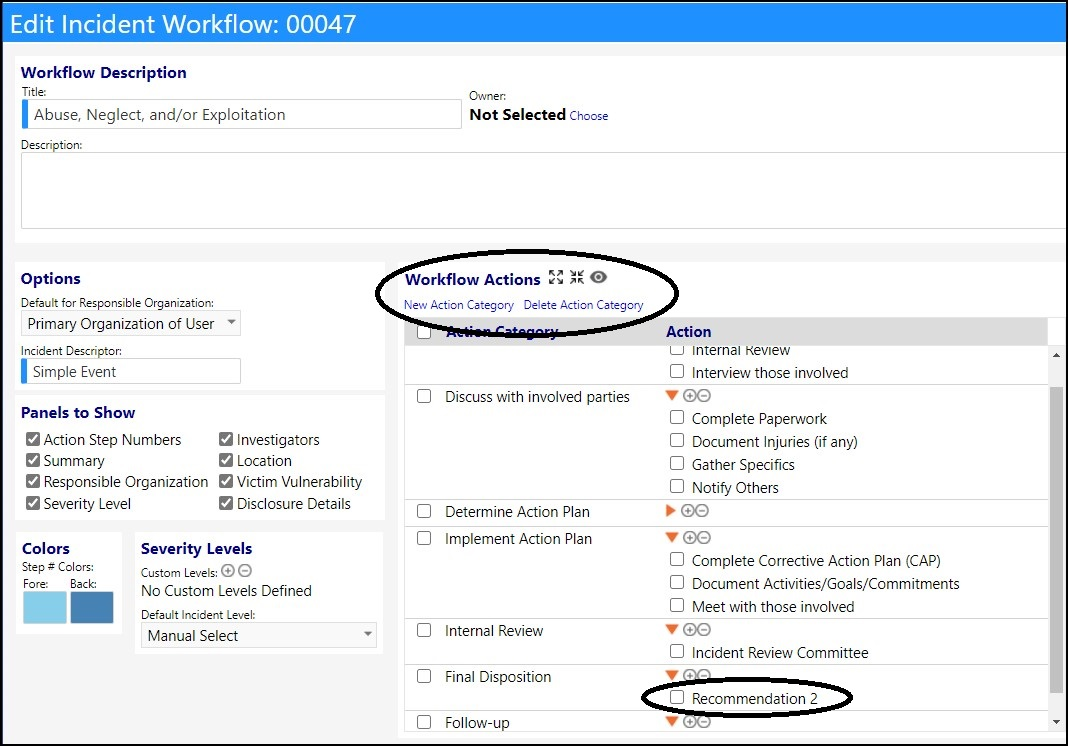
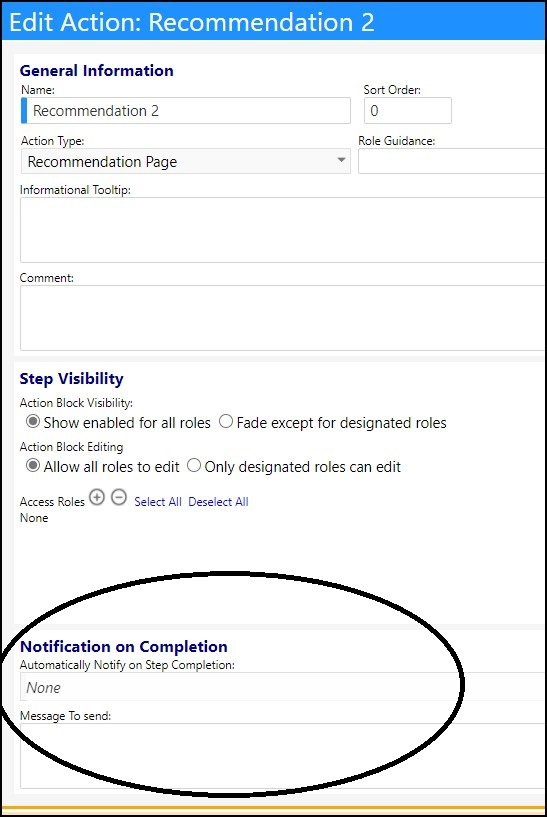
The step details appear.
There is a section for who to notify, by role, when the step is completed and
to enter a message that overrides the default message.
Location Based Notifications
Another notification is based on the location in which the incident occurred.
Notifications can be sent to a contact at that location.
The screen shots below will show you how to use the new location roles.
Contact us if you want more help and want to go through the first one or two
setups together.
Step 1. Define the notification contacts for the location.
Go to Sites & Locations in the Physical Resources section on the Resources
menu.
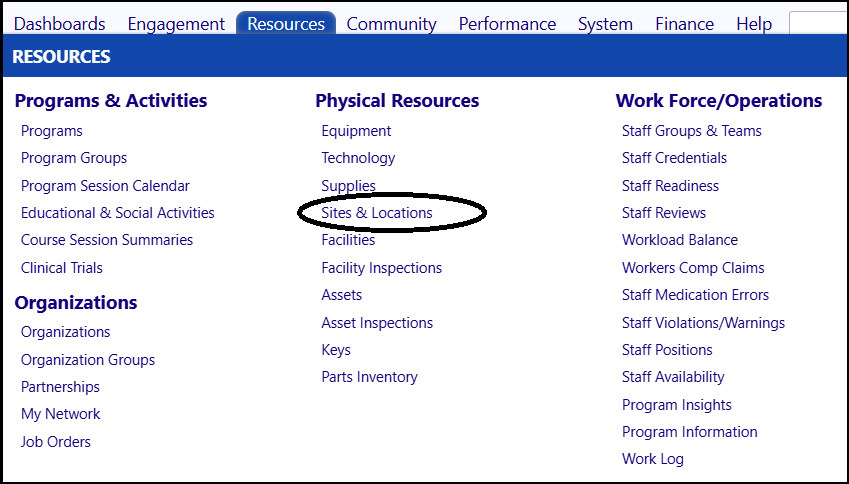
- Click Edit to enter edit mode then click the name of the site
The site details appear.
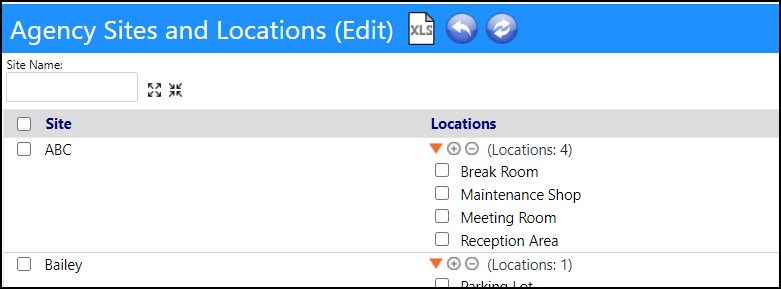
- Click the facility name.
Identify the people that get notified.
- Click the '+' to add a Staff member.
- Select 'Yes' to notify the Staff Member on an Incident.
In this example, Katie was selected to be notified for the ABC facility.
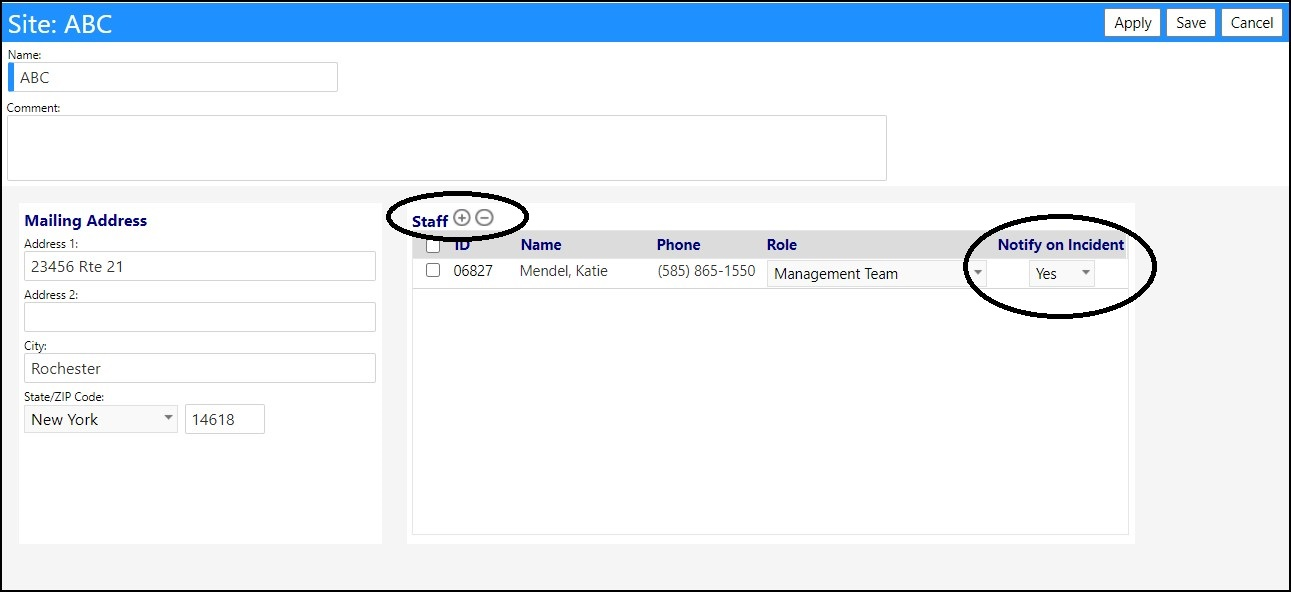
- Save your entries.
Step 2: Go to the Incident workflow.
Go to Incident Response Workflows in the Planning section of the System menu.

- Select the Incident Workflow Type from the list by clicking on its ID.
- In the Notifications on Creation section, select “Location Contacts” as people to notify.
- Make sure the “enable notifications” button is checked.
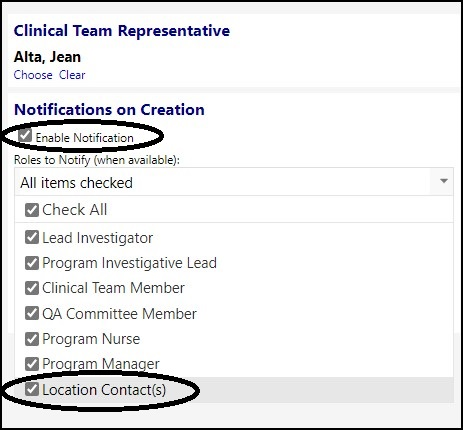
Since you will be notifying based on location, you need to prompt for that.
- Be sure to show the location panel by making sure the Location is checked in the Panel to Show.
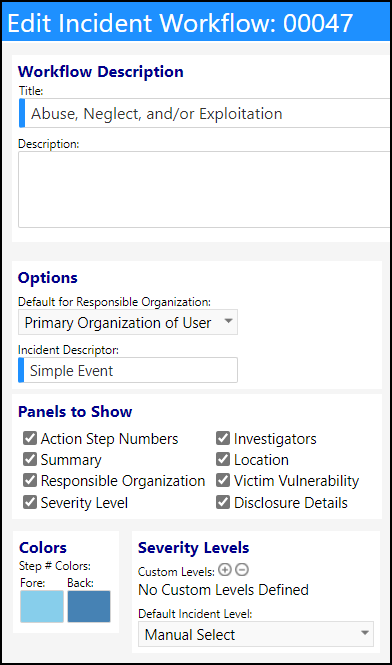
It is recommended that you show the Action Step Numbers in your workflow to
make the action steps easier to follow. It is also recommended that you define
custom security levels for incidents like medication errors. If you need
assistance, please contact Continual Care.
- Save your changes.
Step 3: Go the Incident list. Select a Location.
Access Incidents in the Compliance section of the Performance menu.

- Click New incident

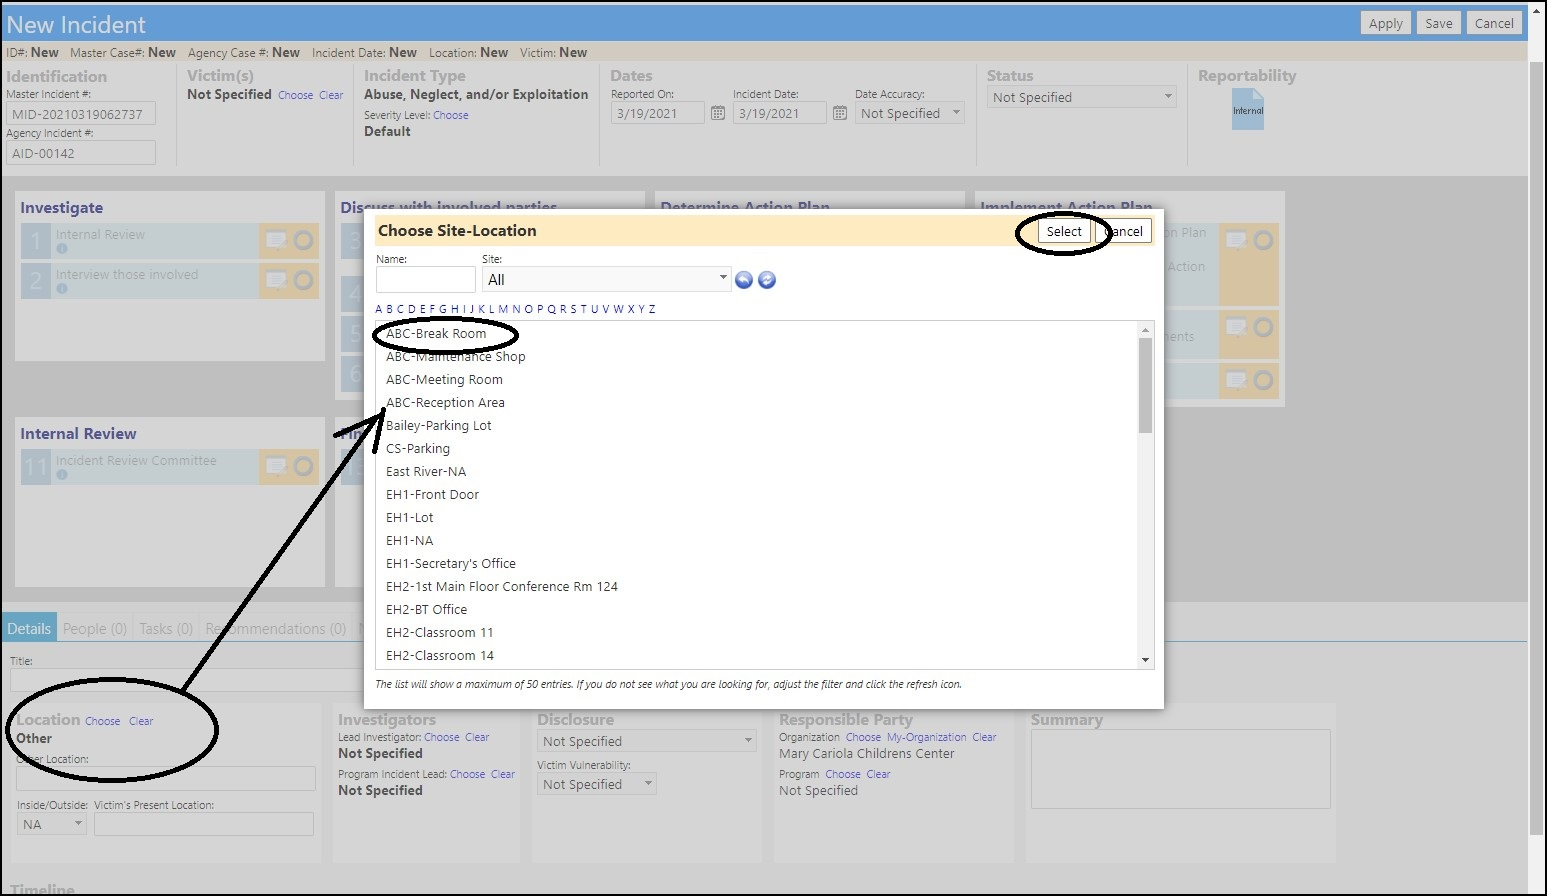
- Choose Abuse, Neglect, and/or Exploitation by highlighting the entry in the list and clicking on Select.

- Select a Location. Just as a reminder – this is where you pick the location (it requires the location panel to be turned on):
- Select a victim if you wish.

- Click Apply or Save.
When you click ‘apply’ or (save) the notification screen will appear. In this
example, the program nurse and the location team were selected to be notified.
There is a single contacts for the location which was selected. If there were
more than 1 contact at that location, both names would have appears. The same
with the program managers.
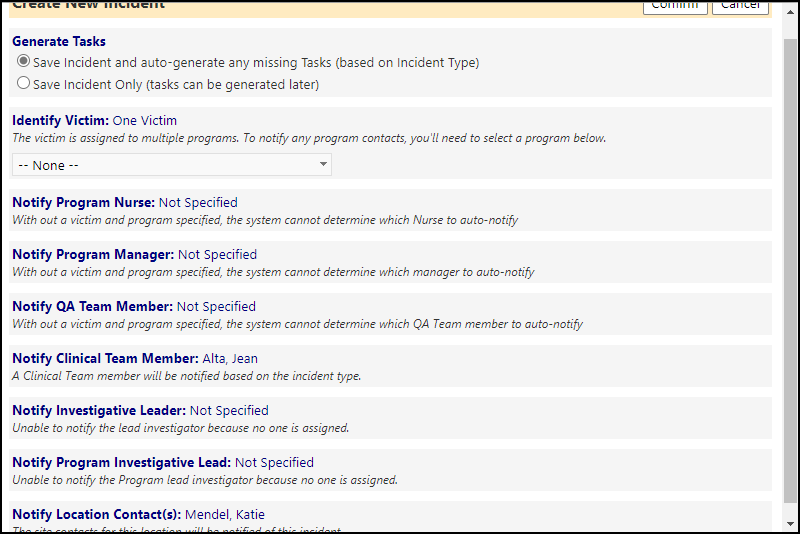
NOTE: The program dropdown appears in the Identify Victim section, because the
program nurse has also been selected and to do that the program must be known.
If the program nurse is removed from the Incident Response Workflow, then the
program selection is no longer needed so the drop down no longer appears.
Step 4: Repeat the above as needed until the popup shows the right people for what you want.
The names listed on the Notification List popup are the people that will be getting notified (provided they have email addresses). Think of the popup as a “Preview”.
NOTE: when testing, you might want to consider cancelling out of the popup
because you might not want to create the incident and just want to see who
will be notified. You might want to consider starting that way then, when you
have the names appearing the way you want them, actually create the new
incident.
Step 5: Do it for real
Upon creating the incident for real, the notifications are sent.
If you go to the menu system and find “Notifications” you can see that the
emails were sent.