This article will tell you how to edit grid settings in an assessment and reset colors and values.
Grid Settings:
- Select Options by checking the box(s) which are applicable:
Score: by selecting this box, the calculated score will be displayed in the assessment
Show All Columns: sometimes, due to the nature of the question, not all columns in a row are used. In order to make the assessment more presentable, imPowr allows you to hide the columns for a specific row. By selecting “Show All Columns” all columns will be displayed, even those you previously selected to be hidden
Manage Colors by Column: you have the ability to change the colors of each column if desired, to make your results more meaningful or easier to read
- Click on Apply
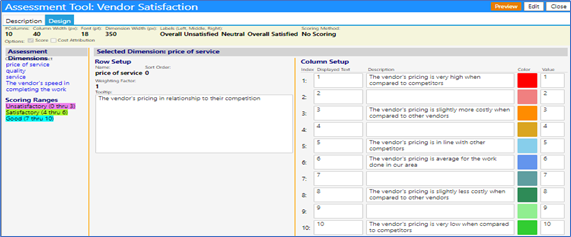
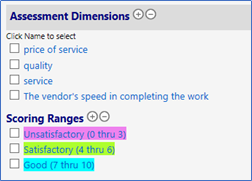
Assessment Dimensions:
- Click the ‘+’ to add an Assessment Dimension (similarly, check the box to the left of an existing Assessment Dimension and click on the ‘-‘ to remove that dimension)
- Enter a Name for your Assessment Dimension
- Click Save
The new Dimension will now appear in the list
Selected Dimension - Row Setup:
- Click on the Dimension Name – this causes you to go into the Edit mode
- Set the Sort Order
- Set the Weighting Factor which will apply to that row in your assessment
- Provide a Tool tip so once the assessment is saved, a user can click on the next to the name and have a better understand what the row is being used to assess
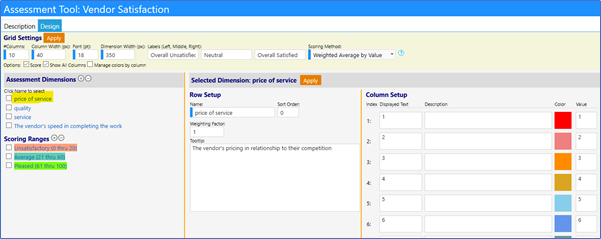
Selected Dimension – Scoring Ranges:
- Click on the ‘+’ to add a new Scoring Range (similarly, check the box to the left of an existing scoring range and click on the ‘-‘ to remove that range)
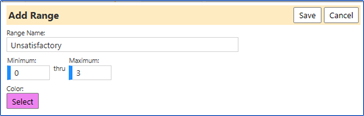
- Enter a Range Name
- Enter the Minimum value for that range
- Enter the Maximum value for that range
- Select the Color for that range
- Click on Save
Example:
- Continue until all of the ranges you wish to have are accounted for
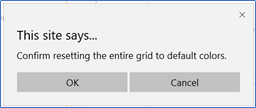
Note: If your ranges are not set up properly, you may get the following
message:
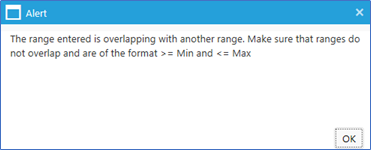
- Click OK
- Correct the range mins and max’s
- Click on Save
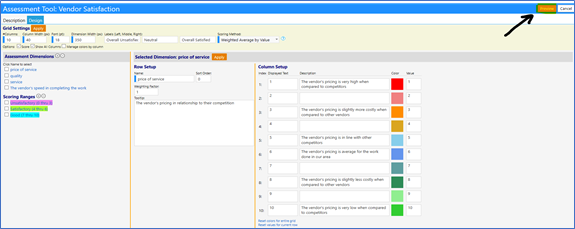
Selected Dimension - Column Setup:
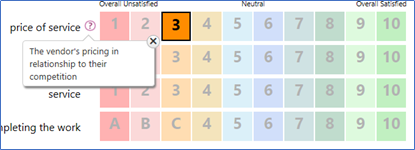
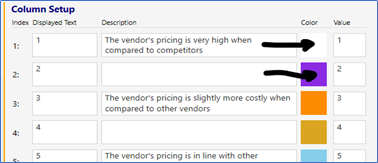
- Enter how you want each box in the assessment displayed for each column. These are to be entered in the “Displayed Text” field
Example:
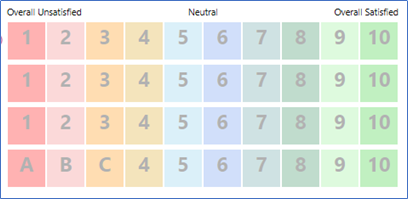
Note you can enter numbers or letters
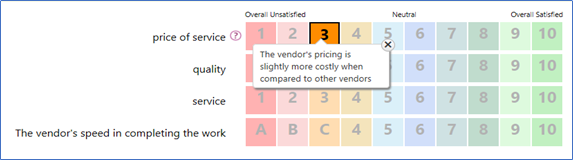
- Enter a Description of each column. These are what will be displayed as a user hovers over the boxes in the assessment
Example of Descriptions for the columns (for this particular dimension/row):
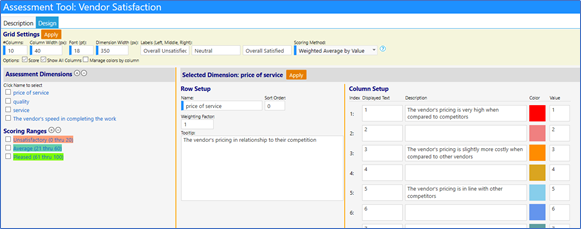
- Set a value for that row (defaults to the number of the row)
- Click on Apply
Reset colors for a box in column (or a particular row):
- Double click on a row’s color
- Pick a Grid Column Color by clicking on the color, to select it
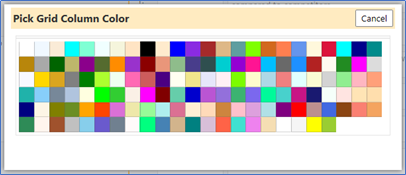
The Color will change for that column, for that selected Dimension (row)
- Repeat as desired
Reset colors for entire grid:
Sometimes, you may change your mind with how the grid coloring is. You can
reset the colors back to the original defaulted colors by…
- Click in any column of the assessment
- Click on Reset colors for entire grid
- Confirm the change
- Grid colors will reset to the defaulted colors
Note: the system will jump out of Edit mode. Click on the Assessment Dimension
Name to re-enter the Edit mode
Reset values (to the default values) for the current row:
- Click in a row
- Click on Reset values for current row
- Confirm the change
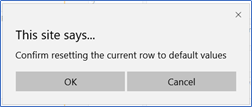
- The value will reset back to the default value which is equal to the row number
Note: the system will exit the Edit mode. Click on the Assessment Dimension
Name to re-enter the Edit mode
Previewing your changes / Testing your Assessment:
- Click on the Preview button to view how the assessment looks and functions (it will be fully functional and will apply the appropriate colors for the scoring ranges you selected.

- Repeat these setups for the other Assessment Dimensions
- Click on Apply for the Grid Settings and the Selected Dimension before exiting the Assessment Tool