See also: How do I add a new Volunteer to a Helpline: [Link](https://knowledgebase.impowr.net/docs/how-do-i-add-a-new-volunteer-to-a-helpline){target=_blank}
Changing from one account type to another is simple and quick... and once they are setup as a non-client individual account or staff member (these are typically those with an organizational email domain such as '@sharecancersupport.org'), they can easily be added to a helpline and be set up as a volunteer.
My suggestion, though, is that you do not change their account type if you wish to keep the history of their calls. If you change the account type, you lose that information, because the helplines only retain client calls. So, if you wish to keep that information, I recommend you create a new non-client Individual Account and change the status on the old account to 'Inactive' by opening the account, clicking on 'Edit' and then looking for the profile picture... and then just to the right of it, you will see the status. Click on the word 'Change' and set the status to Inactive... and click on the account Save button.
If you do not wish to save the call history, go into the Edit mode of the account and click on this highlighted icon and select a new account type: Individual Account, and then click Change, followed by Save or Apply.

Once you have your account, you need to access it in the Edit mode and look for the Account Roles panel on the General Information tab. Click on the '+' icon:

And choose the Volunteer or Volunteer - Peer Combination Role account role. (The difference between the two is that the combination role activates the peer settings in case you use IMPOWR to find matches with clients.) Be sure to save the selected account role and the account (click on save twice).
You will also want to add that individual to the Ovarian Cancer Helpline Staff Group/Team. To do this, while in the Edit mode or the account, look for the Staff Teams panel. Click on the '+' and select the Ovarian Cancer Helpline and click on Save. Be sure to save the account when done.

Optional: When in the account, go into Edit mode and at the top of the screen, to the right of their name, click on the Tag icon:

This allows you to place a tag on the account to easily identify the helpline for that individual and search for those with that tagging in the account list (assuming you have entered tags for others on the helpline). Click once on that icon and a window will open. Enter your tag and then click on the icon once more to save it.


Once a tag is in place, if you wish to change it, you can follow the same process by clicking on the icon. You can delete the old tag by clicking on the 'X' to the right of the tag and add a new tag. You can add multiple tags if desired. When done, be sure to save the account.

In the following example, I added a tag to the account, and then searched the account list for all accounts with that tag:
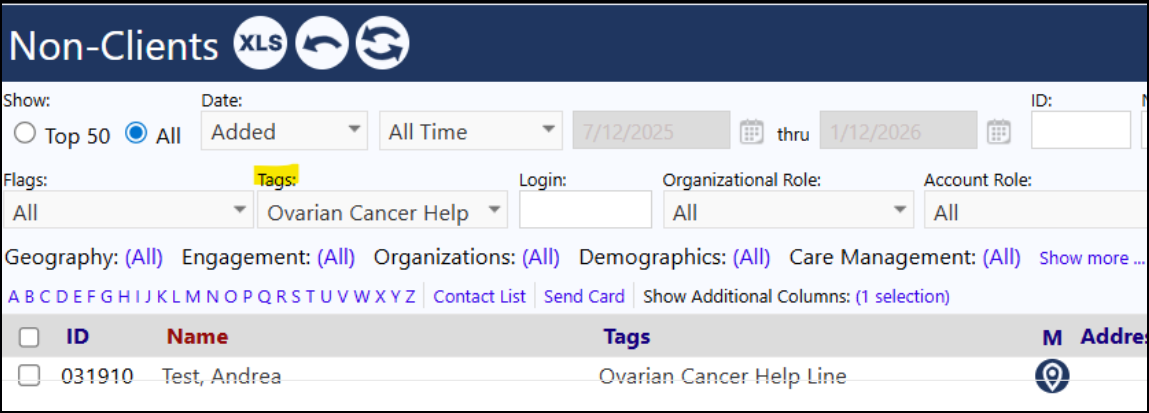
(I optionally displayed the tag by clicking on the "Show Additional Columns" and selected Tags.) If I did not select that particular tag, all selected tags would have been displayed...or if no tags were selected, all accounts would be displayed.
Even though their account is setup, before they can really do anything, they need to be added to a helpline.
To do this, go to the General menu item and click on Helplines. Click on either the name of the helpline (Ovarian Cancer Help Line) or the link 'to view details, click here' listed for that helpline. Go to the Accounts tab in that helpline and click on the '+' to add your new volunteer. After they are added, search for their name in the account list and click on 'Edit'. In the window which opens, you can select if they are an Administrator, Volunteer, Facilitator or more than one. You can also add any desired comments about them or their scheduling limitations. When done, click Save. When done with the helpline page, click Save again.
At this point, once the user is ready, they can log in with their email address and password and sign up for a time slot on your helpline. If you need to setup their password, when in the account edit mode, click on the Manage Password icon that is to the left of the above highlighted one - the one that looks like a lock. Select one of the password options - the preferred one is option 5. If you want to set a temporary password, then options 2 - 4 work fine (for many of our customers, their preference is option 3 because they create something easy for the customer to use to get into the system and then have them click on their profile picture in the upper right corner of any page and have them select 'Update my password'.)
All passwords must follow the organization's password rules. These rules can be found in the Security Advisor panel under the System: Regulatory Compliance menu item. Users with System Administrator account roles typically have access to this and can assist users the policies (for example, must be 12 characters in length, cannot be a user's name, can be re-used, cannot be letters or numbers in sequence, cannot be one of the most commonly used 1000 passwords, etc.)