Account Profile Enhancement - Side Panel Change
- The side panel which was used to provide links to Care Plans, DDPs, LCEDs, Medical Documents, Treatment Plans, and Assessments has now been renamed to 'Care Plans & Clinical Documents' to make it more reflective of the kinds of documents which are included. The amount of types of documents included in this side panel was becoming too great, so the informational grids have been replaced with icons to make it easier to read and access the different kinds of documents.

- The display of the documents is now configurable.
- Users who have the appropriate security rights that give them access to Configuration, can now change the display order and hide the documents they don't use.
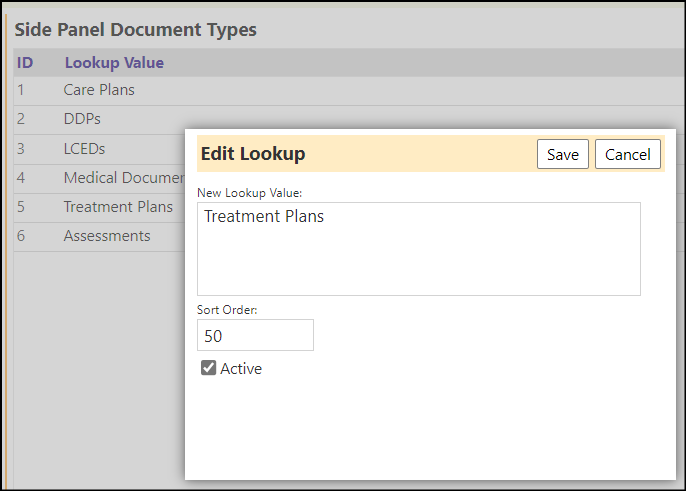
- The setup is configured in the Lookup Lists. Selecting the "Active" checkbox sets the display to be 'True', allowing the icon to display on the screen.

Enhancement to Account Roles - New Child Account Roles
- An account role can now consist of one or more Child Account Roles.
- This not only makes it easier to create a new role that combines the security rights found in other roles, but it also makes it much easier to maintain. Instead of creating a new role that combines the functional and entity rights found in Account Roles A, B, and C, we now create a new role and add Child Account Roles A, B, and C, so it is quicker to create... and, if it is decided that Account Role B needs a new privilege, adding it to that Account Role will automatically update any Account Role which has Account Role B in it as a Child Account Role.
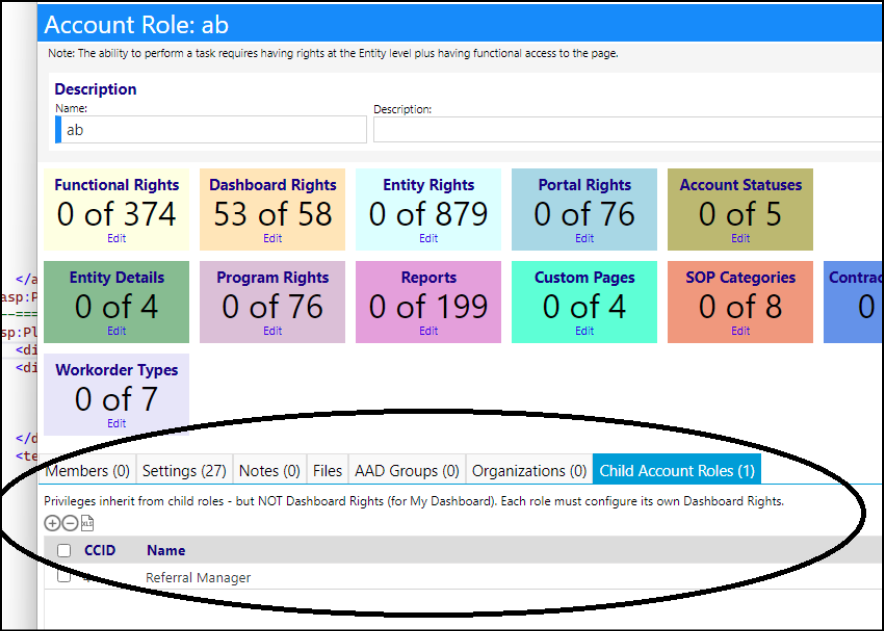
NOTE; For the purposes of SSO (Single Sign On), AAD (Azure Active Directory) does not care about child roles. The user would only need to be in AAD for the aggregated role. Child roles have nothing to do with AAD.
Enhancement to Care Plans - Changes to Approvers
- Approvers can now be added ad-hoc on care plans and care plan addendums. The plus button will bring up the same add window as when adding approvers to care plan types.

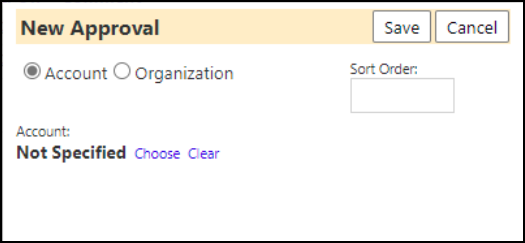
- Approvers can still be added to care plan types in Configuration - but now, when a care plan is created, the approvers from its care plan type will be copied over to the care plan. So it's like setting up a default list of approvers that users will usually want on every care plan, but the approver list can be modified on a per care plan if desired, by clicking on the + or - button.
- A change was also made so that when an approval is submitted, but the status is not "approved", a button with the action "edit approval" will display instead of the only action being to un-approve. Editing the approval will bring up the same submit window as the approval, but with the status and comment pre-filled.
- Only the "approved" status will count as approved now - before, if any status was submitted, it'd count as an approval (and the counts saying things like "1 of 3" for approvals would increment, now that count only increments if it's actually approved.)

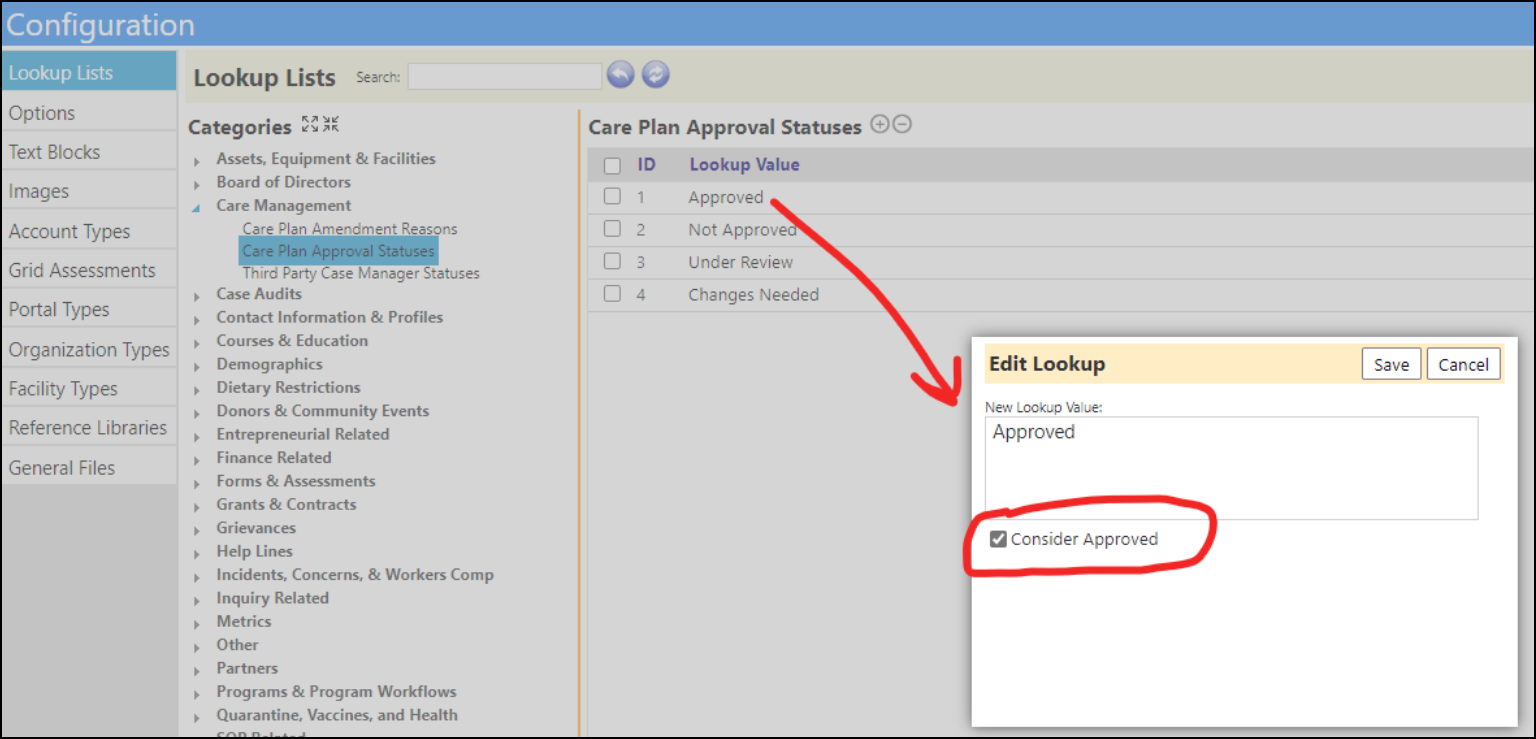
- Administrators can edit which statuses count as approved in Configuration. If a status named "approved" exists, that will default to have approved set to true.
Case Audit Enhancement - Multiple Changes
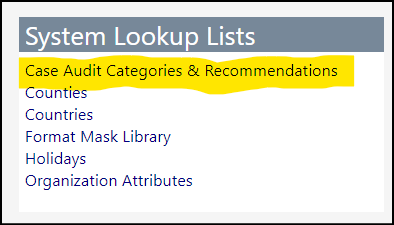
- The Case Audit setup in the Configuration Reference Files has been renamed from 'Audit Recommendations' to 'Case Audit Categories and Recommendations' to make it easier to find the setup.
- Case Audits are now linked to Corrective And Preventative Action (CAPA) forms.
- On Case Audit View and Edit screens, a new tab for linked CAPAs has been added. Users can add or delete CAPAs and the displayed ID is a link to the CAPA document.

- A free text Audit Location field has been added to the Case Audits.

- A count has been added to the Note and Tasks tabs, for those associated with the audit.

- When the AuditQuestion entry method is selected for a question, it will appear on the form as shown. The choices are fixed and the values for those will be saved like the other radio buttons do. The "None " next to findings is a link which displays a number there are any findings, or "None" if no findings were found.
- The form will now be saved every time findings are entered resulting in the count increasing.
- This same solution applies to the Recommendations Link button.

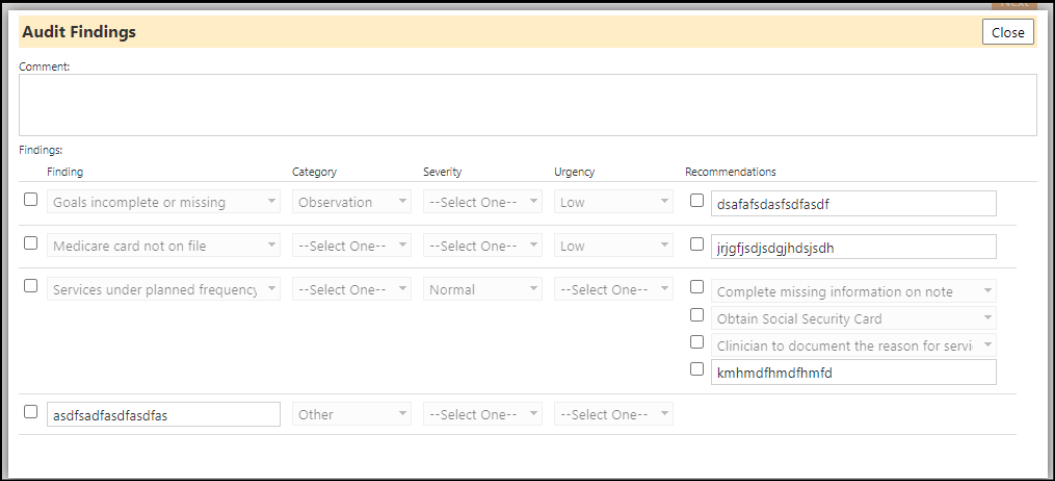
- Clicking on the Findings or Recommendations links, brings the user to a new Audit Findings screen. Pressing the + button next to "Findings:" or ("Recommendations:") creates a new row. Pressing the N button creates a new row, but with a textbox instead of a dropdown so users can enter a custom finding (or recommendation). The checkboxes allow users to delete rows like done in other places.
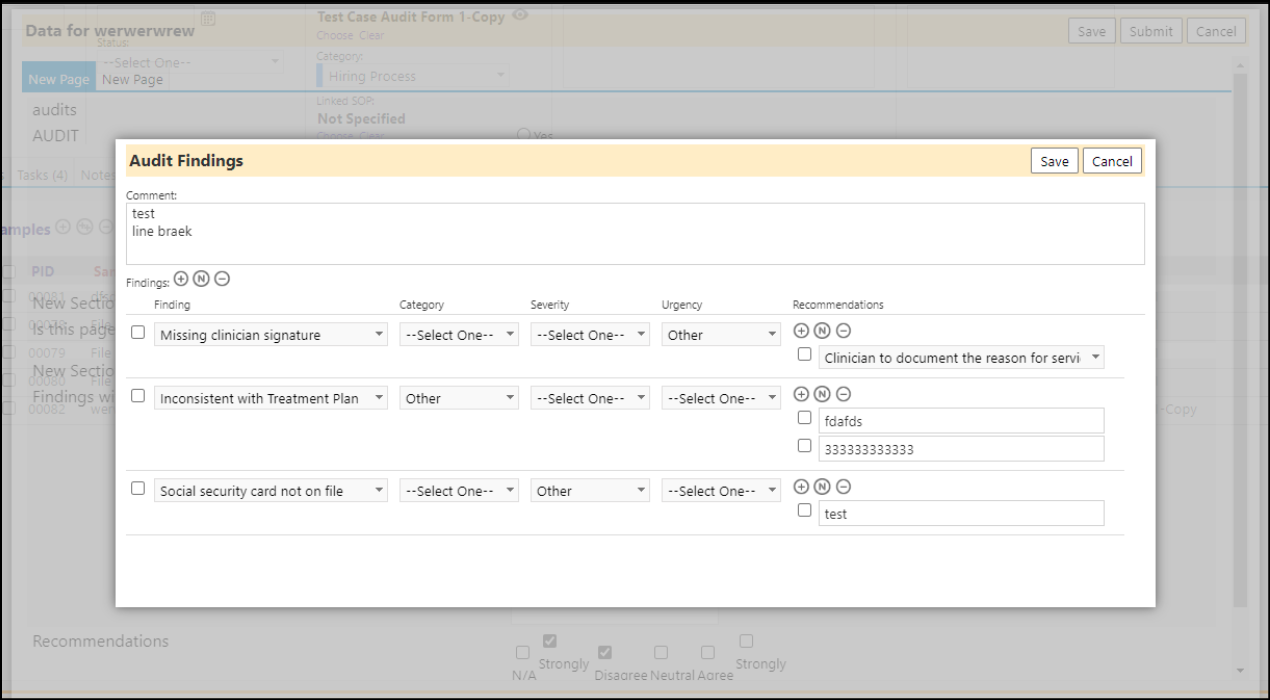
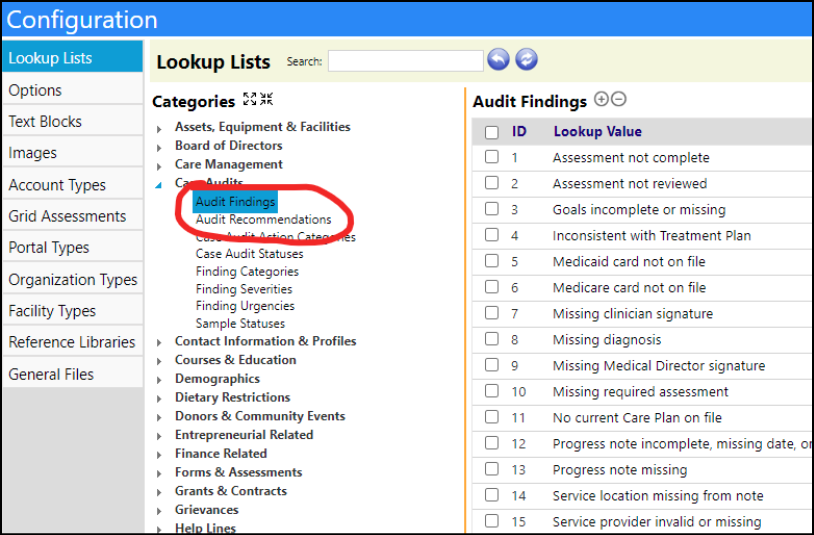
- The lists of standard findings and recommendations can be set up in the Configuration Lookup Lists in the Case Audits categories.
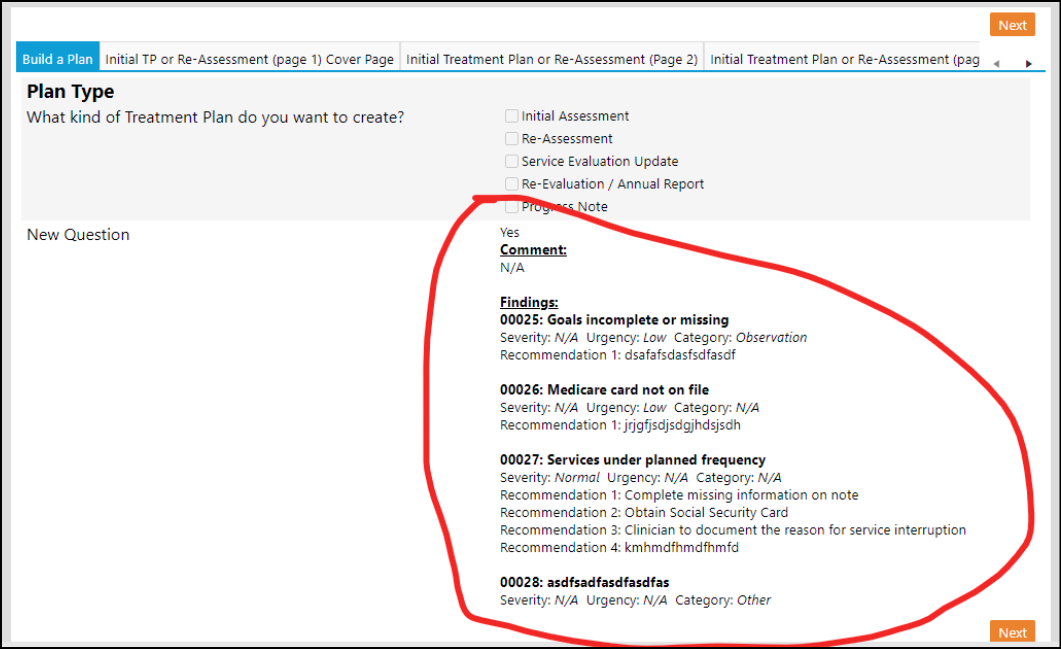
- When printing the Audit Form, it will display all findings and recommendations as entered.
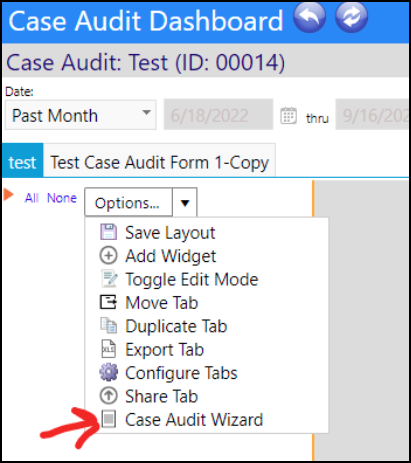
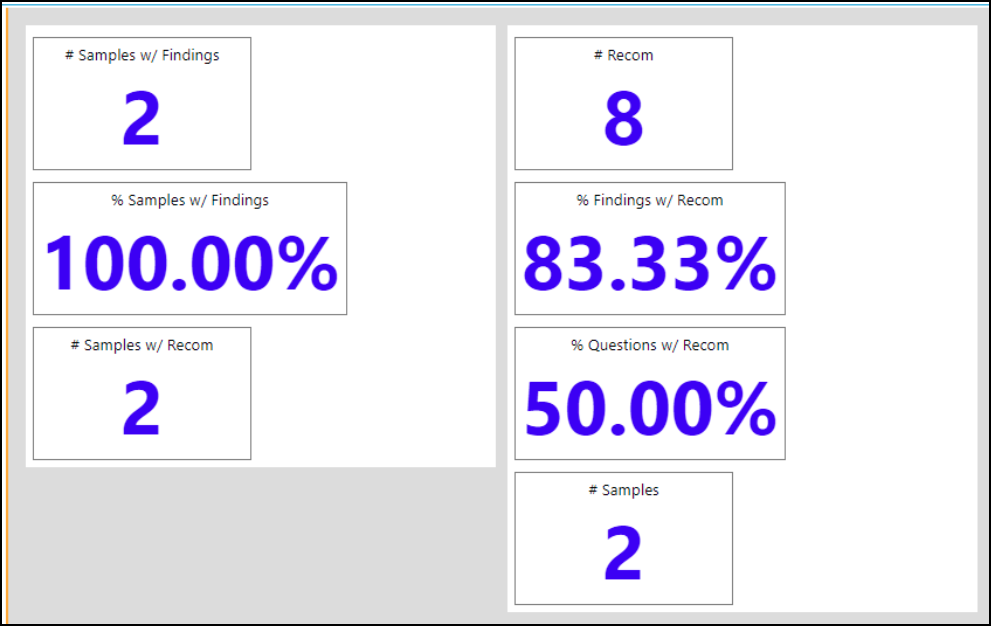
- When invoking the report builder from the case audit dashboard, you get new options to add to the dashboard.
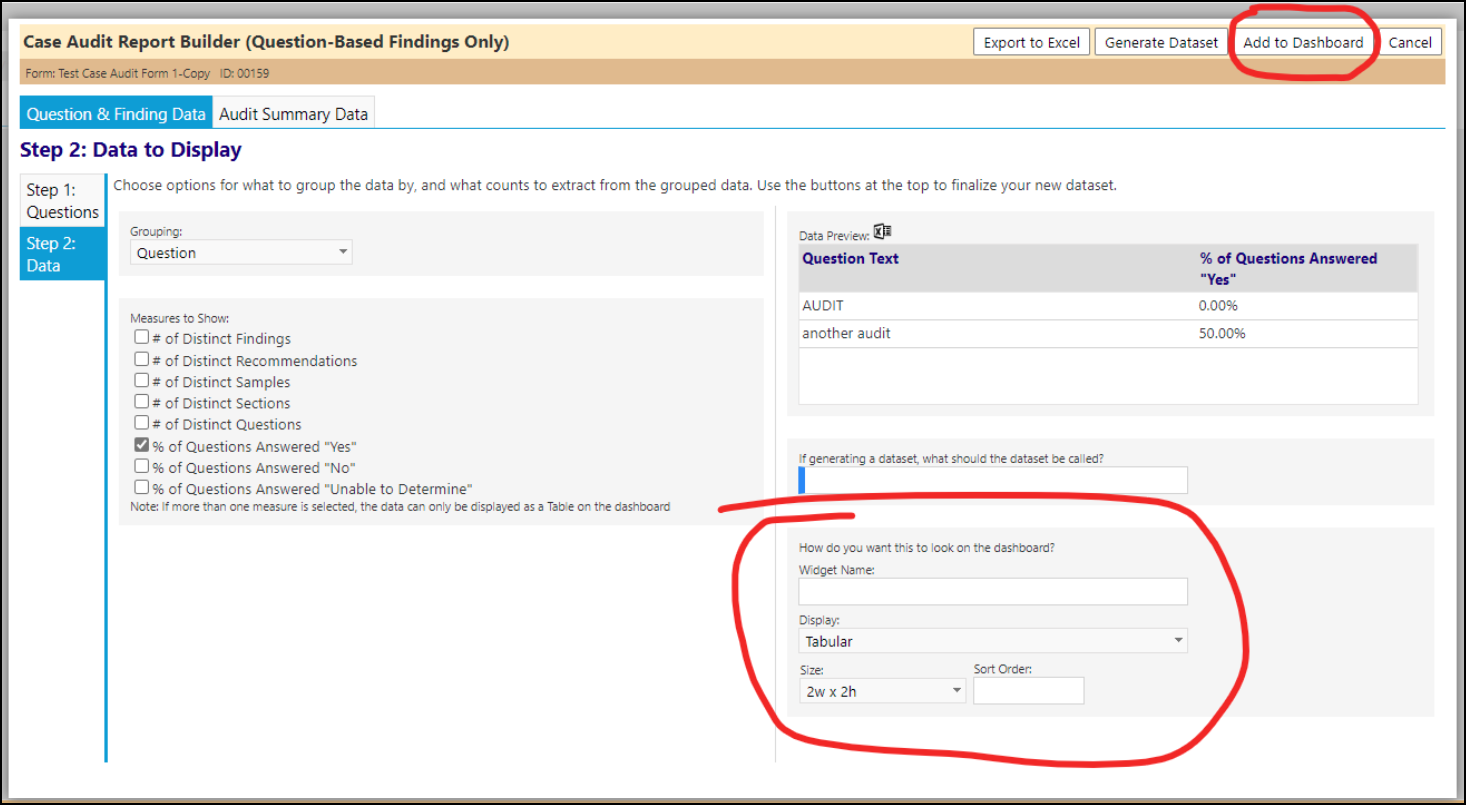
- Build a dataset like normal with the user filling out basic dashboard chart information on step 2. Only datasets that use one "measure to show" can display as graphs, otherwise the only option will be tabular. Clicking "add to dashboard" at the top of the window will place the dataset on the dashboard. If it's the first time creating a dashboard widget through the report builder, it will create a special new tab named after the form linked to the case audit (the name can be changed in configuration).
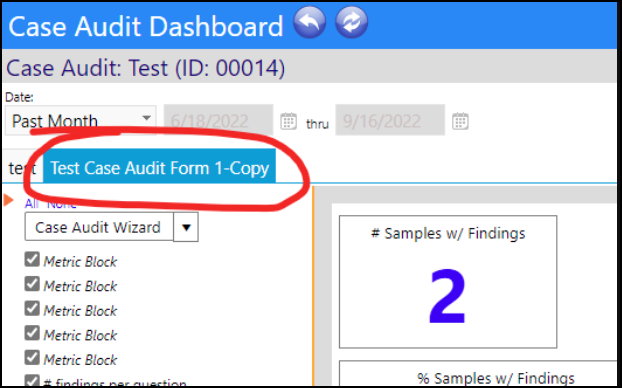
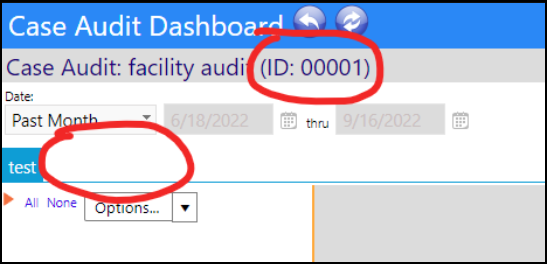
- This tab is linked to the form on the case audit. This tab will only display on the dashboard if the case audit (refer to example ID 00014, below) is linked to the form "Test Case Audit Form 1-Copy". Otherwise, the form will be hidden. Viewing the case audit dashboard with a case audit that uses a different form, causes that tab to not display:
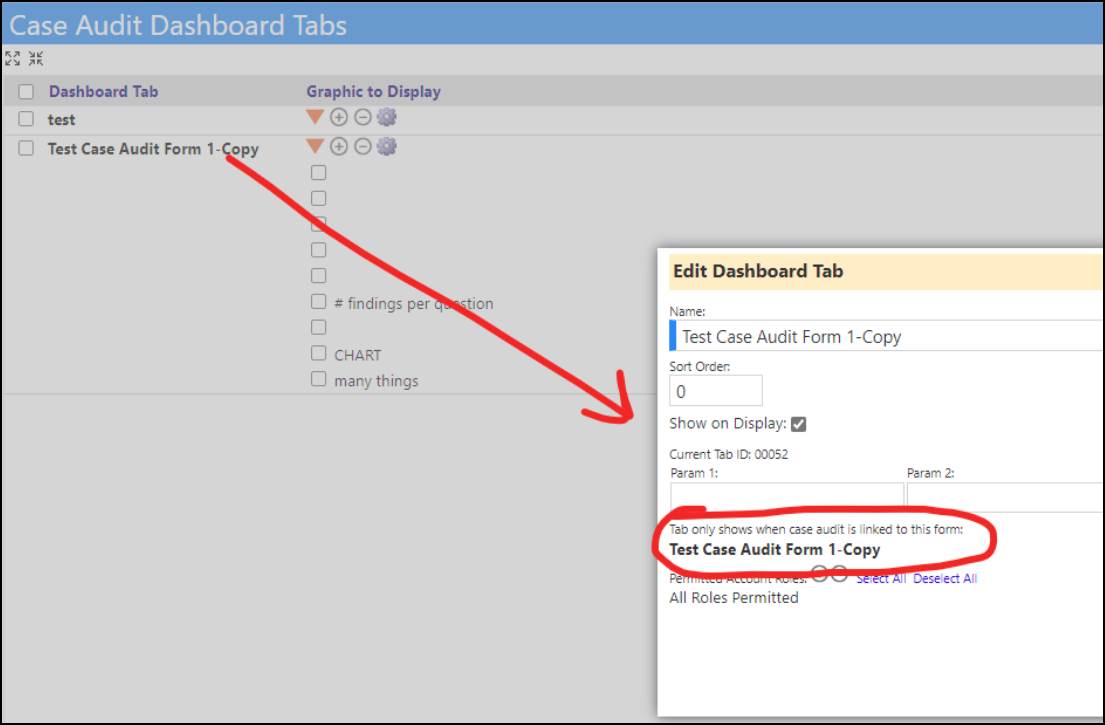
- Accessing options > configure categories, and clicking on the tab the report builder created, the user can see what form it's linked to. This form linking is not currently user configurable.
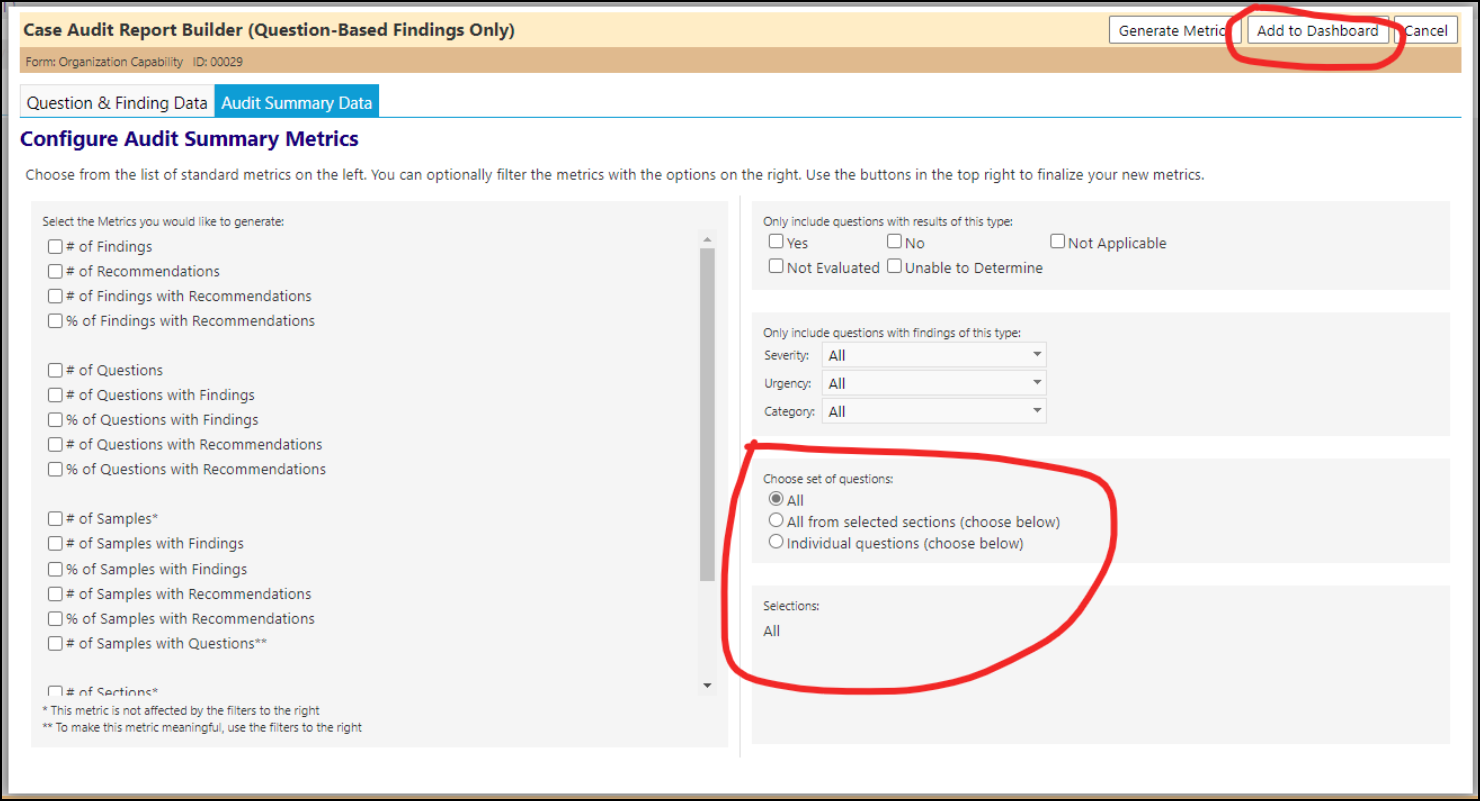
- Metrics can also be added to the dashboard through the report builder. Using the Audit Summary Data tab to get a new add to dashboard button at the top, users can add a new section/question chooser to this tab, the same as the one on the dataset tab.
- Since users can create multiple metrics at once, they get grouped together in bunches of 4 on the dashboard.
Enhancement to Case Managers - New Filters for Program Case Managers
- imPowr supports both an agency level case manager (sometimes called account case manager and sometimes just called case manager) and it supports program level case managers (program case manager). There are sometimes 3rd party case managers also assigned from external agencies (for Life Plans).
- Case Managers are displayed on multiple screens but the main ones are:
- program details
- account profile
- account list
- program activity
- Program Case Managers come from the Job Counselor or Program Case Manager listed on Account Programs.
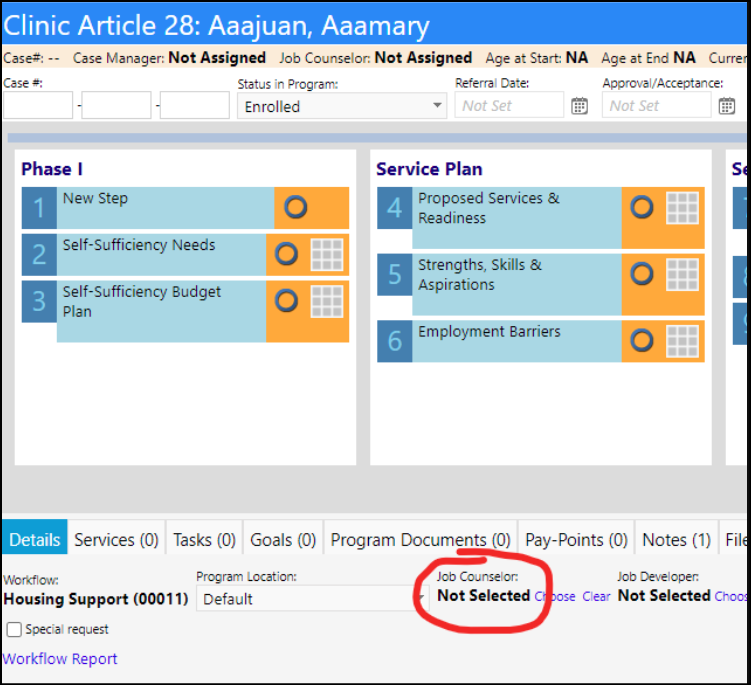
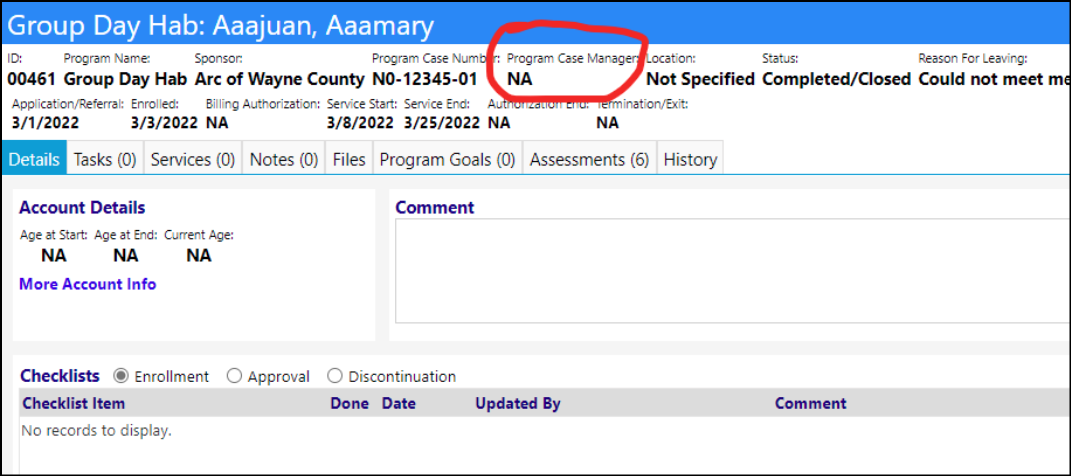
- To aid in finding needed data, a new Program Case Manager filter has been added to the Client list (account list but only in client mode), Referrals list, and Assessments list.


Customer Invoice Enhancement - Locations Added
- Users can now optionally display delivery locations in the Customer Invoice list, used with Entrepreneurial Tools.

Enhancement to Dashboards - Multiple Changes
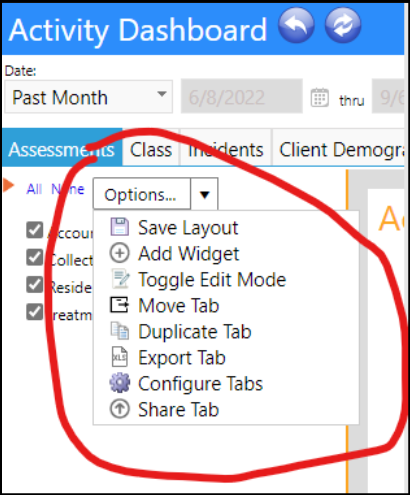
- A change was made to the Dashboard Edit icons. They used to look like this:
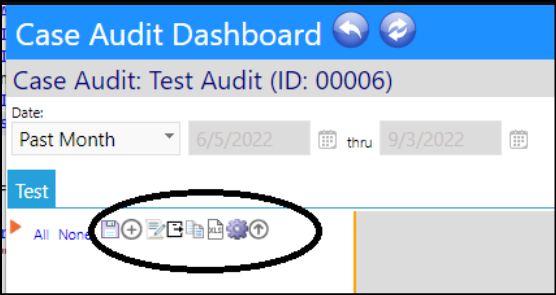
They have now been changed to a drop down list to make them easier to see and use:
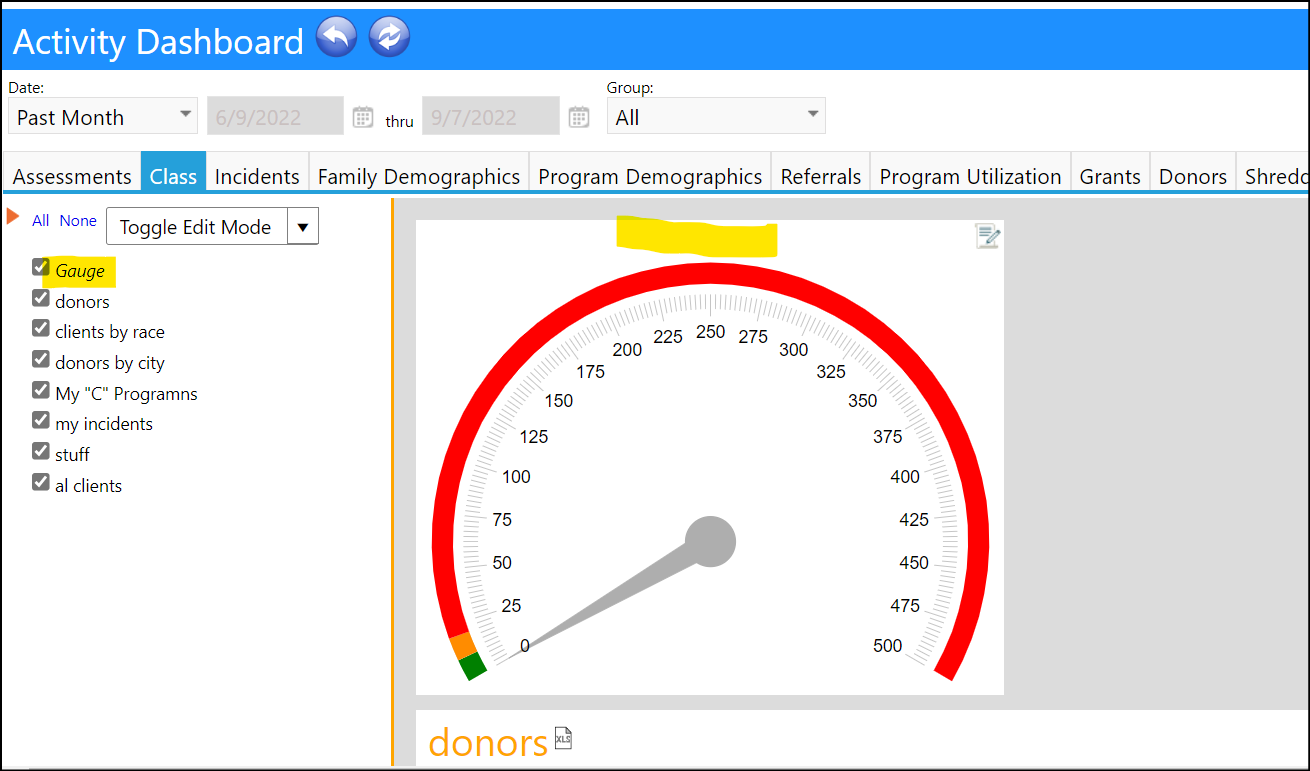
- Often, the widget name is the same as the data being displayed, especially when displaying only one metric.
- To make this display better, a change has been made so widget names are no longer required.
- When a user creates a widget and chooses to not enter a name, the widget name will reflect the type of Metric being used (such as a gauge, a dataset, a metric block, etc.) in italics.
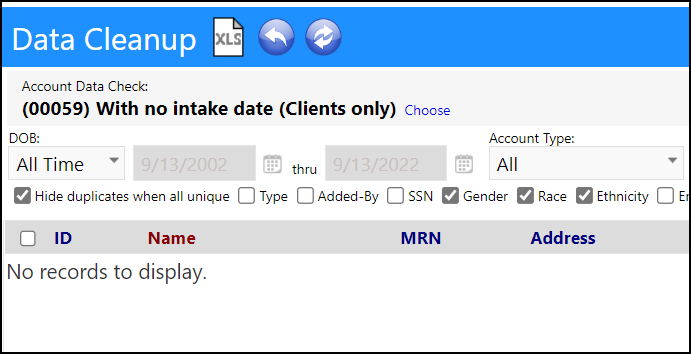
New Data Cleanup Tool - Missing Intake Dates
- A new Account Data Check has been added to the Data Cleanup tools - Client Accounts with no intake dates.
Enhancement to Entrepreneurial Tools - Multiple Changes
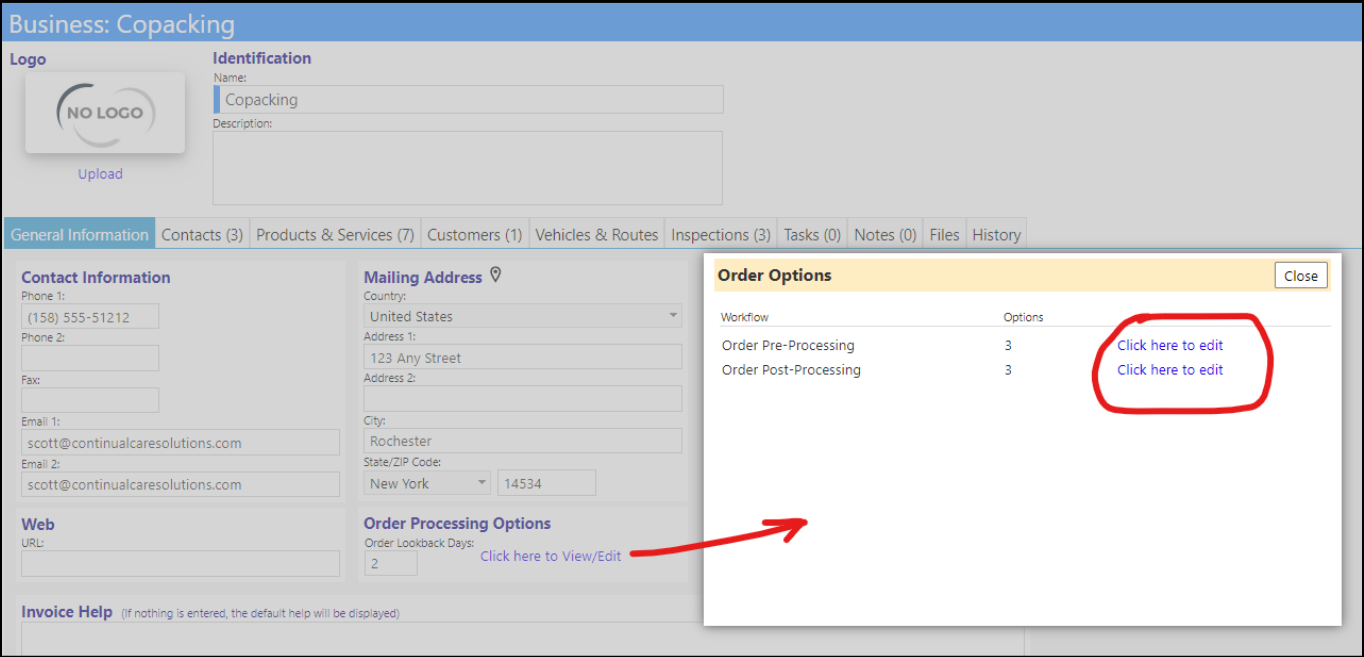
- When viewing an order from the process orders screen, new sections will now only show if pre-processing or post-processing has been performed.

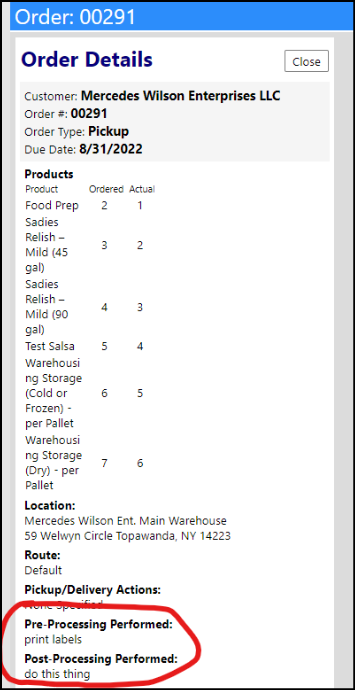
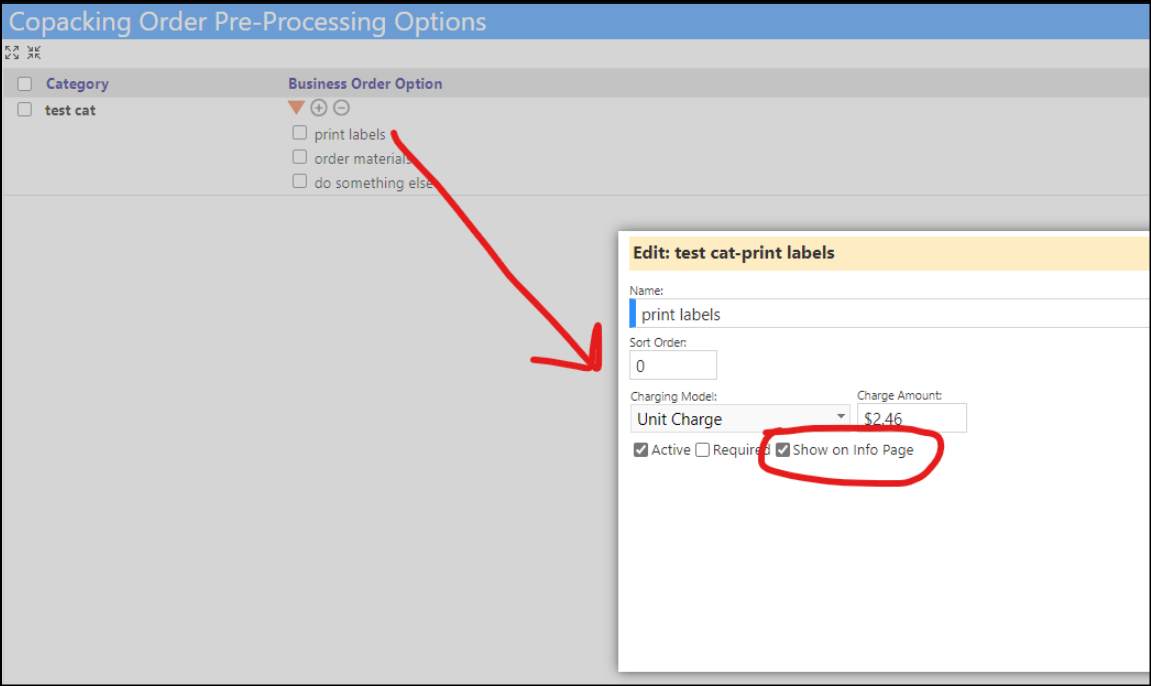
- Only pre or post processing tasks marked as "show on info page" will appear on this list.
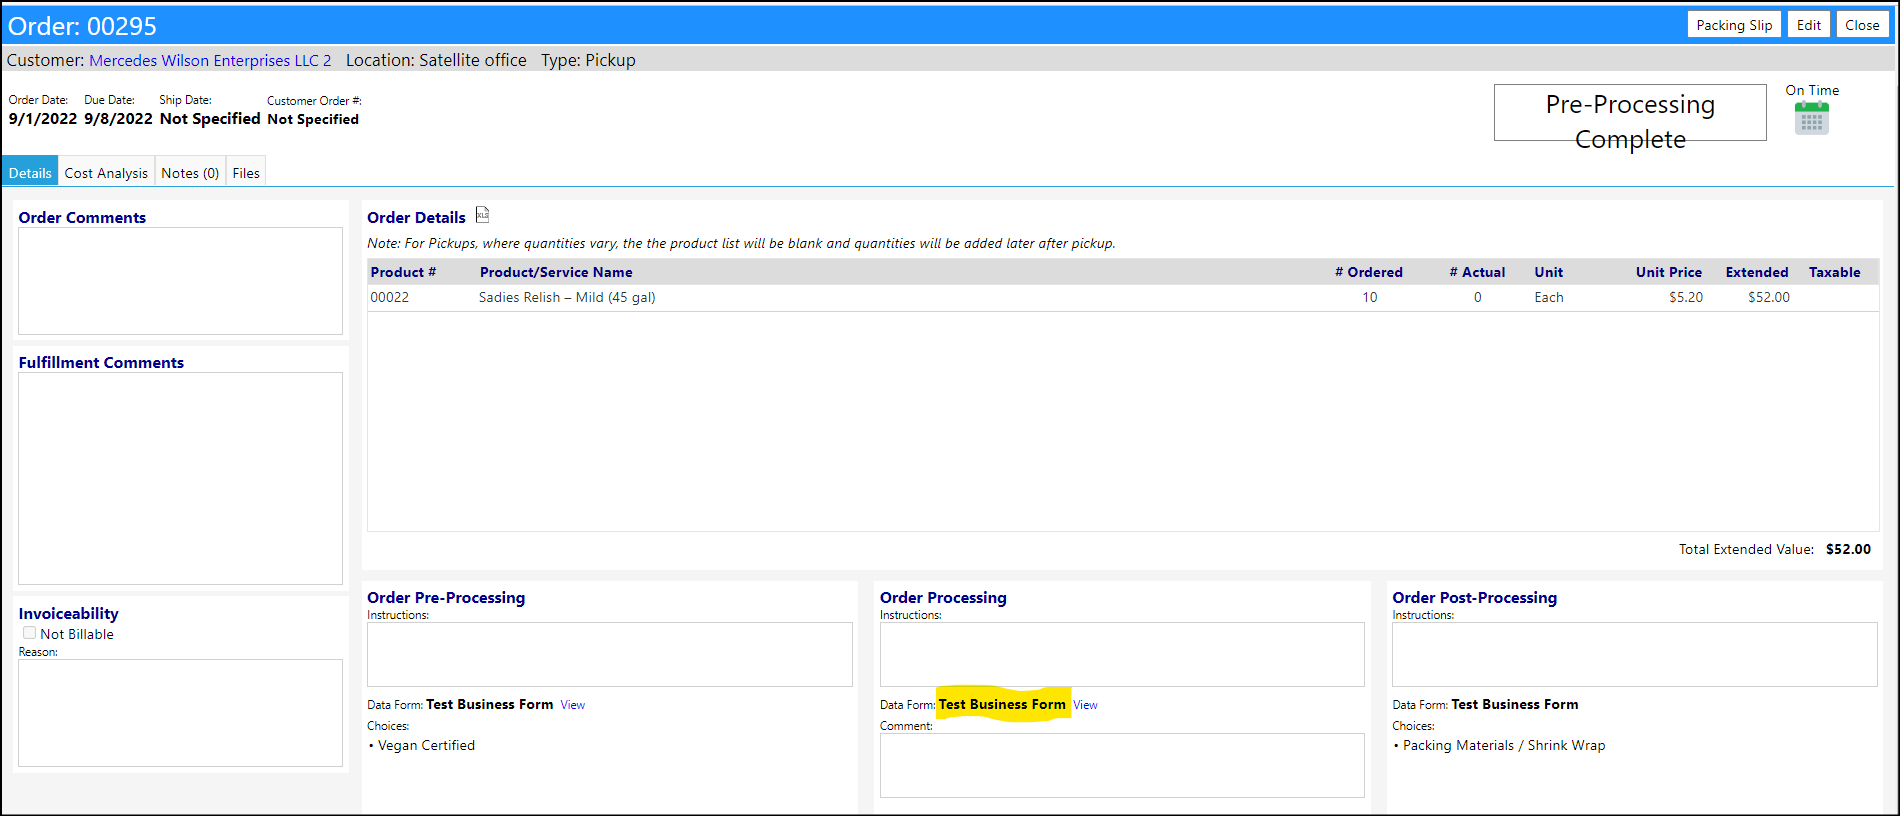
- Users can now create Business related forms and attach those forms to an order so they can be accessed during pre-processing, order processing, and post order processing. These forms can be used as instruction sheets, places to capture data, etc.
- The forms are created in the Forms Library, in the Business tab, and are created like all other forms.

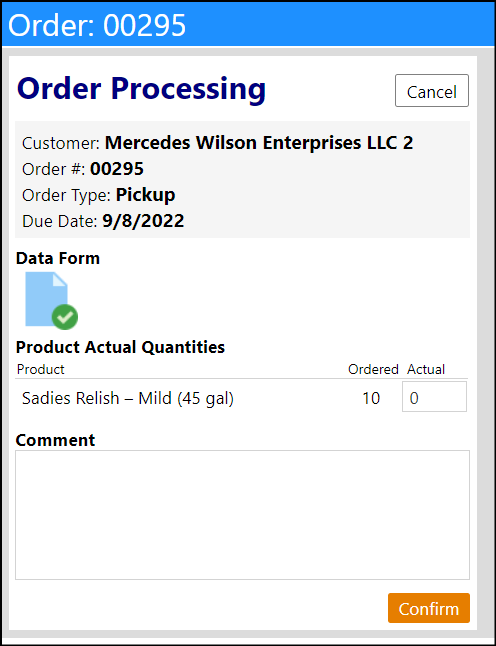
- The forms are attached to the bottom of the order, and display in the order processing panels. Separate forms (or the same form) can be selected for the pre-processing, order processing, and the post processing sections of the order.
- An inventorymanagement multi-select option for businesses has now been added. Inventory management is designed for Delivery orders only and not Pickup orders. The reason is that we have no way to know if a picked-up item is placed back into inventory or not.
- For Delivery orders...
- Upon completing washing, the system defaults to Add to Inventory. This occurs at the time the wash confirmation is completed.
- Upon fulfilling a delivery order, the system defaults to Deduct from Inventory.
- When rolling back a delivered order (i.e., setting the status from fulfilled to not delivered), if items were removed upon fulfillment of the order, they are restored back to inventory
- When cancelling a delivered order (i.e., setting the status from fulfilled to cancelled), if items were removed upon fulfillment of the order, they are restored to inventory
- When deleting a fulfilled order, since we don't know what the reasons were for deletion of the order, the inventory is left as is (i.e. do not restore any committed materials). This will hopefully never happen, but if it does, inventory will need to be manually adjusted to include or not include restoral or any other partial adjustments
Forms List Enhancement - Translating Forms to Other Languages
- When translating forms to another language, sometimes the name of the form is no longer recognized. A new change has been implemented which allows users to identify the form with an English Alias name, and specify the language the form has been translated to.
- The setup is done in the form's Page Usage (Edit) Settings.
- Both the Alias and Language can be optionally displayed in the Form Library list.


- A change was also made so that when a form is translated, the system will automatically try to capture the language the form was translated to and will change the form's language field to reflect that language. If no match is found, it will do nothing.
New Note Tagging Feature
- This feature is only available with special entity right privileges.
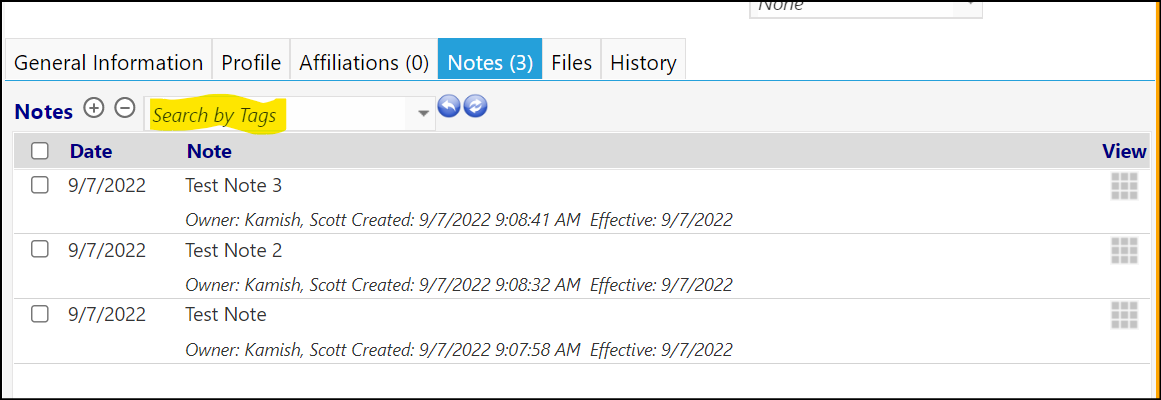
- Note tagging allows users to tag notes, and filter notes by that tagging.
- If a user does not have this privilege, they can still use tags, but they can only use tags that have already defined and can't create brand new ones. Once they have the appropriate security rights, they will be able to create their own tags. As users begin to type their tag, they will receive suggestions based on other tags that have been used for that entity (all accounts, all assets, etc depending on what the note grid is attached to). If they type something new and press enter, it'll be created as a new tag as long as they have the corresponding "new note tags" privilege.
- Only specific pages support Note tagging.
- As long as a user deletes every use of a specific tag, it will no longer show in the list of suggestions. That list of suggestions is made up of the list of every unique tag from every note of the current entity type. For example, if a user is adding tags to an account note, the list of suggestions will be every unique tag on every note under any account. But it won't suggest tags that were used on equipment notes. There is no centralized list of tags - they are only per-instance and have no way of showing up in other instances. Every instance will have a unique list of tags. If a tag shows in the tag filter or in the list of suggestions, it's because it's in use somewhere.

Program Workflow Enhancements - Multiple Changes
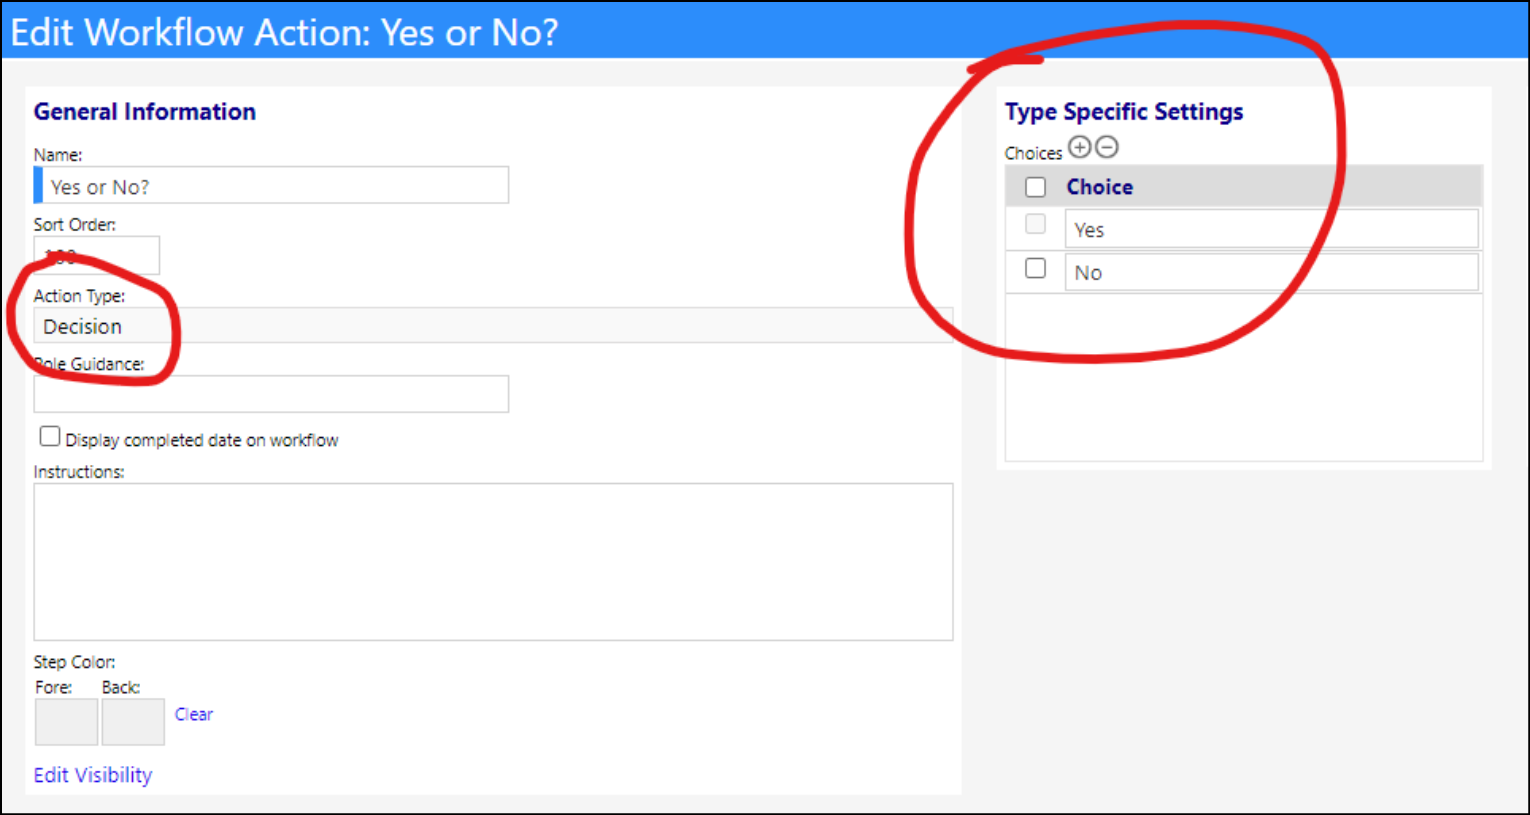
- Workflow decision steps now let users enter a list of choices. Choices that have been selected at least once will have their checkbox greyed out - hovering over the checkbox informs the users as well.
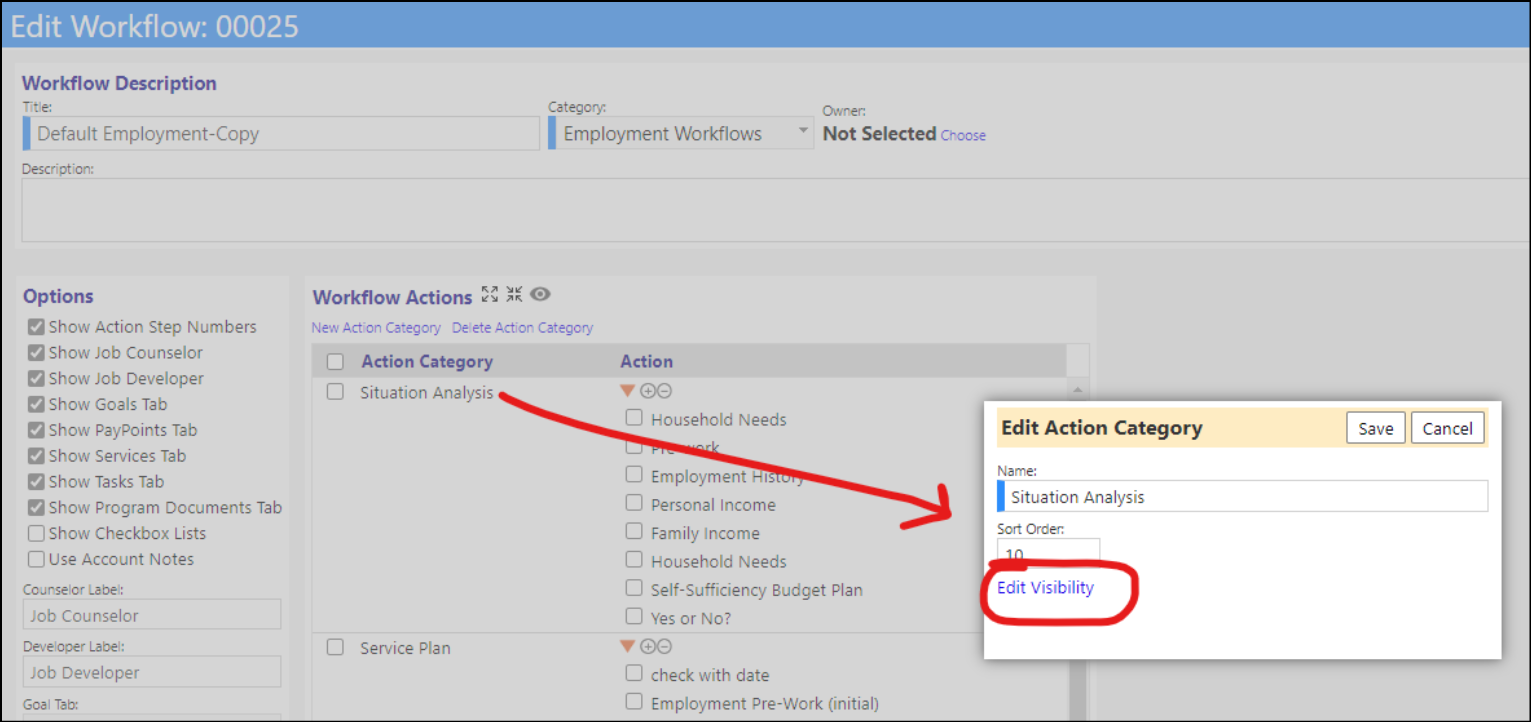
- On the workflow category edit window (or on the workflow step configuration screen like seen in the previous screenshot), users can edit the rules that control the category/step's visibility.
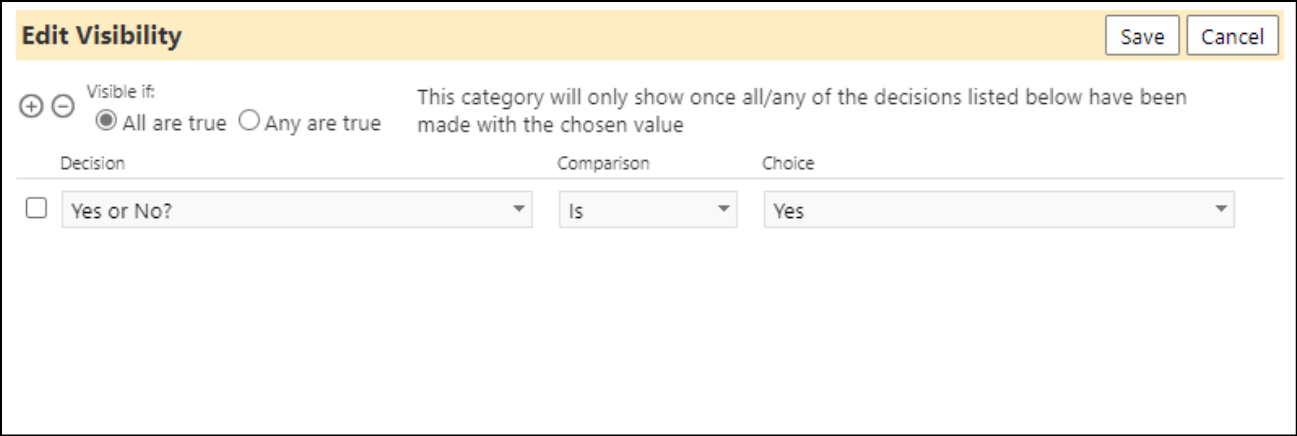
- Users can use the plus icon to add rows. Each row will let users choose a decision step on this workflow, then a choice for that decision. This is just a list of rules, and when all/any of the rules are fulfilled during the workflow, the category/step will show. If there are multiple rules in this window, use the radio buttons at the top to determine if it should show only once every rule has been satisfied, or if only one has been satisfied.
- When working with the actual workflow, the decisions are fully implemented. Click on one to view the list of choices.
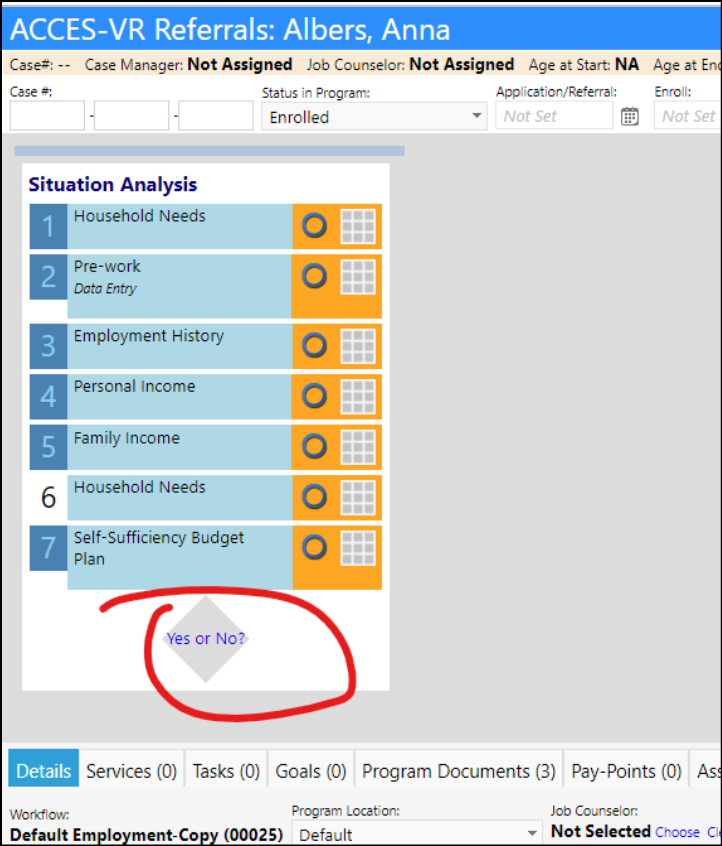
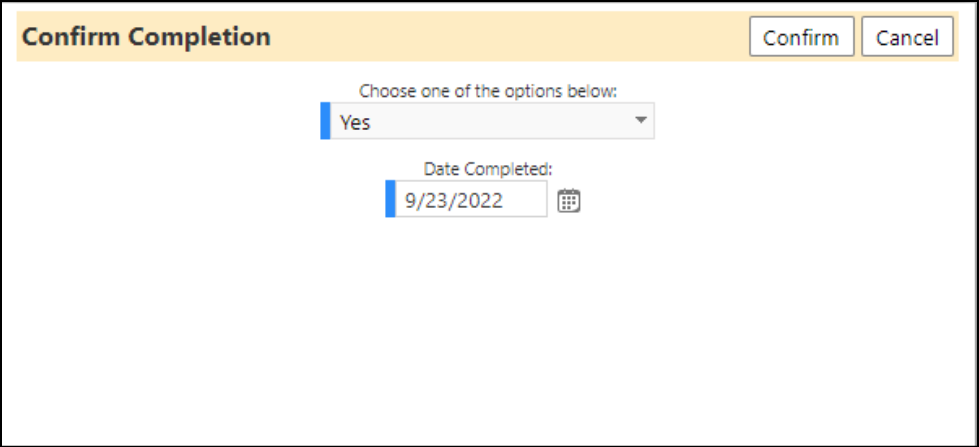
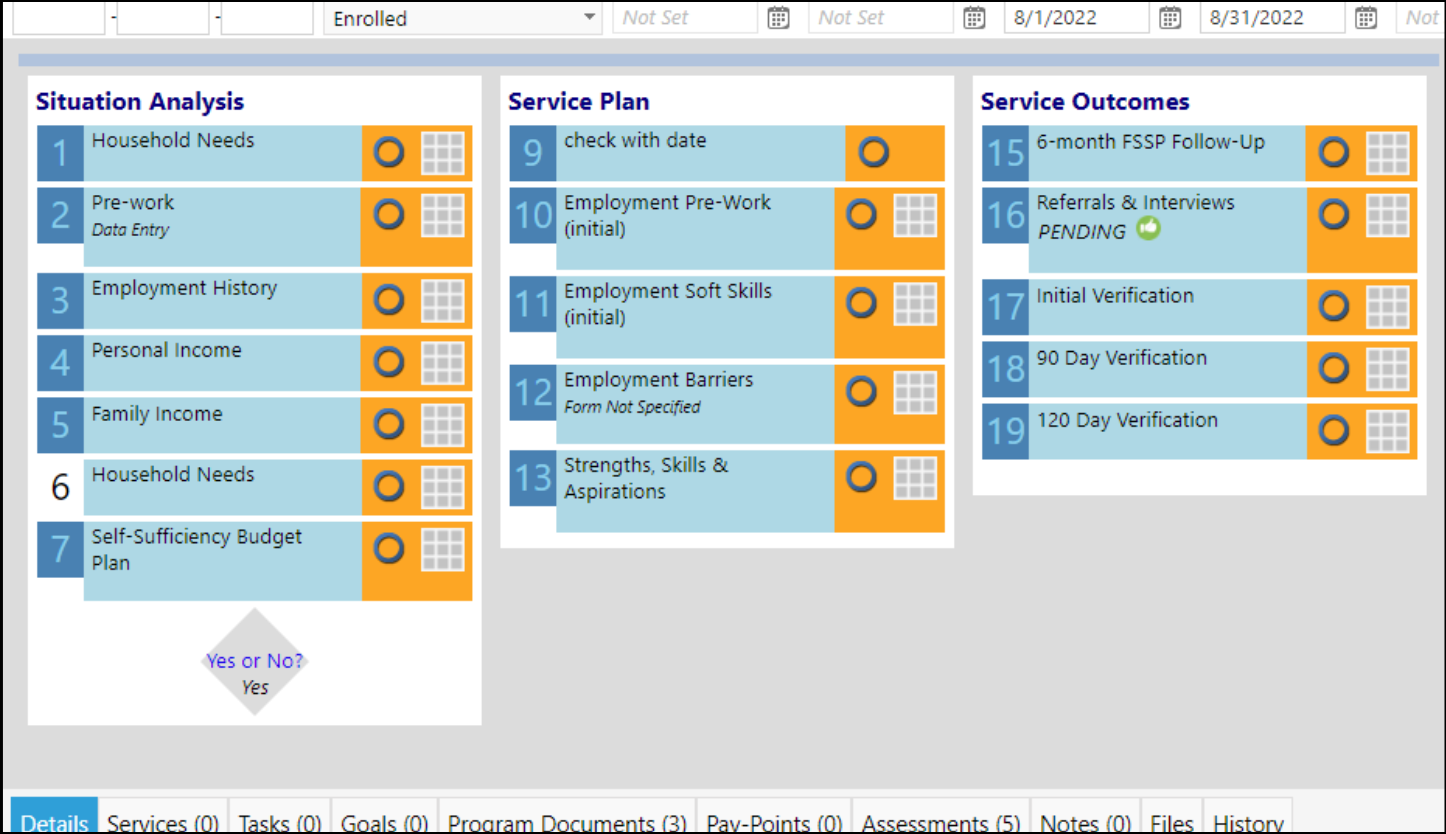
- When decision is completed with the choice "yes", the next two categories appear. In the following example, there are actually 4 categories in total - but categories 2 and 3 only show if the user answers "yes", and category 4 only shows if user answers "no". Notice step 14 is not showing - that is for demonstration purposes where a rule was added to make it never appear, so users can see these rules can apply the same to both categories and steps. The answer the user chooses for the decision also shows in italics under the decision diamond. If the user clicks the decision again, it will delete the choice previously made, which will hide these categories again until the user makes the decision again.
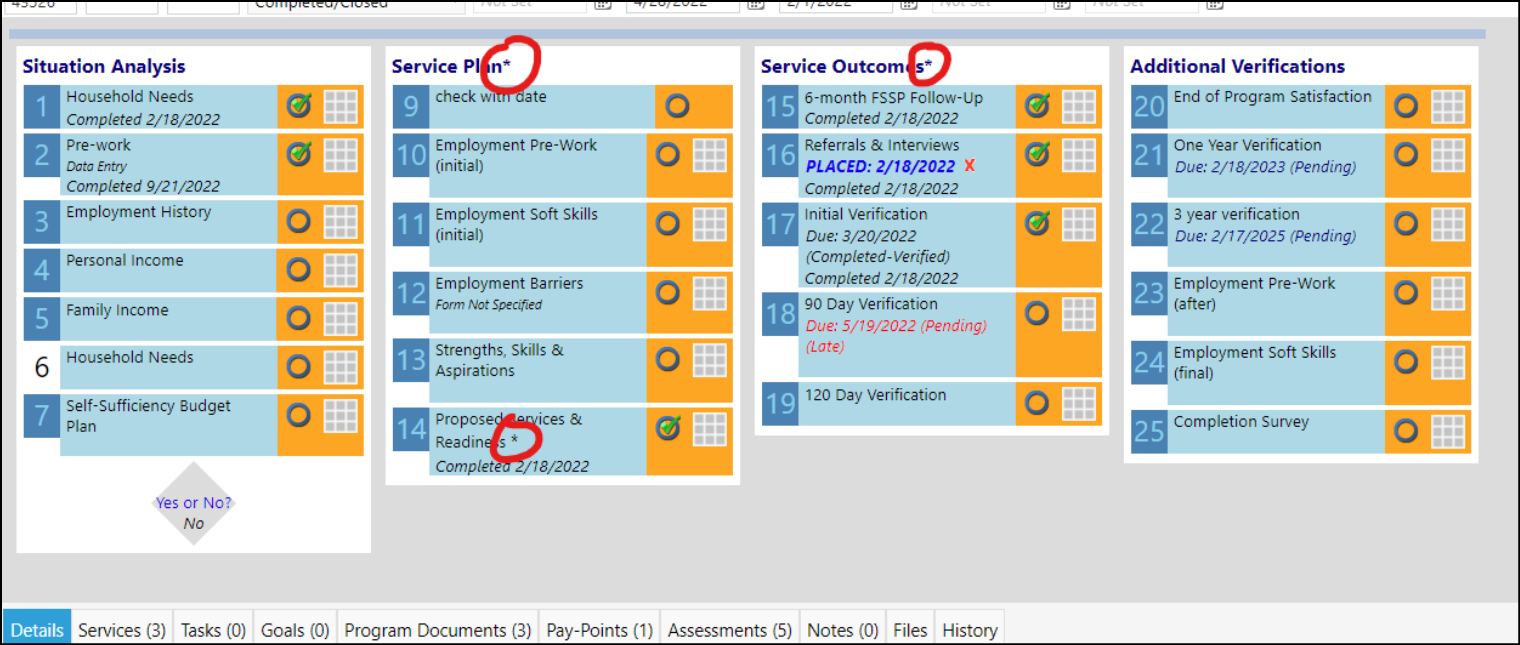
- An edge case worth going over, which is not expected to occur is once a step is completed, it will always show on the workflow, even if the rules say it should be hidden. For the above example, this can happen if the user answered "yes" to show categories 2 and 3, then completed some steps in those categories, but later removed their decision and changed it to "no". Normally, this would hide categories 2 and 3 and just show category 4. But since some steps in categories 2 and 3 were completed, those will continue to show, this time with an asterisk. Hovering over the asterisk will explain why they are showing in a tooltip. The same applies to individual steps - they will also get an asterisk if they are forced to show because they are complete.
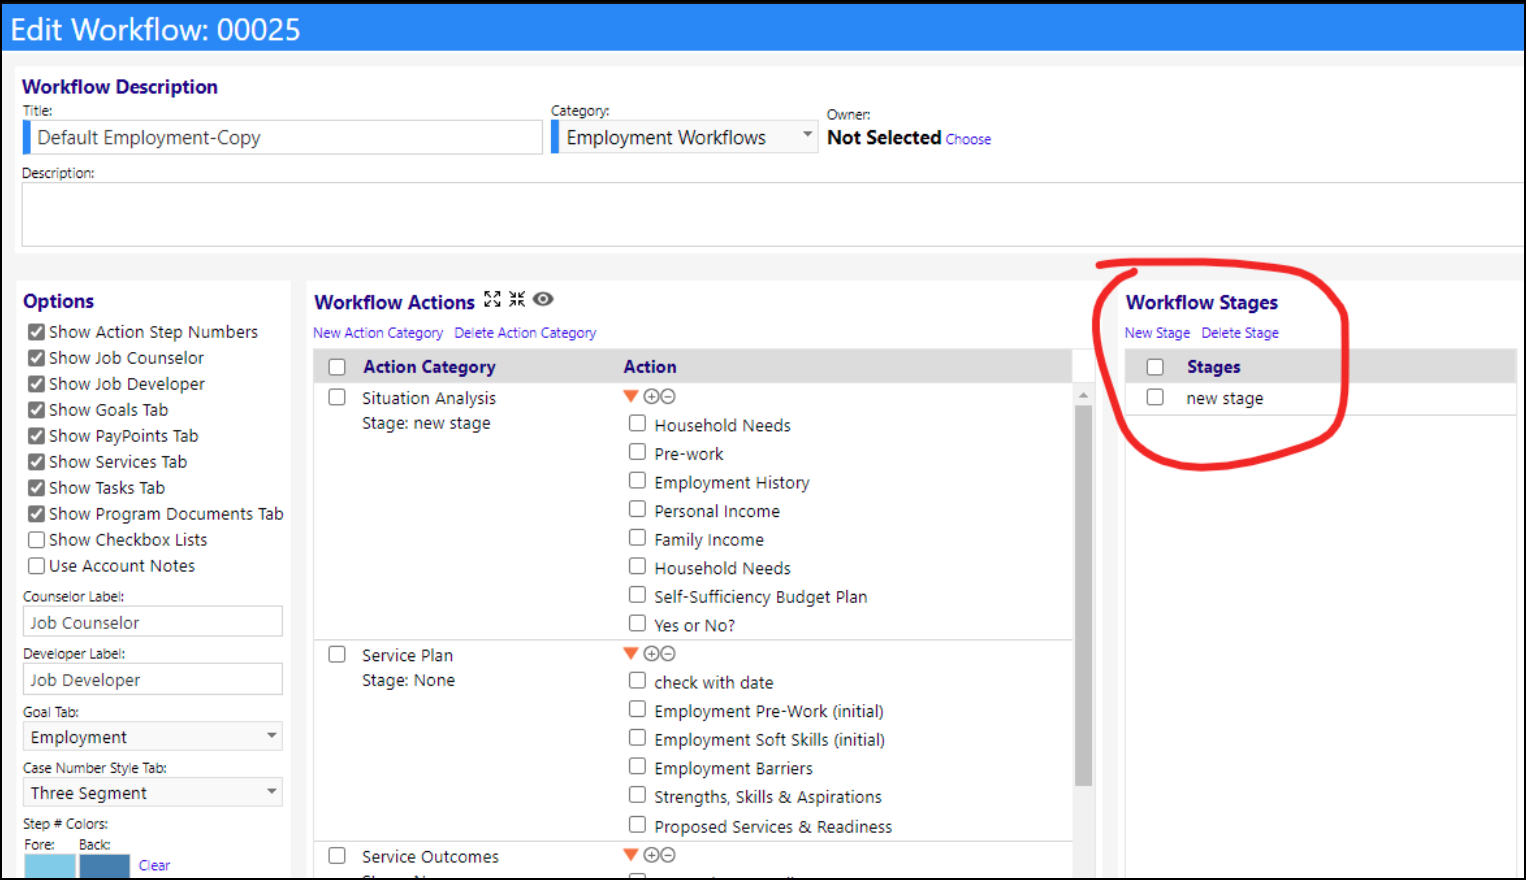
- Stages have been added to the edit mode of programn workflows to further enhance how they are displayed by grouping various categories into a single stage, and how users can search on the various process stages.
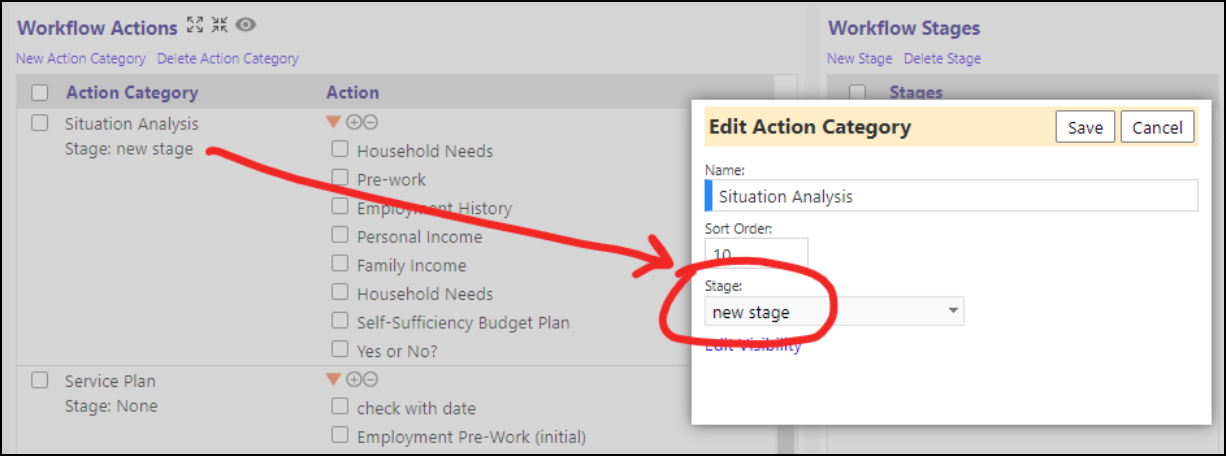
- Users can attach those stages to categories.
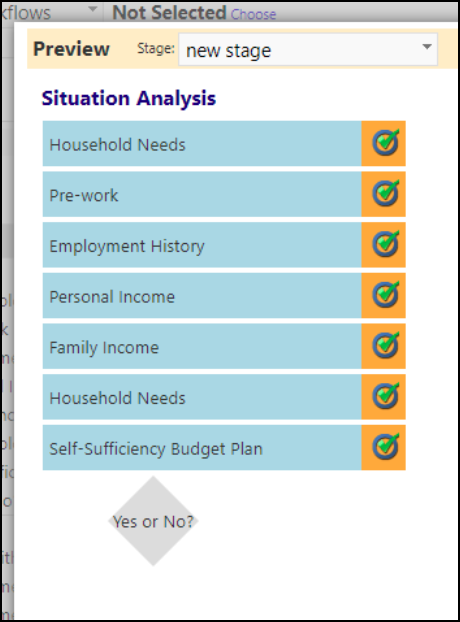
- The preview now has a filter for stage.
- The navigation bar on account programs now only shows if there are more than one stage defined, or if there is a single stage but some categories are assigned to the stage and some aren't. Any category not assigned to a stage will be put under the "Workflow" stage that shows at the end of the list.

- Stages are defined in the workflow configuration screen (this page was re-arranged a bit from the prior screen captures).
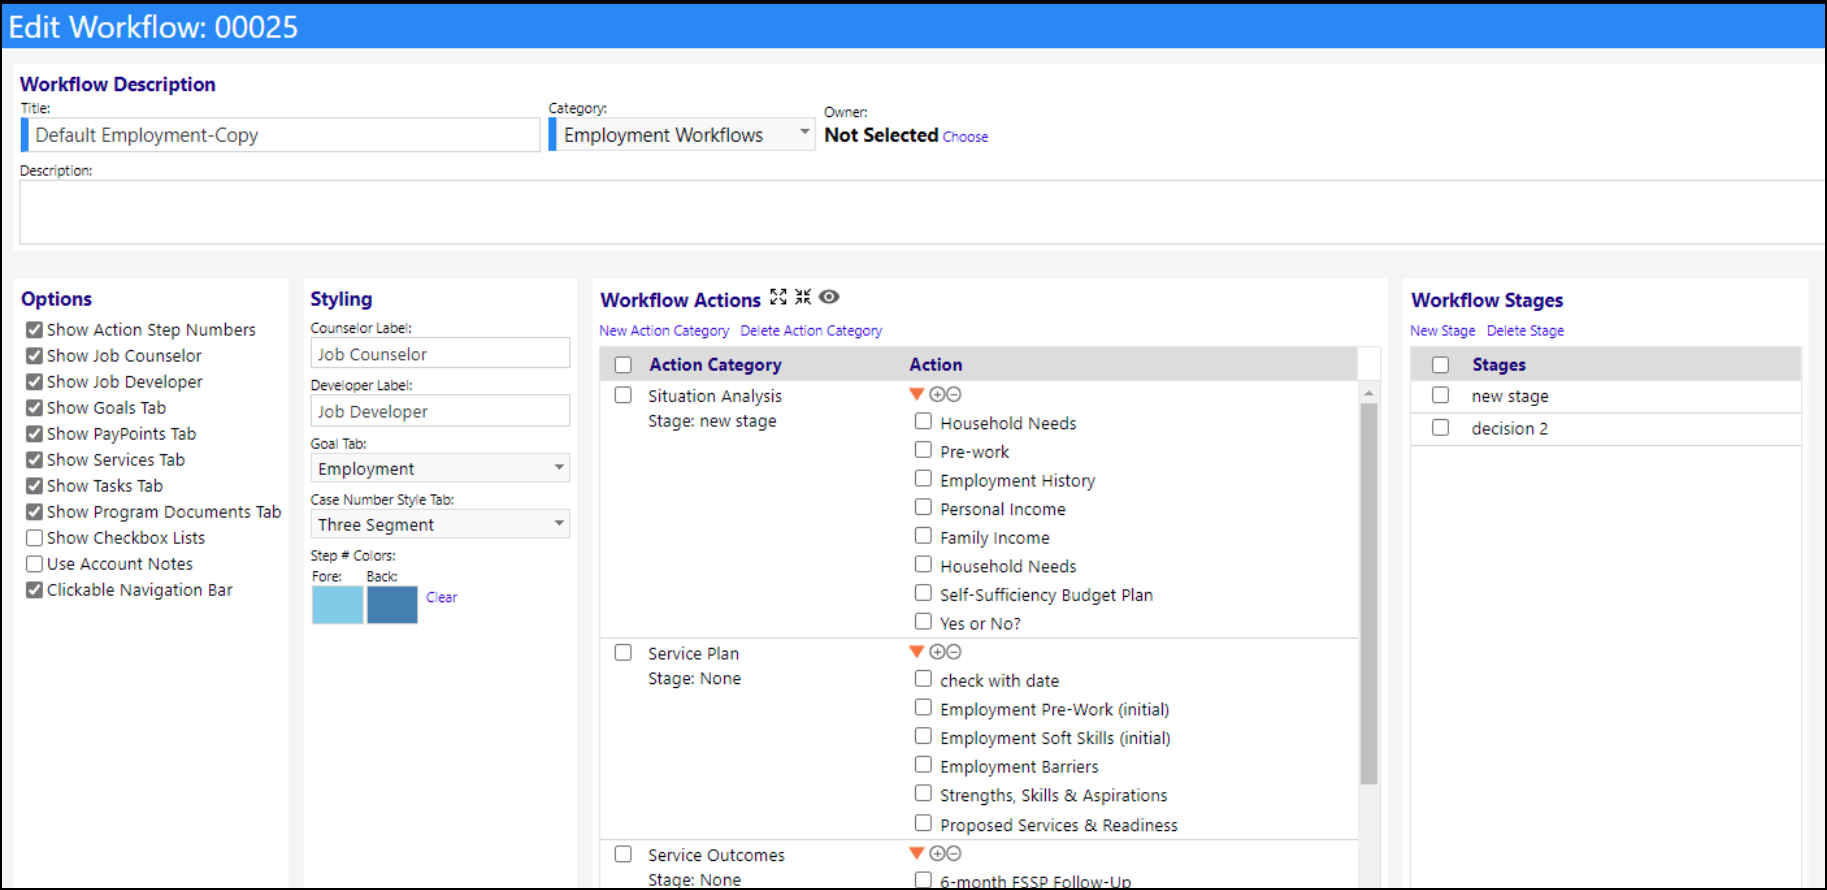
- There is a new option on this page - "clickable navigation bar". This is renamed from "auto-expand stages" in the original design. If this option is checked, the user can click on the name of a stage in the navigation bar, causing that stage to expand and causing the rest of the stages to be hidden. If that option isn't checked, the navigation bar will still show, but it won't be clickable. There is also an expand/collapse all button at the top of the account program page (circled on the first screenshot). The expanding/collapsing now gets remembered - so if a user leaves the page and comes back, it'll look like the way it was previously left. It saves this information per workflow, so if a user goes to another account program using the same workflow, it'll use that same remembered layout.
- An additional change made was the workflow legos now are uniform in size and line up properly now. This change involved making the workflow scroll horizontally, so if there are many workflow categories, it'll keep scrolling to the right instead of things stacking on top of each other.
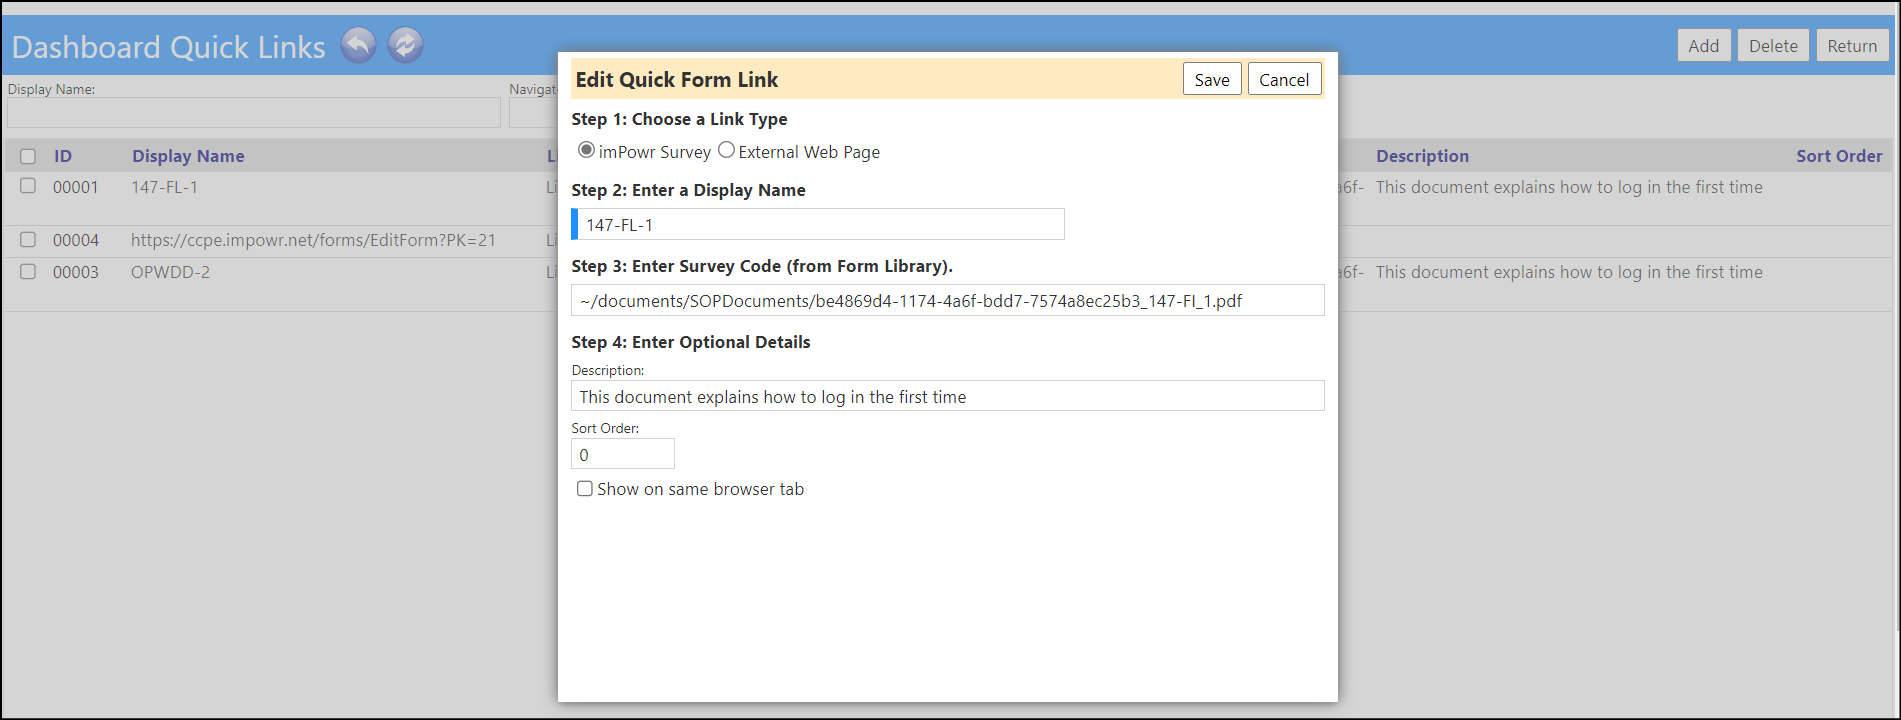
Enhancement to Quick Forms in Dashboard Workflows - Now Accomodates Links to Surveys
-
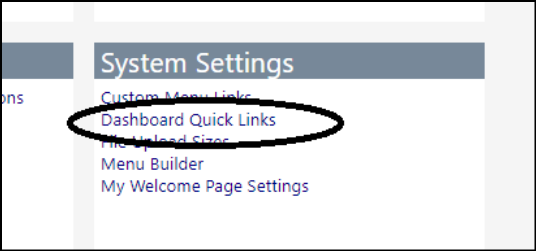
Users can now add a link to an internal or external document in Quick Forms, making it accessible via the Quick Forms workflow button on the MyDashboard page. This enhancement provides a solution to the problem of when it is difficult to find a document, people will not use it.
-
The link is set up in the Configuration Reference Libraries.
- For imPowr forms, users can enter the survey code from the Form Library. Users can enter instructions whether or not the form is an internal one.
