Asset Enhancement - Insurance Claims Displayed
- Assets have has been updated to display the linked insurance claims.
- The claims cannot be changed from this screen - they are display only. Claims are created in the Insurance Claims menu item, found in the Financial Analysis section of the Finance module.

Enhancement to Client List - New Filters
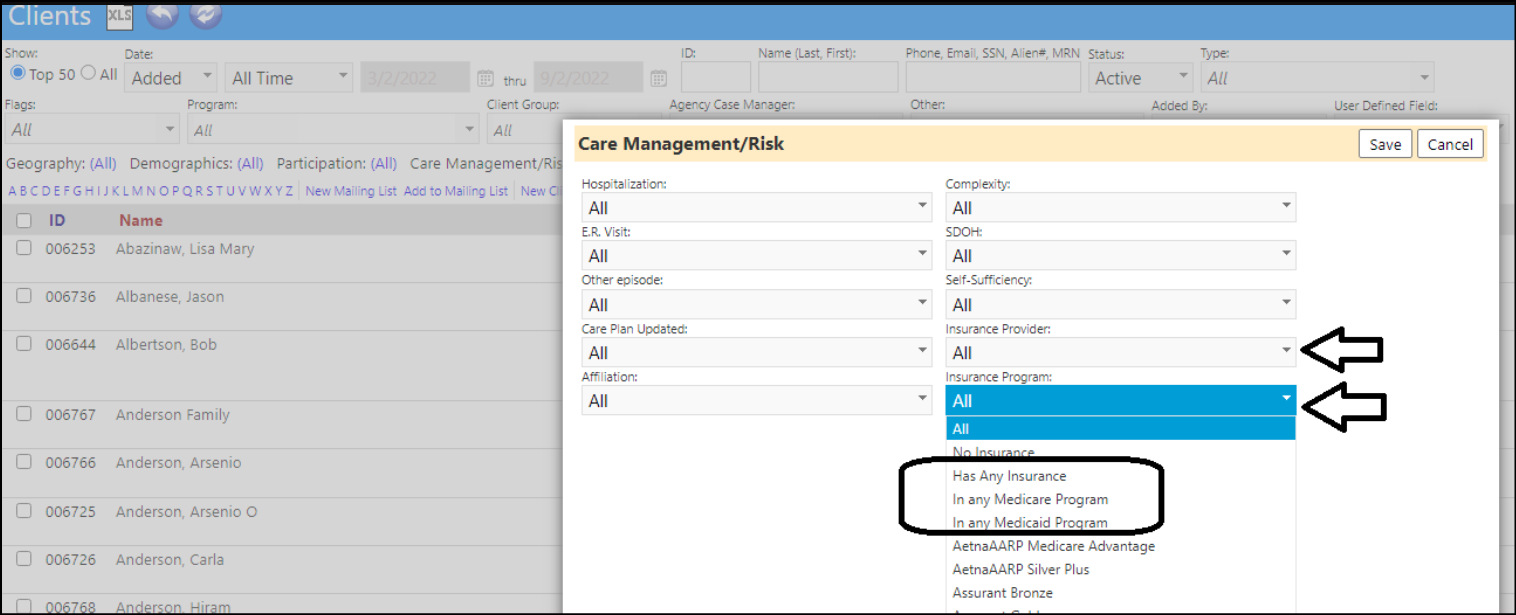
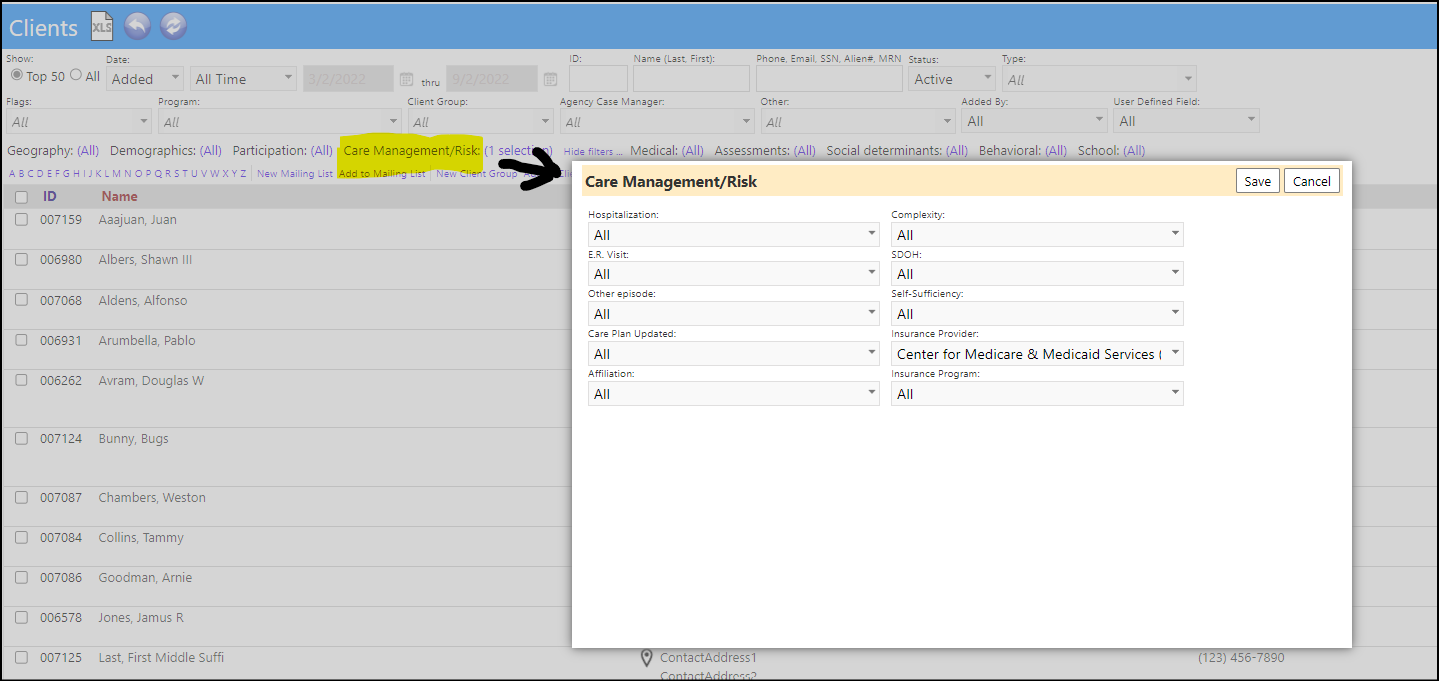
- New Insurance related filters have been added to the Care Management/Risk filter on the Client List.
Contract Enhancement - Signature Comments Now Displayed
- When a user signs a contract in the Partner Portal and leaves a comment, that comment is now displayed in the Contract.
- Clicking on the 'eye' to view the signatures also displays the comment.

Enhancement to MyDashboard - New Expandable Feature on Some Panels
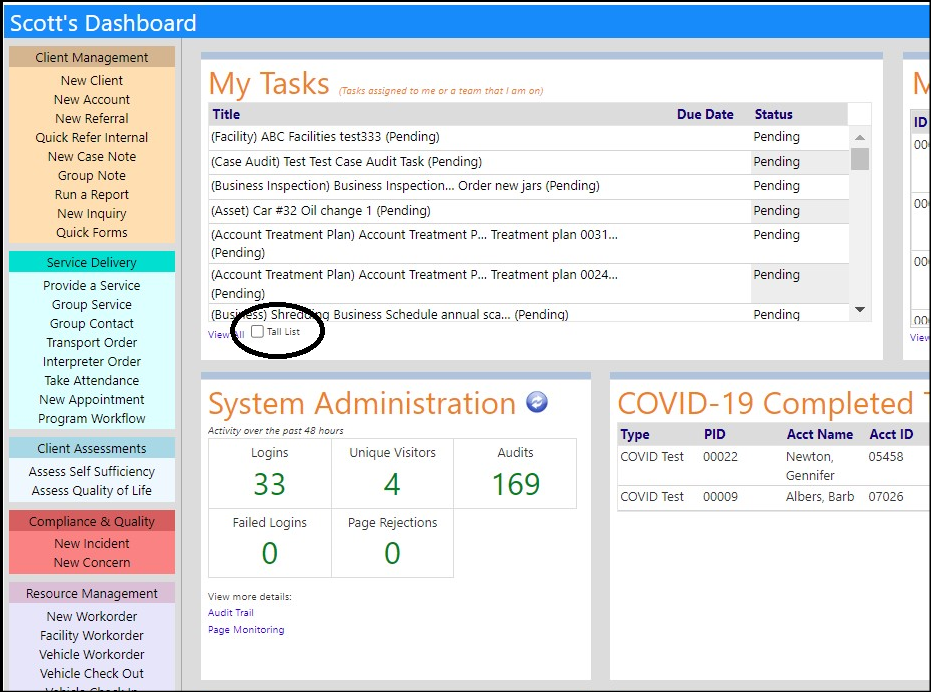
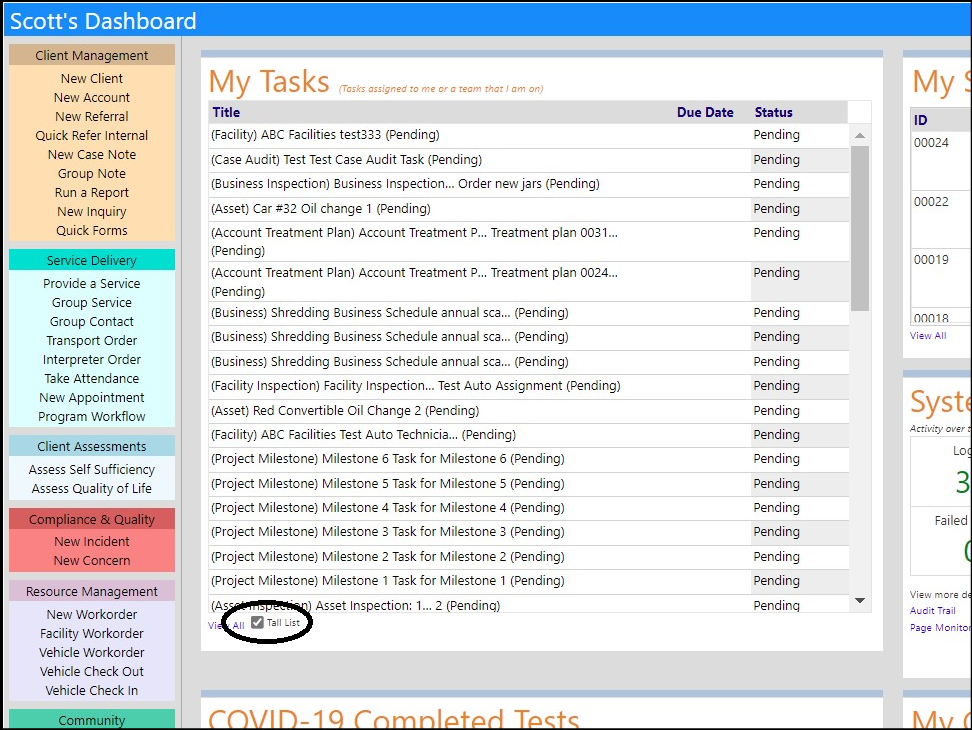
- The Assessments, Treatment Plans, Clients, and Tasks panels can now be expanded to a tall list, by selecting that button on the panel.
Before selecting the Tall List checkbox:
After selecting the Tall List checkbox:
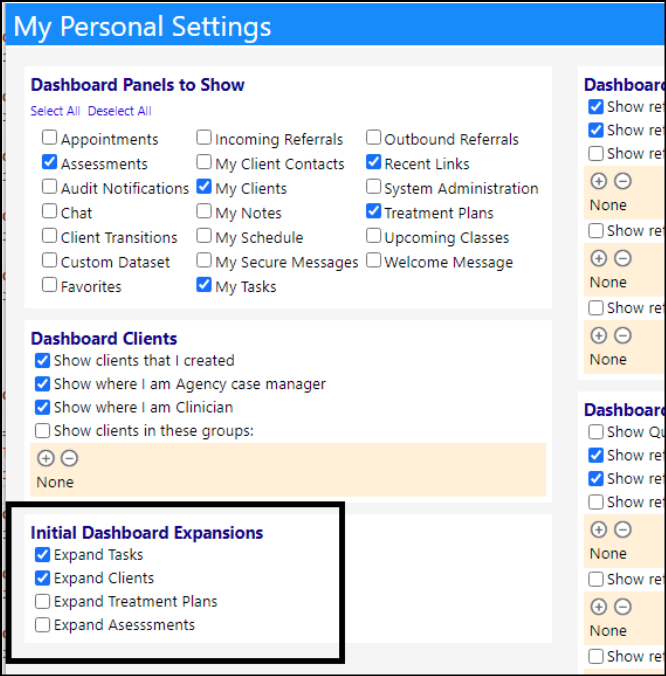
- Users now have some new dashboard setup options which can be used to default the panels which should already be expanded when viewing the dashboard. That way they can set their MyDashboard panels to start 'expanded' when they begin their next imPowr session.
Enhancement to Entrepreneurial Tools - Multiple Changes
- A new 'eye' icon has been added to the order calendar (week view only). This icon shows whether auto-refresh is on or off. Clicking it will take you to the route log for that day's route. If no routes are defined on that day, it will show a message saying none exist.

- If multiple routes exist, a popup to choose one of the routes will display:

- Once one of these routes is clicked, or if only one route exists on that day when the eye icon is clicked, the route log will display the stops on that route:
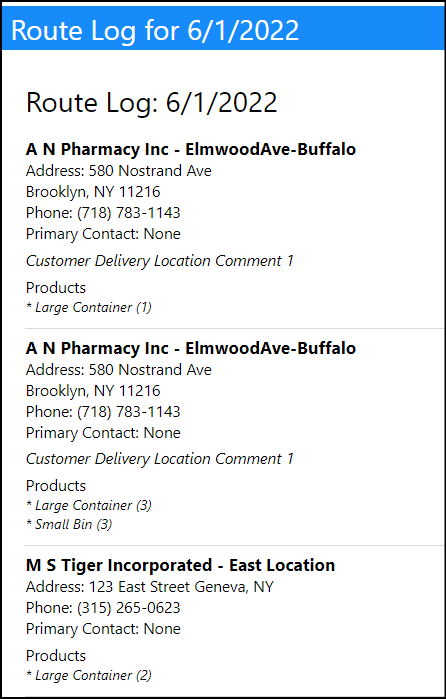
- To accomodate the use of products which have various nuances, customer orders have been modified to contain more detail.
- Users have been provided with the ability to create a list of order "pre-processing options" (things done before the order is fulfilled - e.g., preprinting labels, precooking items, staging ingredients, getting approval for an embroidery design, etc.) and "post-processing options" (things done after the main product is produced - e.g., boxing requirements, final product labeling, post production storage (hot or cold or dry or wet), embroidery inspections, sealants and coatings, etc.). All options have a price component to them (in some cases it will be a preset price and in others users may want to vary the price by customer or other aspect of the order) and some options may be required to be done for the order processor while others may be discretionary (e.g. the packer should clean the bottle if it needs cleaning).
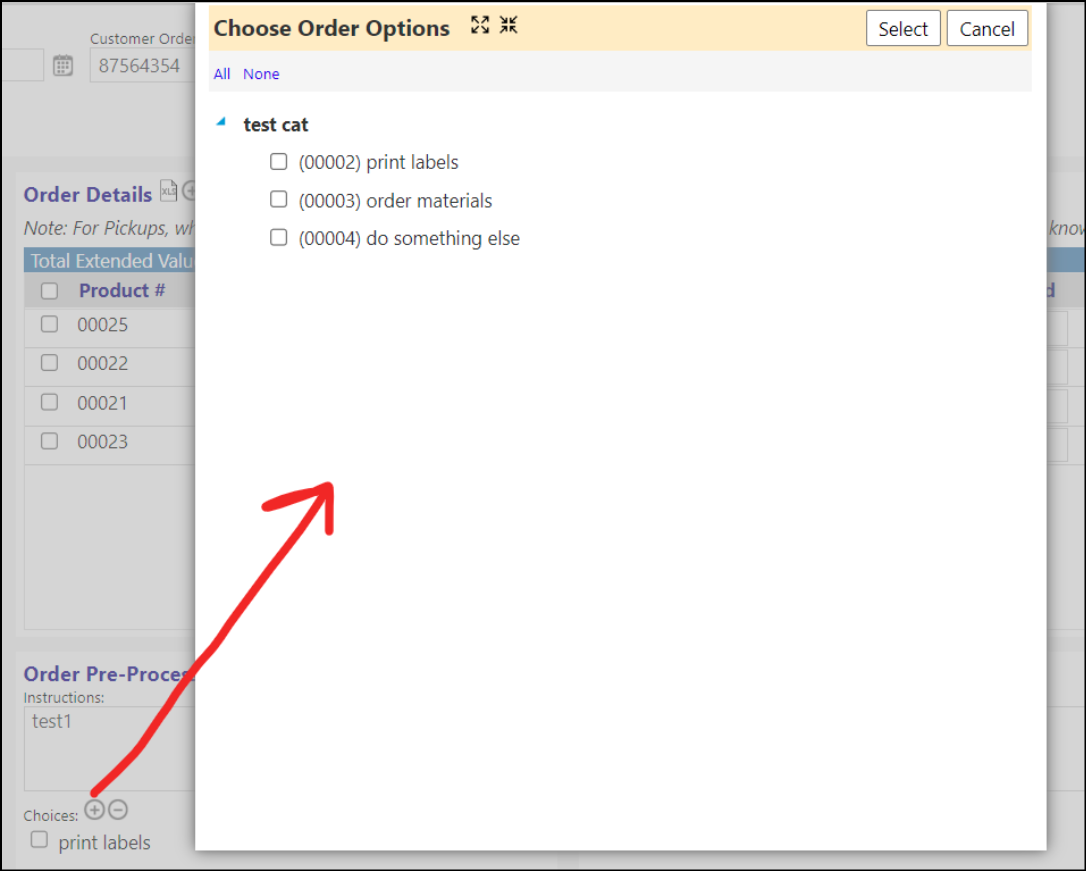
- The options are user configurable and can be categorized to segment options by product.
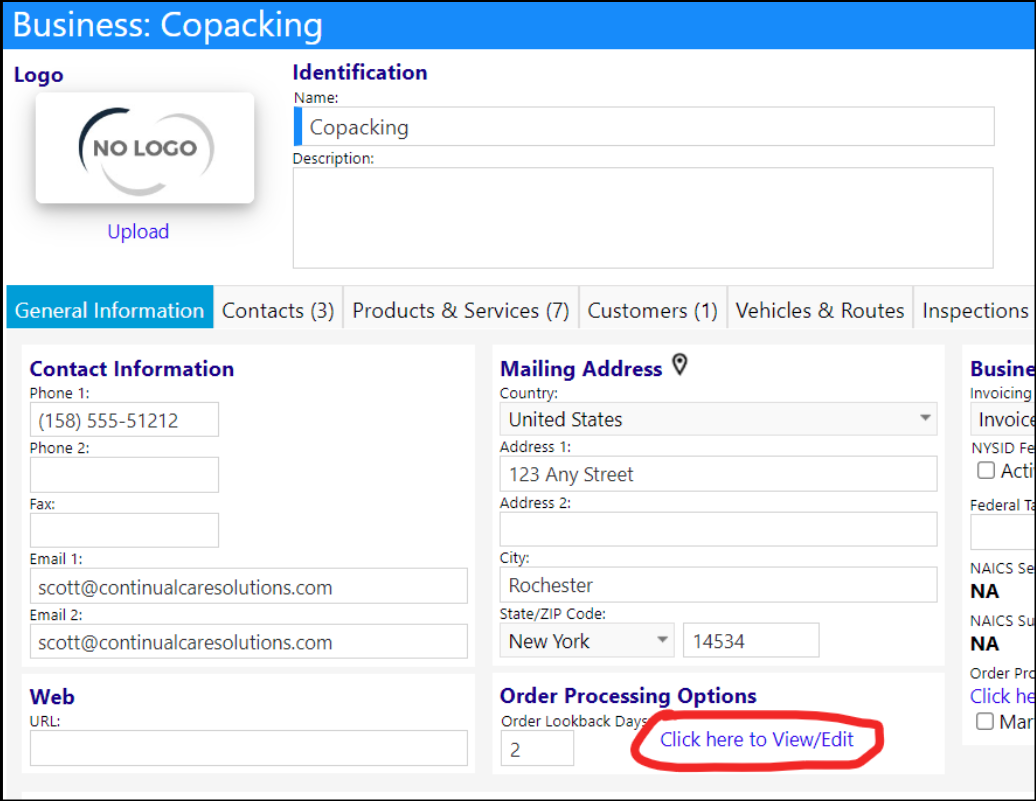
- The options are turned on or off in the Business Unit setup.
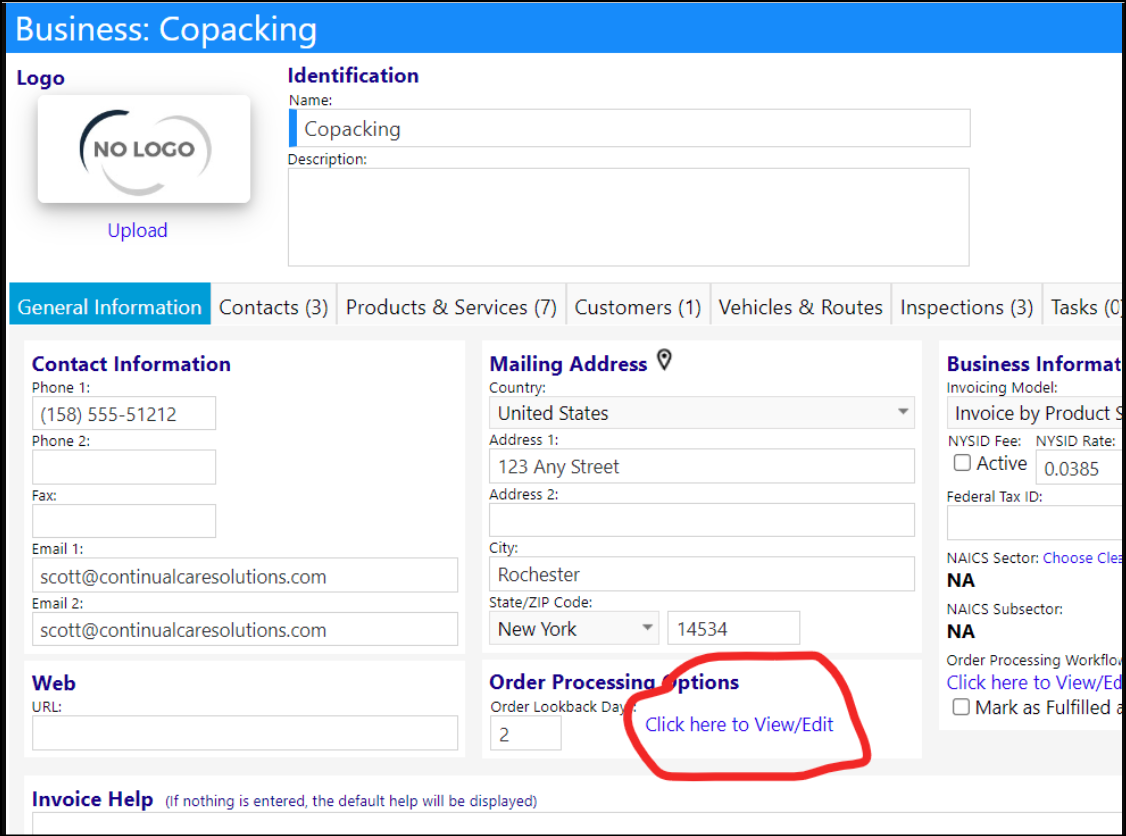
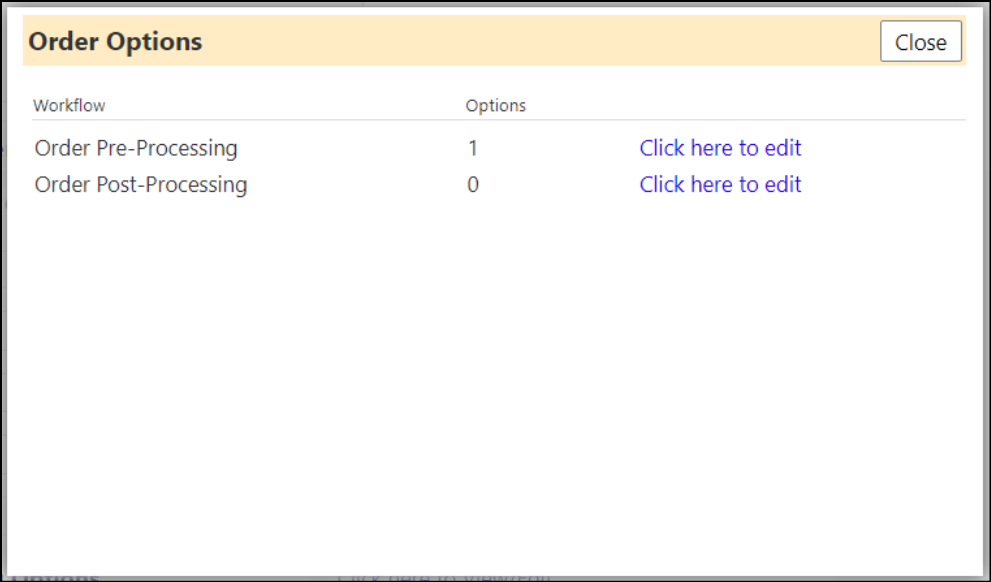
- Clicking on either the pre-processing or post-processing link will take the user to a page where the categories and options can be defined.
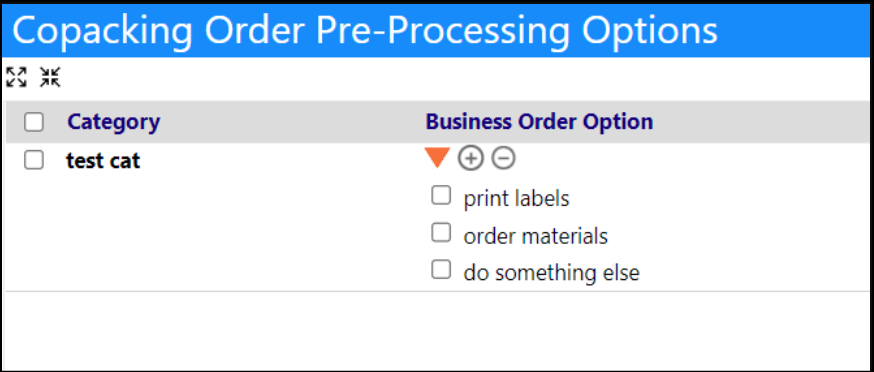
- Note that Categories are purely informational and are only used to sort the options when adding them to an order. However, the options themselves have a unique edit user interface.
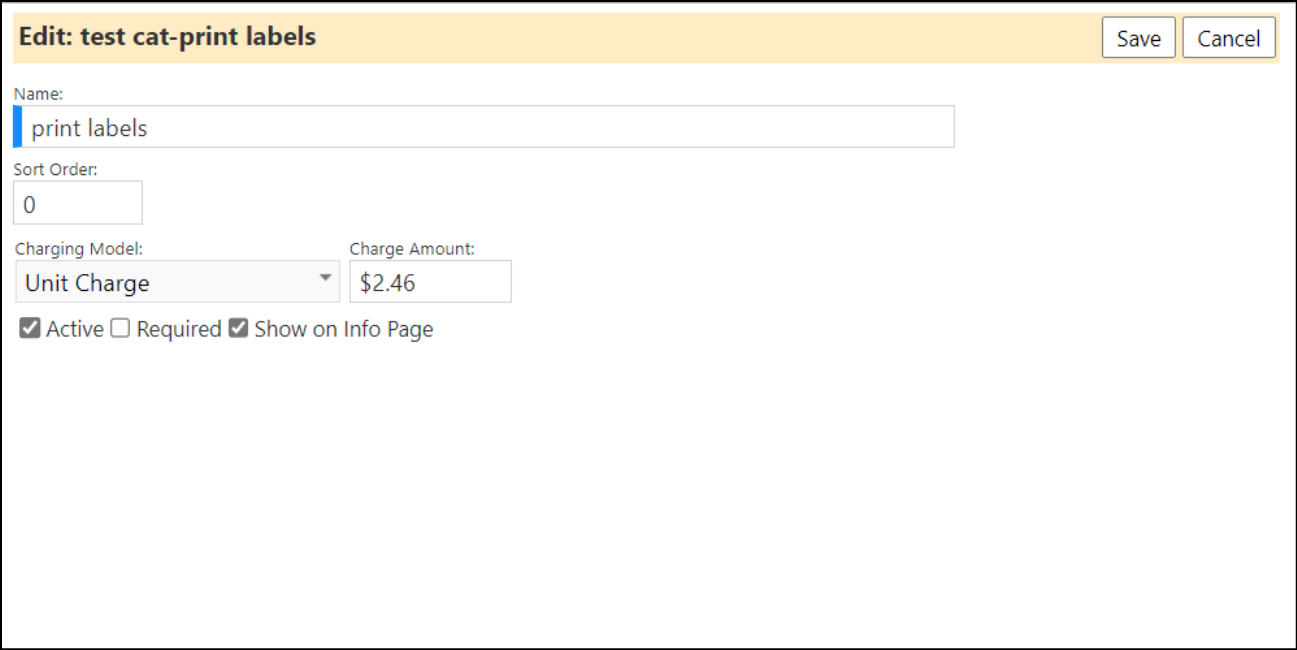
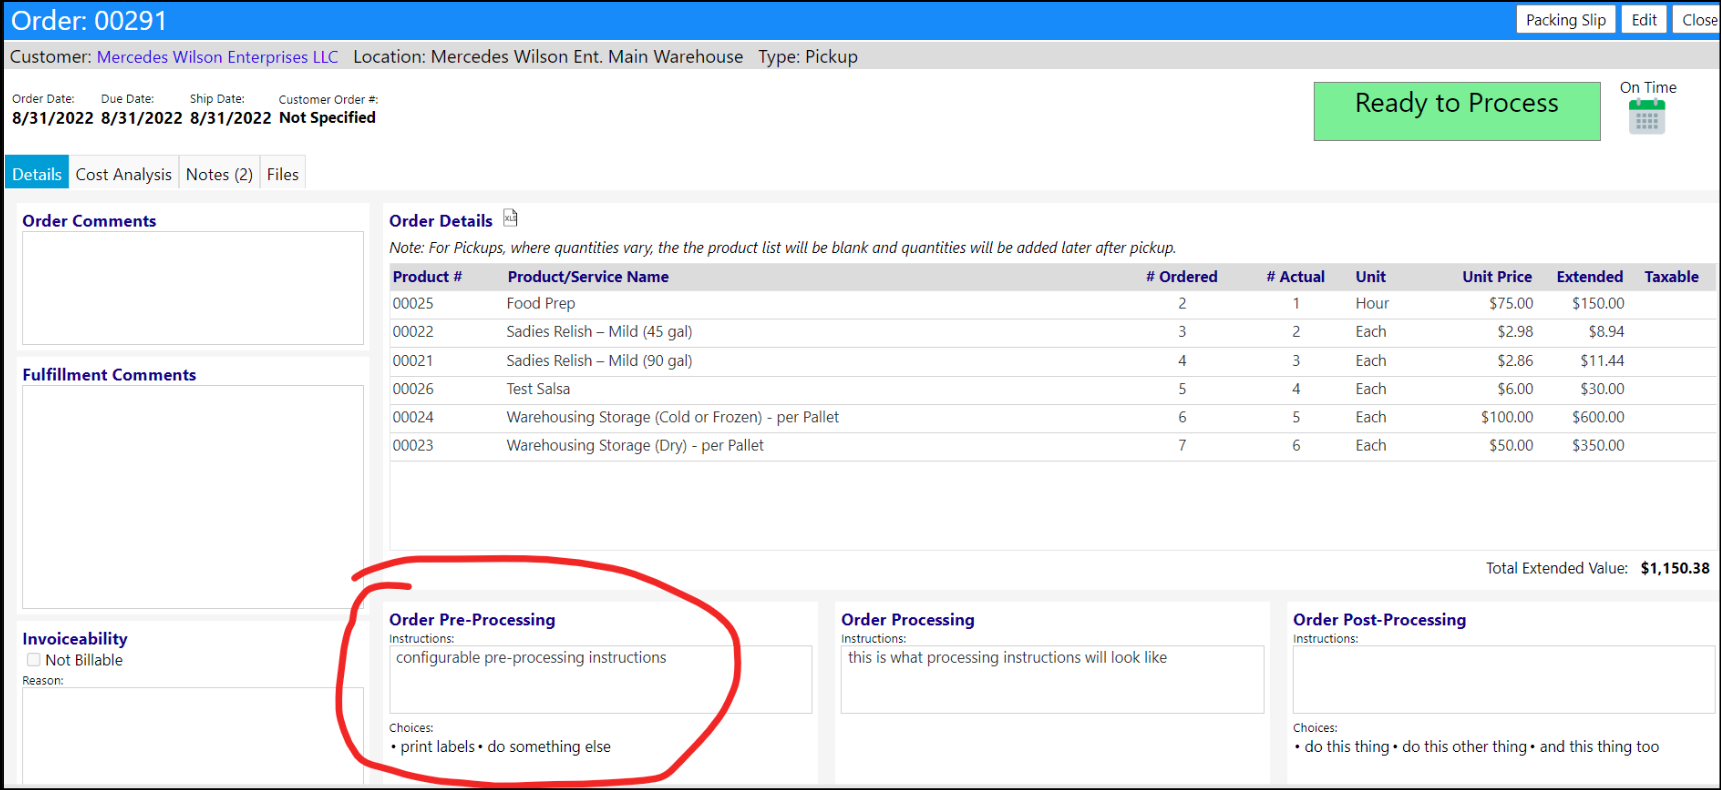
- When creating an order for that business, users get new segments based on which of the workflows is active. These segments will not show if the corresponding workflows are disabled. These also only show when editing an existing order.
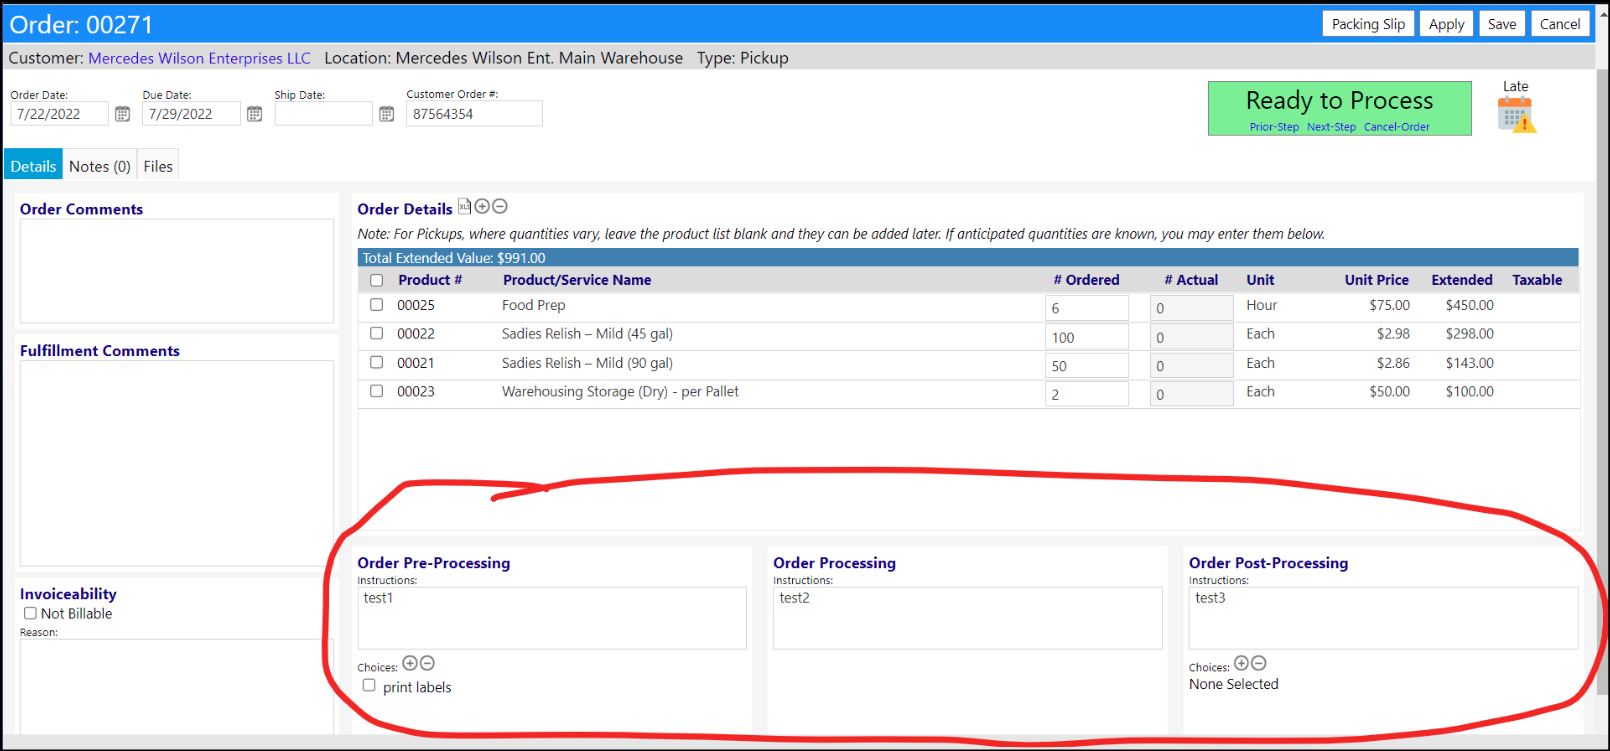
- The instructions boxes are just optional text fields. But the choices under pre- and post-processing allows the user to add in the options previously defined. They will show in a tree view with the category structure which was defined.
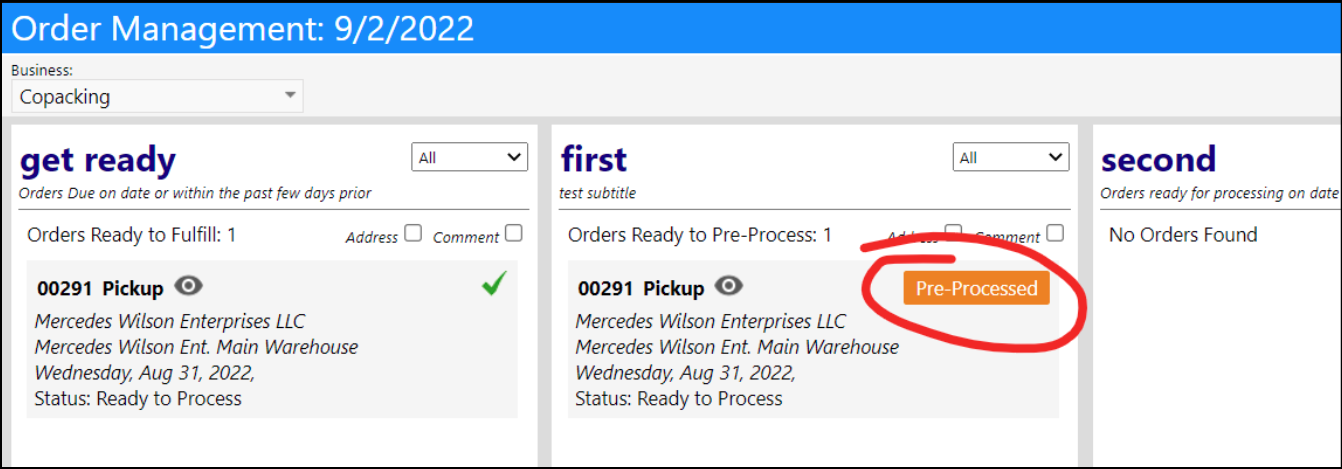
- When an order is ready to process, the user can now go to the pre-processing workflow:
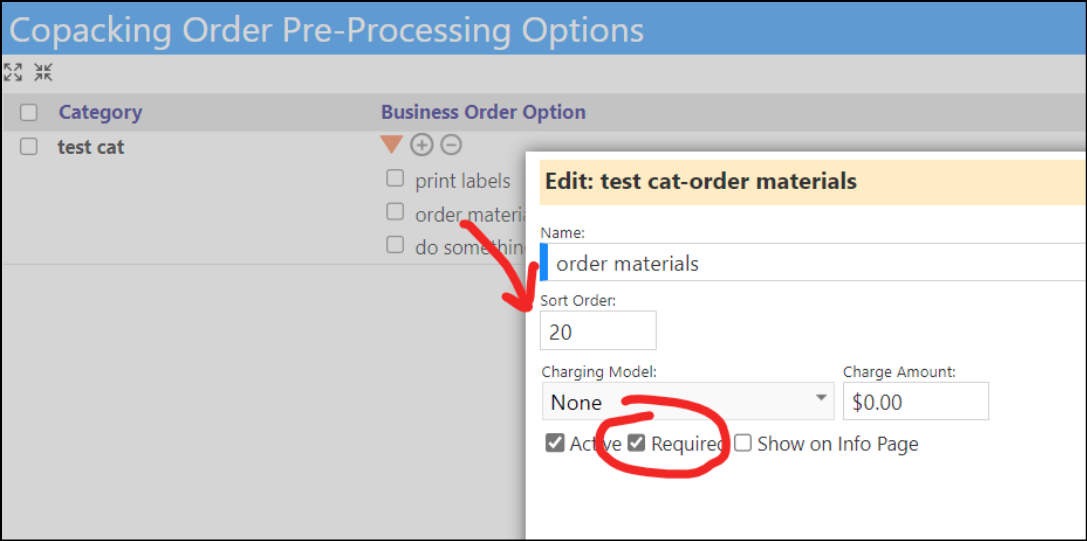
- This will show instructions and a checklist of items to complete. Required items have a asterisk in front of them and will not let users proceed until those are checked.
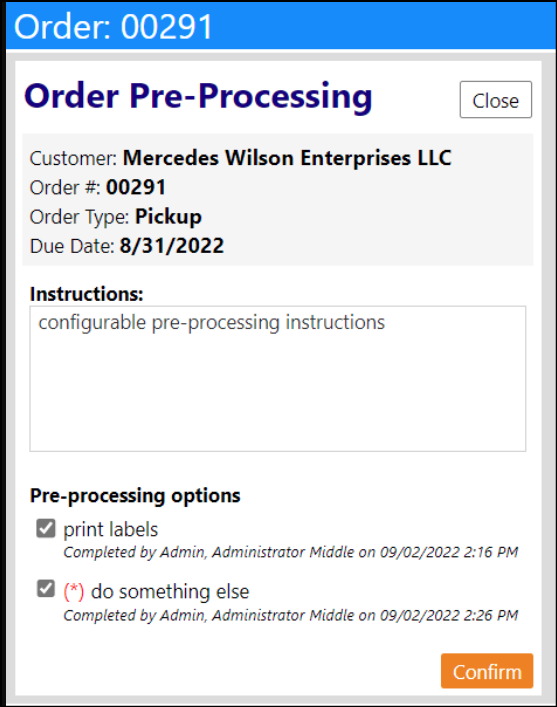
- The instructions and the checklist come from the customer order page:
- Users can configure which items are required in the Business Unit screen>
-
Once a user completes the pre-processing step, the order will get the "pre-processing complete" status and move into the processing step. That step is identical to the pre-processing step (it uses the same controls, just with different data backing it up)
-
The processing workflow has also been implemented:
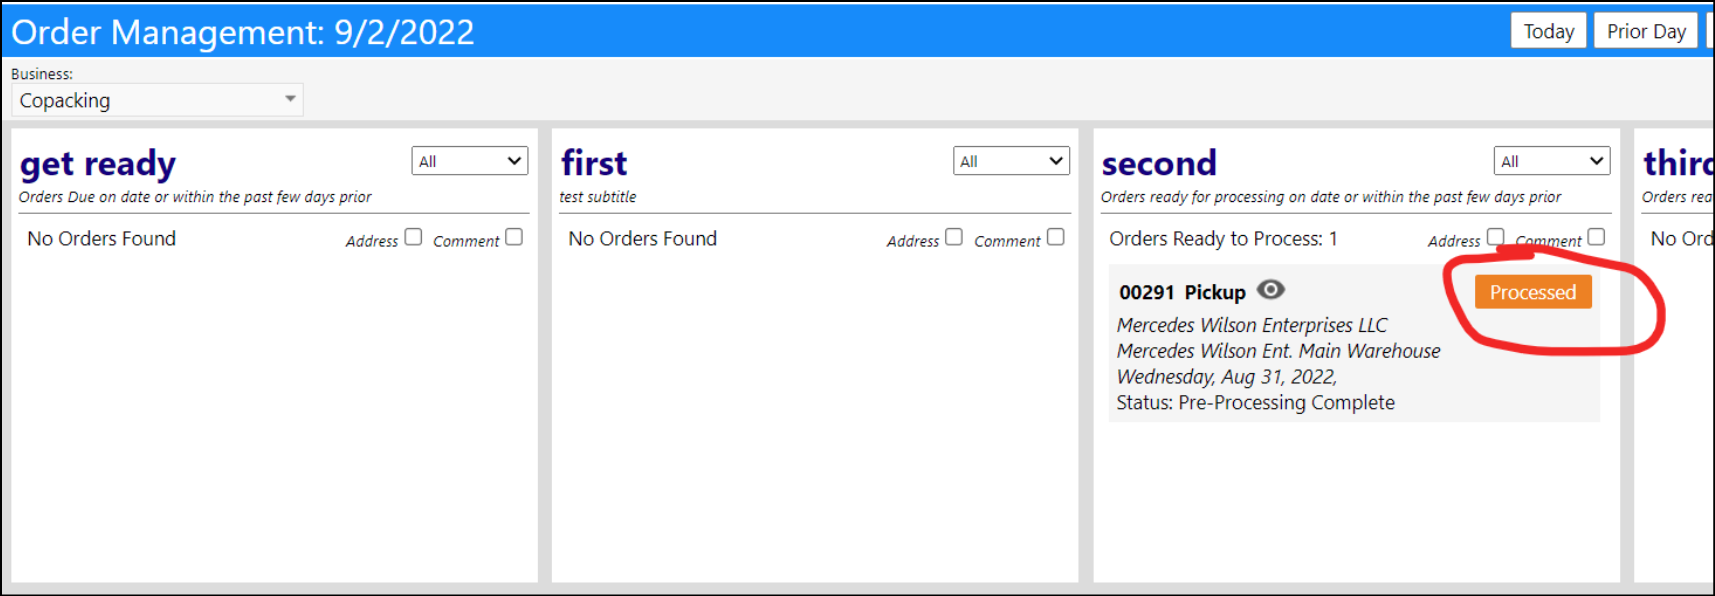
- The instructions will display in addition to the list of products, letting user enter actual quantities. There is also a spot to enter a comment.
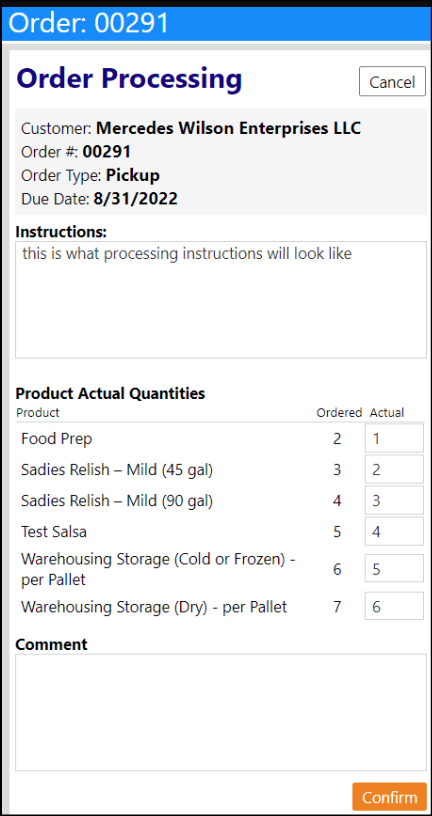
- The instructions come from the order screen, as do the comments. The comment will not be editable - users can only edit the comment from the workflow as shown above.
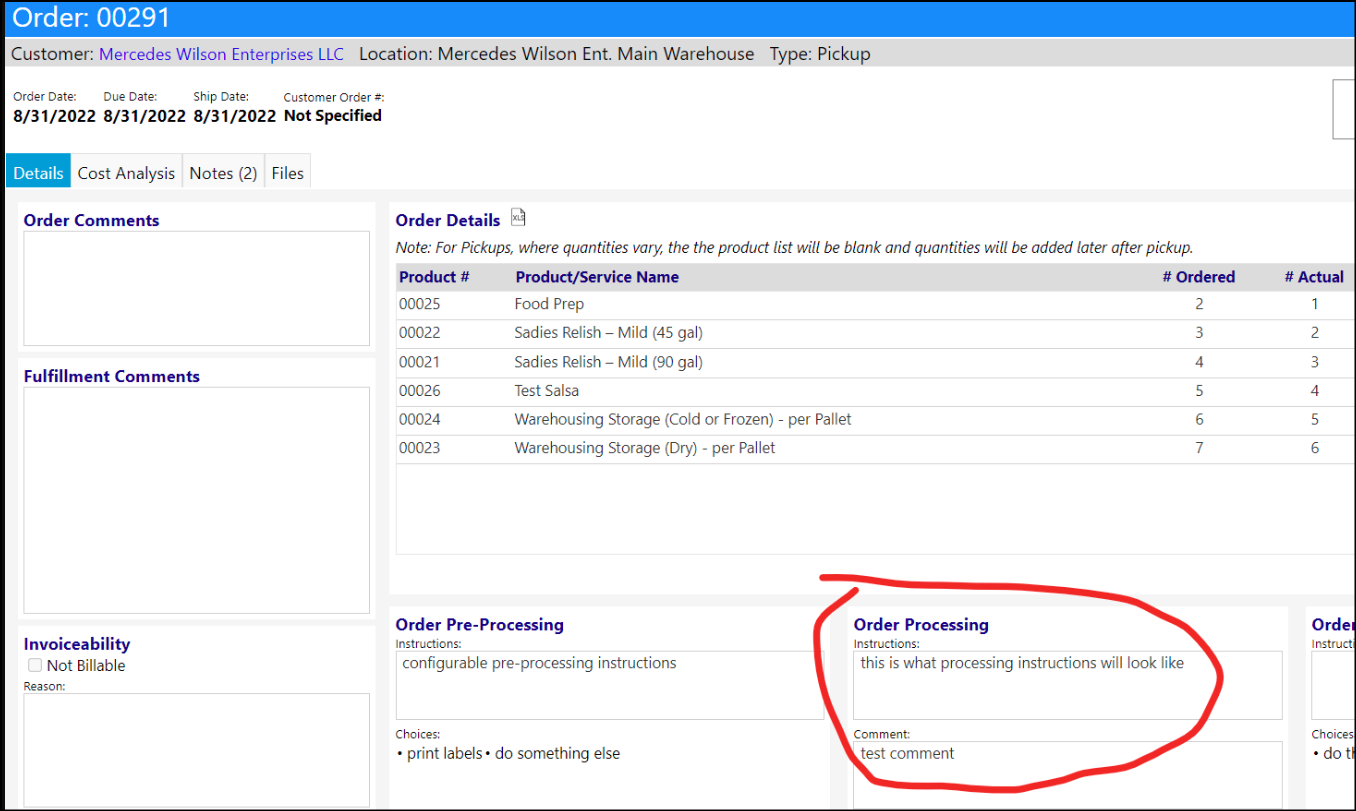
- A new Cost Analysis page has been added to both invoices and customer orders. This tab, which is only visible with the appropriate privileges, provides detailed costs of the items used in the making of the product, along with the services performed. This analysis can be used to determine gross margins.
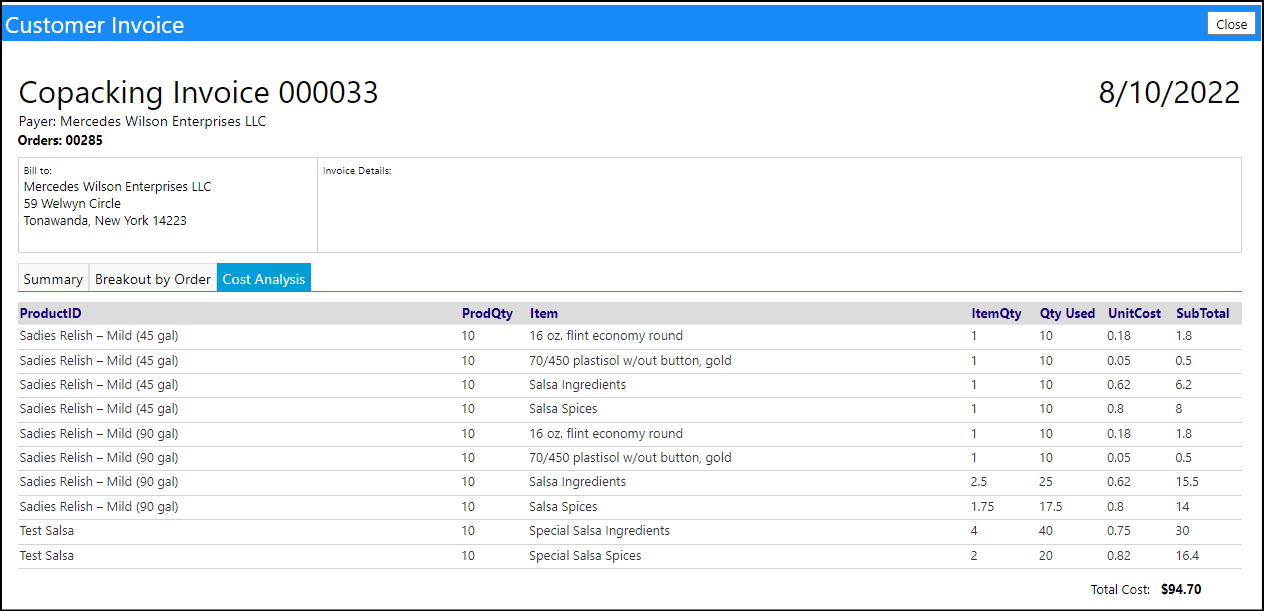
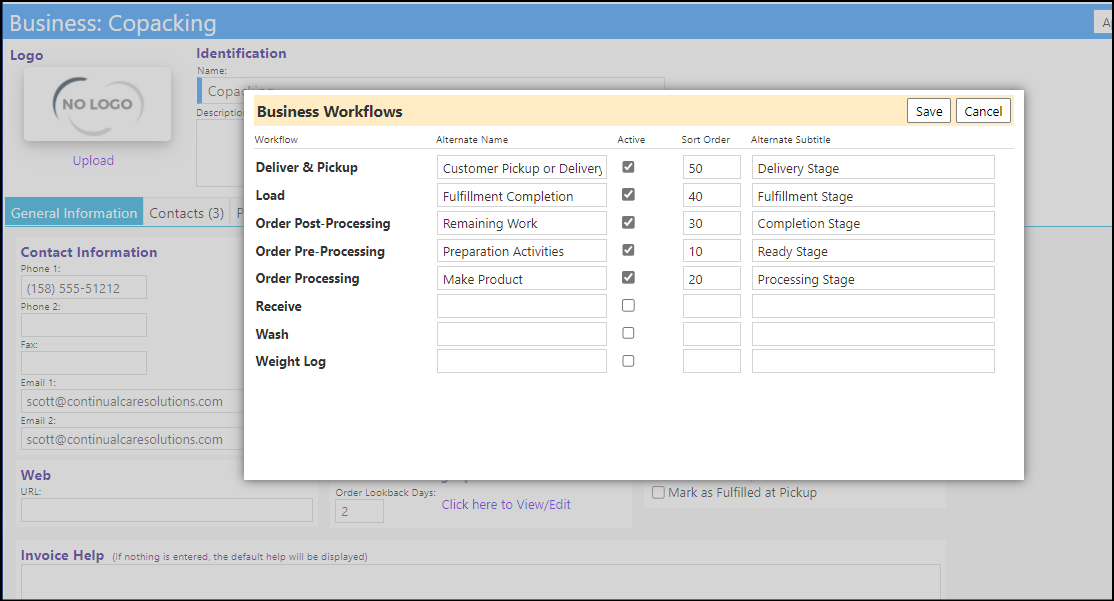
- Changes have been made to the selection of the Business Unit's order processing workflow setup, to make it more flexible and able to accomodate multiple types of businesses and users.
- Different workflow panels can be displayed, renamed, and sorted to make them accomodating and meaningful to users.
- In order to view any of these panels, users must be associated with the business unit and have an account role that provides them with the appropriate order processing portal privileges.

Enhancement to Population Analysis - New Filters Added
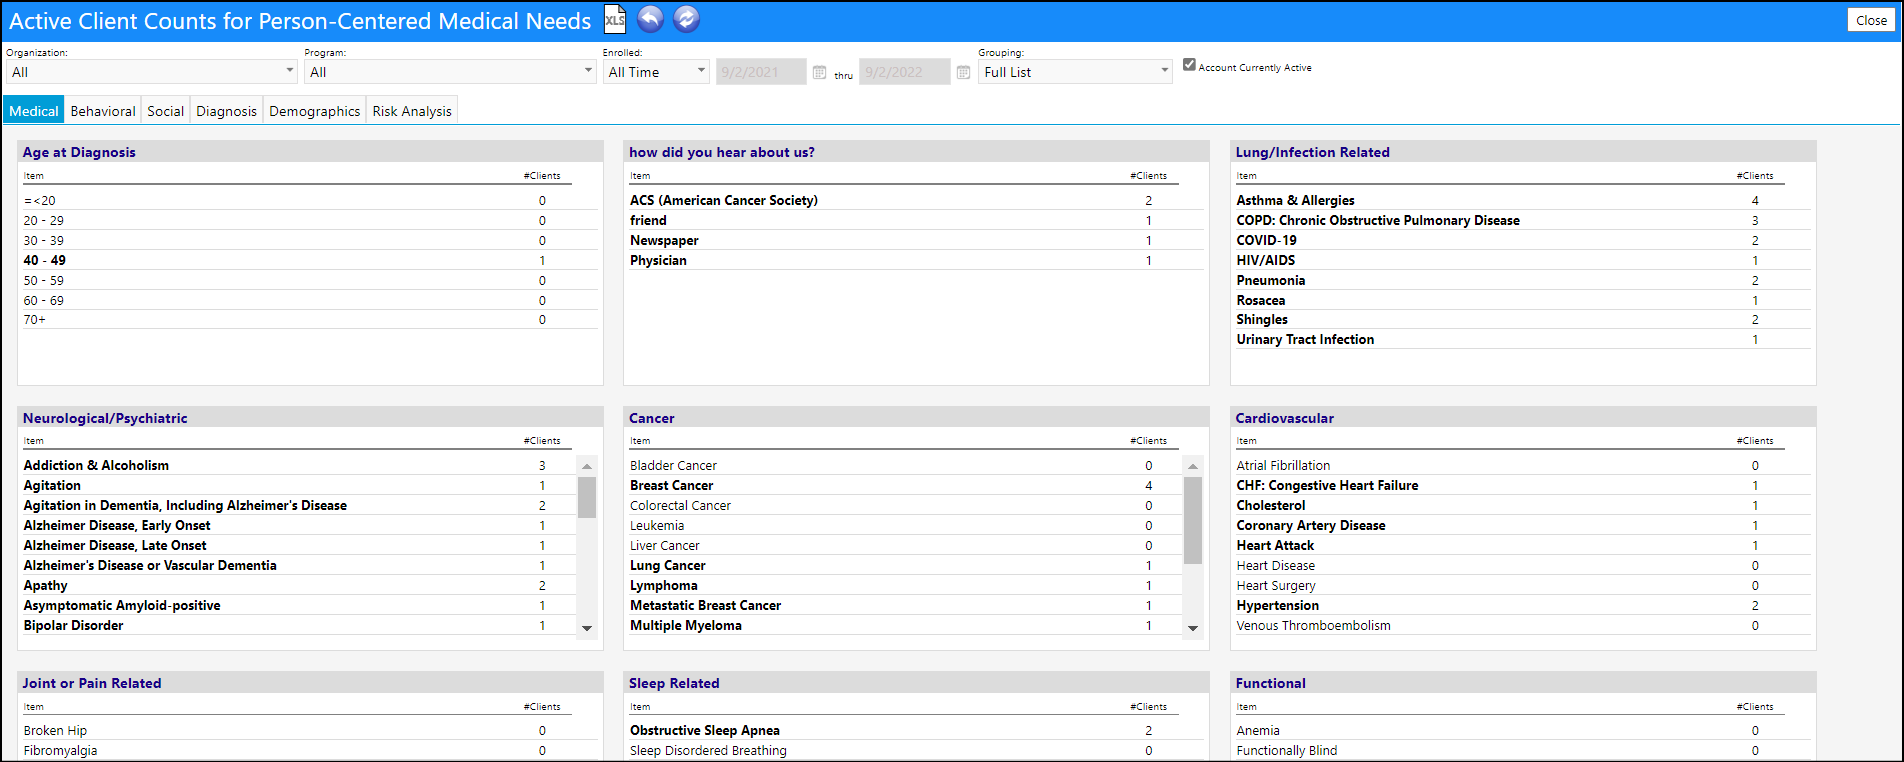
- To make it easier to find person centered needs, a program filter has been added to the screen (this filters on the existence of clients in account_programs), and the date now filters on the overlap with account_program start and end dates.
Enhancement to Services - Anonymous Services Now Captured
- Agencies often provide anonymous services. These services can now be tracked and reported just like other services.
- Go to the service list and click 'add service" as usual. Select the client 'Anonymous' and a list of services appears as usual.


Supply Type Enhancement - Configurable Types
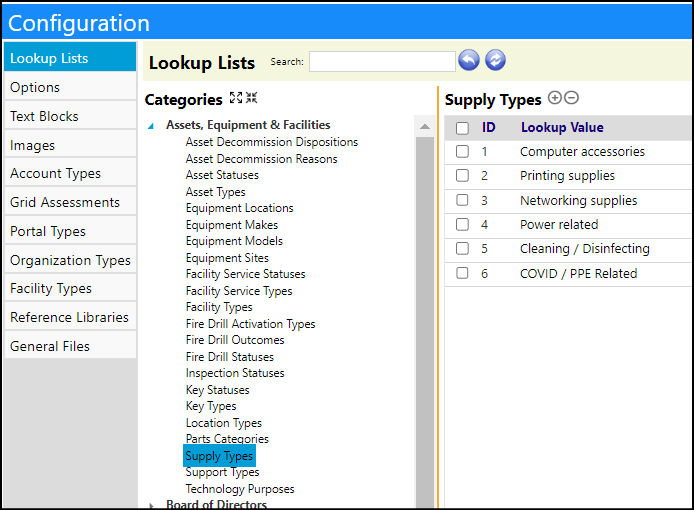
- Users can now configure their own Supply Types in the System Configuration.
Treatment Plan Enhancement - Multiple Changes
- Only treatment plans in a package will have their approval updated when approved by the medical director - assessments will not have their approval updated
- There is a new package icon on the Individual Plan List. When pressed, it will display all of the packages that particular treatment plan or assessment is in.

- A new filter has been added to the Required Plan Summary grid, to allow users to filter on the clients who are on Medicare or Medicaid.

- The designation of whether or not their insurance policy is a Medicare or Medicaid policy is on the Insurance Product which is captured in their Insurance details on their Account Profile.


- A new insurance filter has been added to the Client List Care Management / Risk filter to make it easier to identify which clients are on what insurances, including Medicare or Medicaid.
- Medicare has a requirement that an assessment be performed every 30 days for a Medicare patient receiving certain, treatments. It also has a requirement that a treatment plan be reviewed every 90 days for those services. Because of this, new functionality was implemented in the treatment plan area of imPowr, that will allow users to setup repetitive treatment plans and assessments so that when a treatment plan or assessment is completed, a new one, scheduled for 90 or 30 days later, respectively, is automatically generated.
- The generation of a new plan or assessment is based on the approval of the old one and based on a set interval of time. The setup is done in the Configuration Reference Libraries settings.
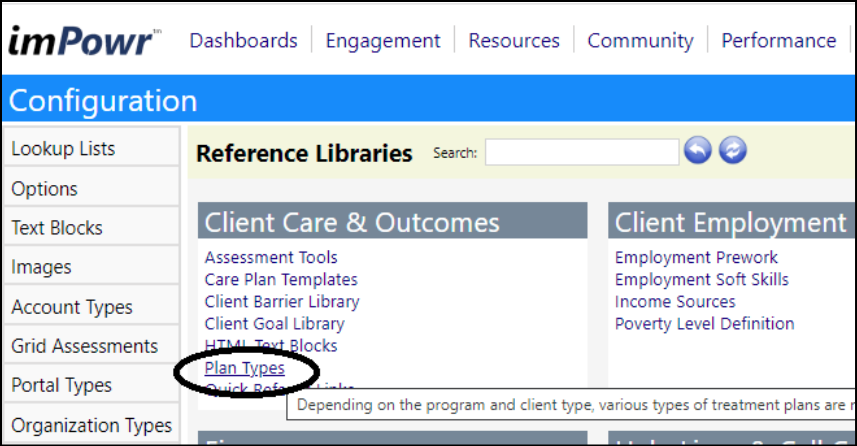
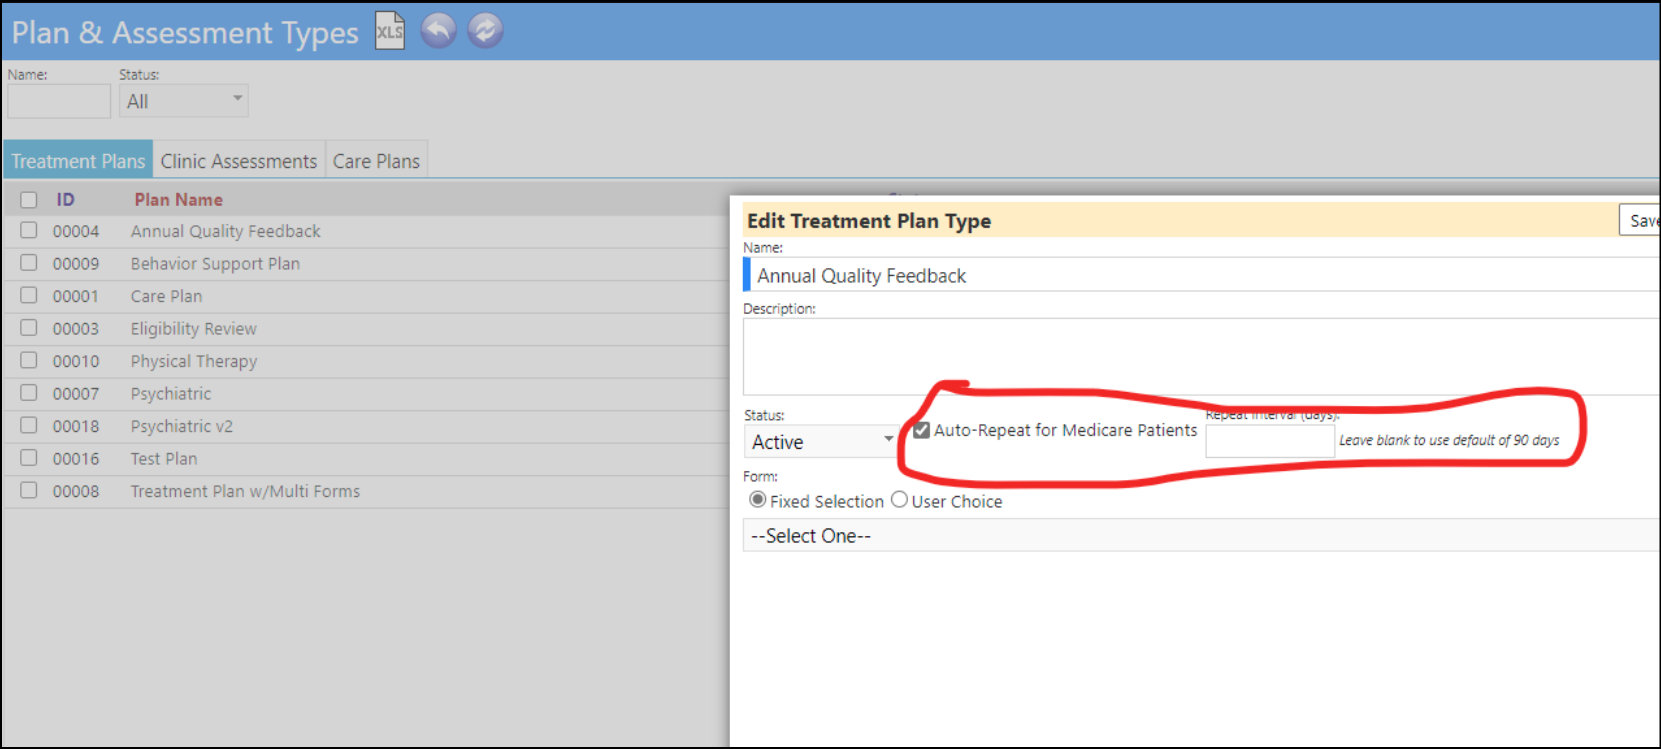
- When editing treatment plan types or assessment types users have an option for auto repeat and the repeat interval. These default to unchecked and blank respectively. Users can leave the repeat interval blank and use the default number of days. For treatment plans it's 90 days and for assessments it's 30 days.
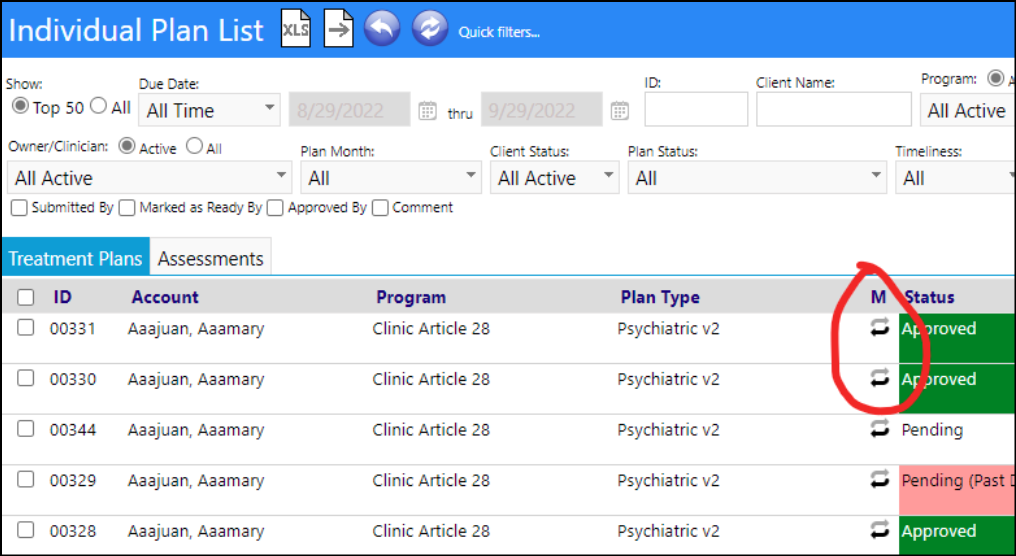
- The individual plan list displays an indicator if that plan has auto-repeat enabled. Hovering over the repeat icon will show the repeat increment in days. Note that if the client is not on Medicare, the icon will still show, but the plan won't auto-repeat.
-
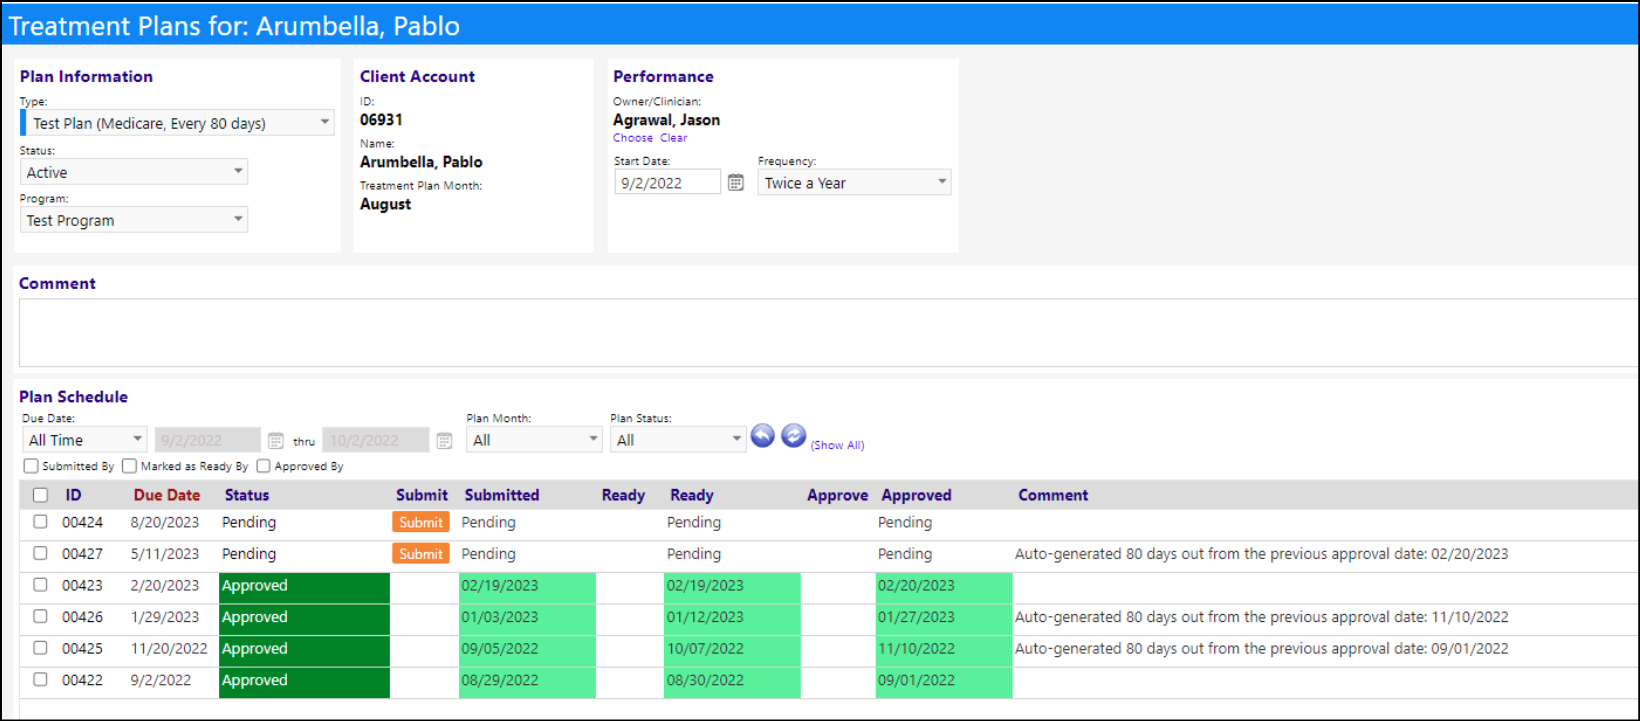
If the patient is on Medicare, and the auto-repeat icon is showing, approving the plan will create a new plan at the given number of days after the date it was approved on. This will work anywhere users can approve the treatment plan - the individual plan list, medical director work list, and the edit treatment plan page.
-
Example: setting the interval to be 43 days:

Sample of the Required Plan Summary List:
Enhancement to Workorders - More Types
- Workorders are now more flexible. When setting up a new workorder, if Asset related, users can now select the type of asset from those available. The Asset Type must first be set up in the Lookup Lists in configuration. Once set up, when a new workorder type is created, and the user selects the Entity Type "Asset", a field will be displayed which will allow the user to select the type of Asset from the those set up in the system.
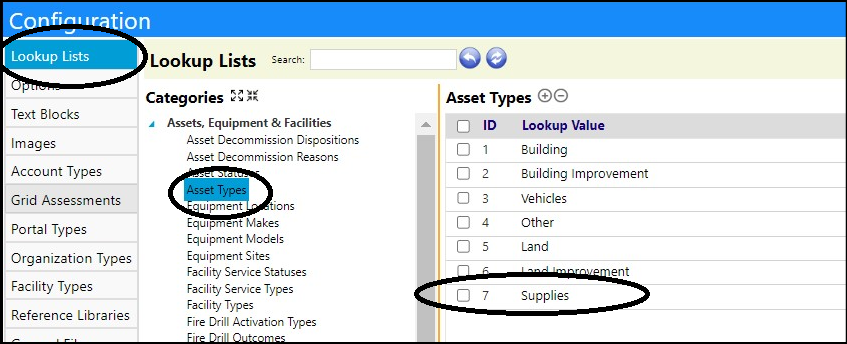
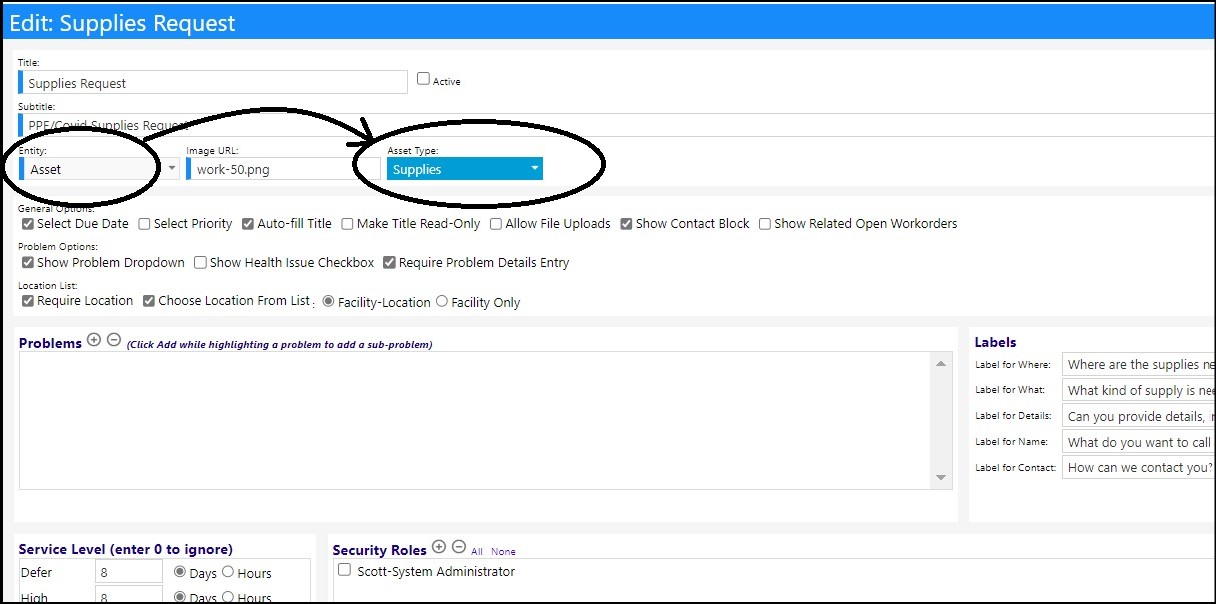
- Currently, when selecting a Supply asset type, the supply list where the supplies are chosen from is that which resides on the Asset List page (if not already created, users will need to create that Asset type).
