ImPowr's Entrepreneurial Tools are very flexible when it comes to adapting to other businesses an agency may operate. This article explains the steps needed to use imPowr to operate a Shredding Business.
This article addresses the required setup activities before customer orders are processed, the placing and processing of orders, as well as invoicing. It also touches on the scheduling of pickup/delivery trucks and their routes. It does not address the setup of any reports used in tracking the business, nor any notification policies which can be setup to inform others when specific activities occur or are due. As with most pages in imPowr, the appropriate security roles are required to perform these activities. Please contact your imPowr System Administrator if you have questions, require access, or need any assistance.
Initial Setup:
To use imPowr for a Shredding business, some items need to first be setup before any activity takes place: the shredding business unit needs to be set up, the products, services, and pricing involved in that business need to be defined, and the customers who will be participating in that business need to be setup in the system.
Business Unit Setup
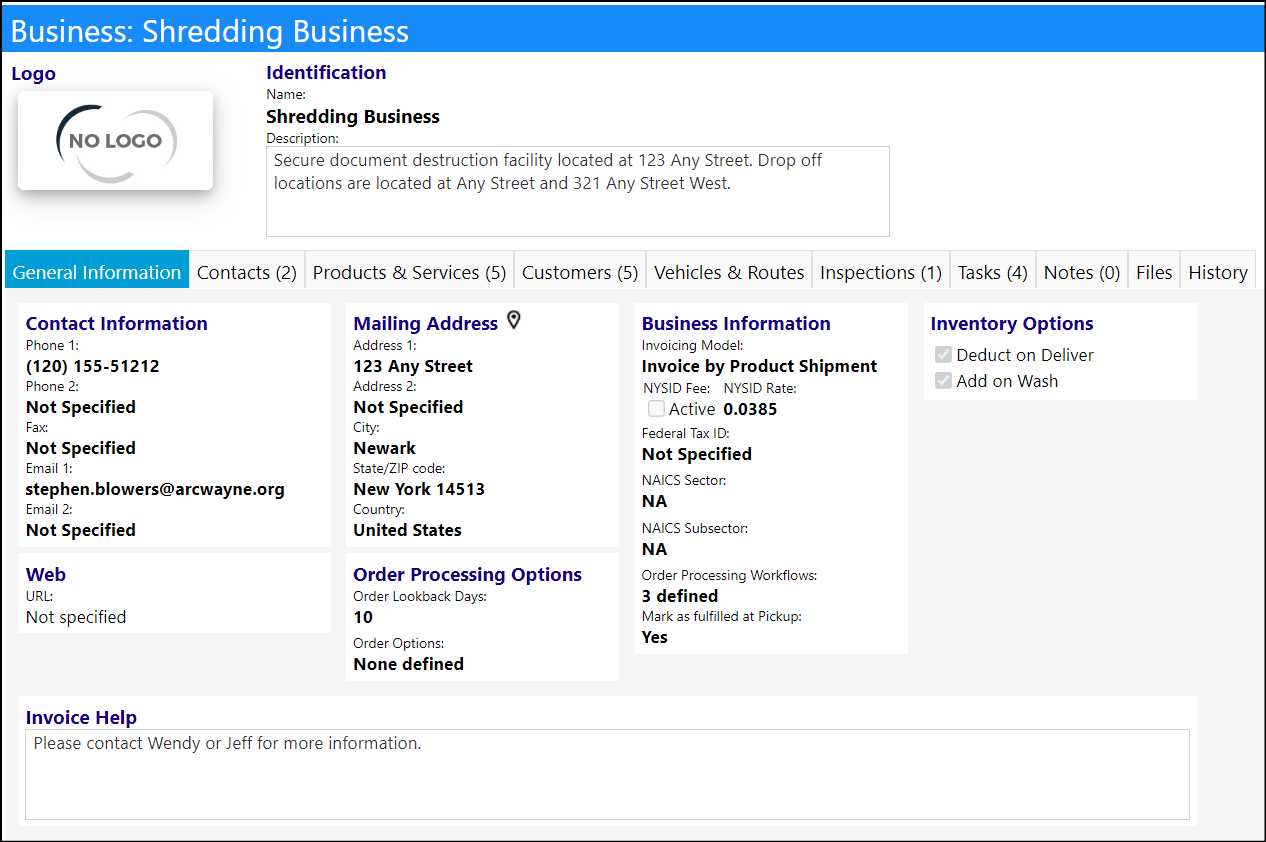
The Business Unit must be created before any other setup takes place.
This setup is the basis for the Shredding business (and other Entrepreneurial businesses) and provides the structure that the business is built off of. It involves some basic details along with some default settings like the business process workflow which will be used. This section will discuss each section separately.
Steps:
Creation of the Business Unit
- Click on Finance > Entrepreneurial Tools > Business Units
- Click 'Add New' to setup the Shredding Business in imPowr
- Enter the name of the Shredding Business or just a generic "Shredding Business" so you can quickly identify this business from any others
- Click Apply to save your entries and make the other tabs in the Business Unit active
- Optionally add a logo to the Business by clicking on the 'Upload' link under the 'No Logo' panel and uploading a jpg, gif, png, or jpeg extension picture file. Click upload to complete the activity
General Information Tab
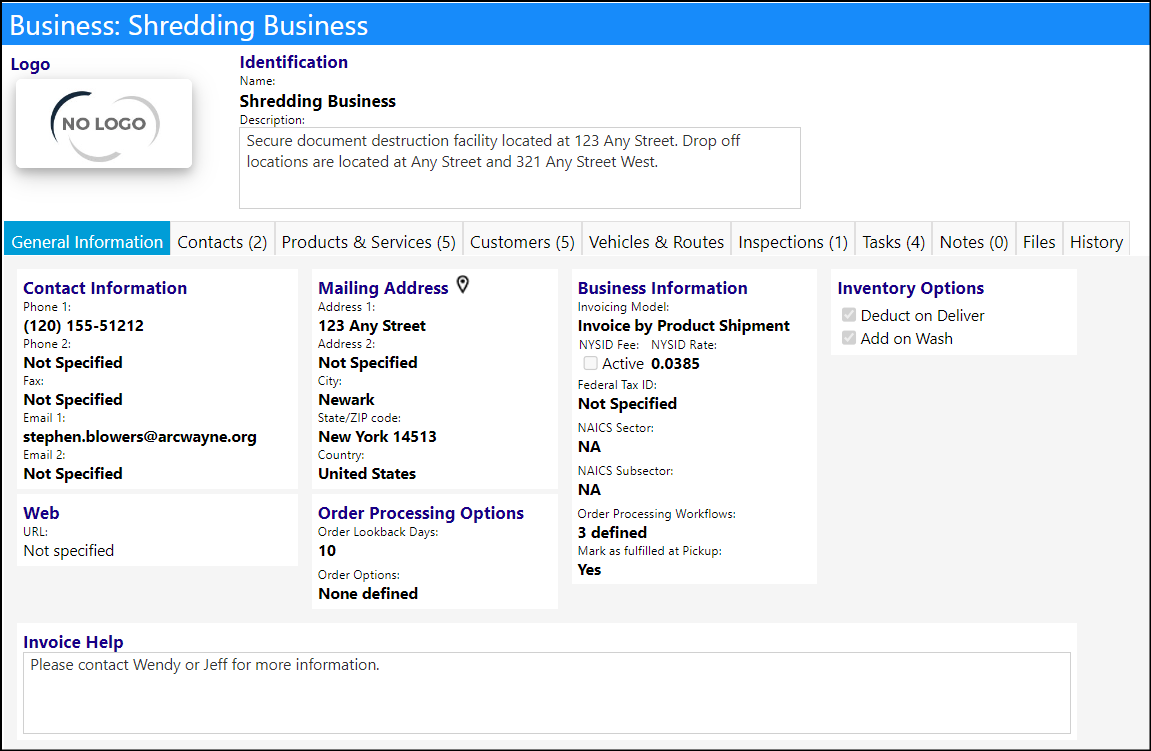
The General Information tab consists of basic details about your business.
- Optionally enter the contact information for your business
- Optionally enter the Mailing Address
- Optionally enter the Business Information. Select the Invoicing Model 'Select Invoice by Product Shipment' from the drop down list
- Click on the 'Click here to View/Edit' under the Order Processing Workflows and choose the Business Workflows involved in your process by checking the Active box for Delivery & Pickup, Load, and Receive (This determines which panels will be used for your order processing process)
- If you want a message to display at the bottom of each invoice, optionally enter a comment into the Invoice Help field
- Click Apply to save your entries
Contacts Tab
The Contacts tab is used to capture any business related contacts you may have - so you have a single location you can go to, to locate their information.
- In the Contacts tab, enter contacts by clicking on the '+'. (Conversely, to delete any contacts, select that contact and click the '-'. )
NOTE: the accounts used for Contacts must be setup in imPowr in order to be able to select them. They are typically setup as Non-Client Accounts (Engagement > People > Non-Client Accounts) or Staff Members (Engagement > People > Staff). The appropriate security rights are required to be able to setup and edit accounts. Please contact your system administrator for more assistance.
Products & Services Tab
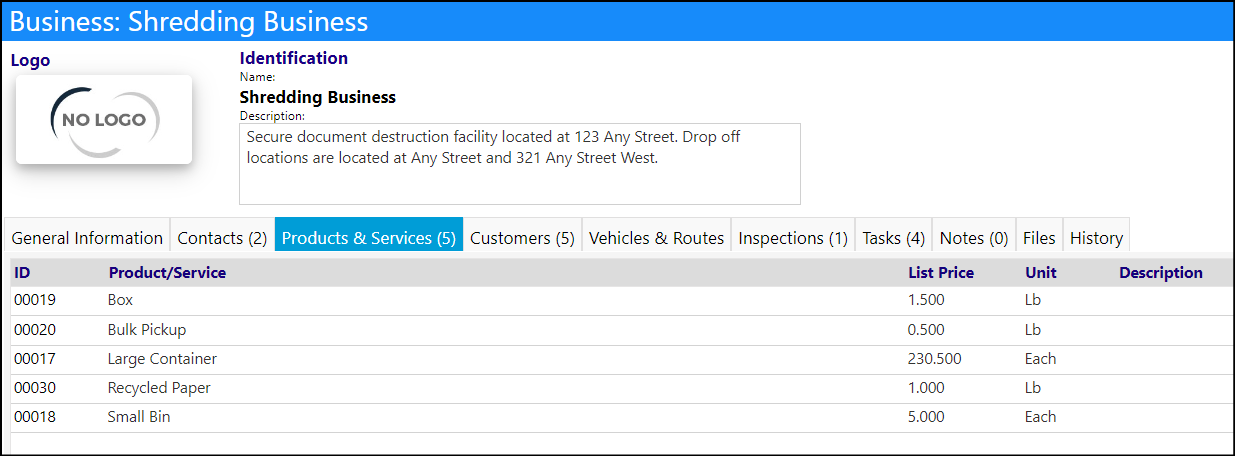
The Products & Services tab is used to identify what kinds of products or services your business will offer to its customers. It can be things such as, but not limited to containers to collect the documentation for shredding, or even bulk shredding services.
- After selecting the Products & Services tab click the '+' to add new products (Conversely, to delete any product or services, select that product or service and click the '-' )
- Enter the Product Name (example the products or services you could potentially delivery to a customer site, like a container, or Gaylord boxes, etc., or enter the types of products you might pickup, such as Bulk Item shredding)
- Select a Unit of Measure from the drop down list (typically 'each' or 'lb')
- Enter the Unit List Price (this is the default price for this product or service - customers may also have their own contractual based prices - those will be addressed in another section in this article)
- Check the box to indicate if the product or service is taxable or not
- Click Apply to save your entries
- If the Product or Service consists of multiple products or services, you can create a Bill of Material (i.e., the components that go into the finished product). To do so, click the '+' and select an inventory item from the list displayed (the products and services you have created in the system). Click Save when you are done selecting the items. Enter the quantity of that item that goes into the finished product or service, and click Save to be brought back to the Products & Services tab
Customers Tab
The Customers tab is where you would identify the customers who you are doing business with
- Click on the '+' to add a customer to the list
- Select the customer by clicking on 'Choose' located by the New Customer Name.
- Select the Organization (Customer) from the drop down list and click 'Select'.
NOTE: All customers must first be setup as an Organization in the system before they can be selected as a customer. Go to Resouces > Organizations > Organizations to do that. The appropriate security rights are required to be able to setup and edit Organizations. Please contact your system administrator for more assistance.
- Enter the Customer's status
- Click Apply to save your entries and activate the rest of the page
- The Primary Contact and their Phone number should display - if not, please go back into the Organization and add that information into the Primary Contact panel
- Optionally enter the Start and End Contract Dates
- Optionally enter any customer related Comments
- Click Apply to save your entries
Customer Invoices Tab
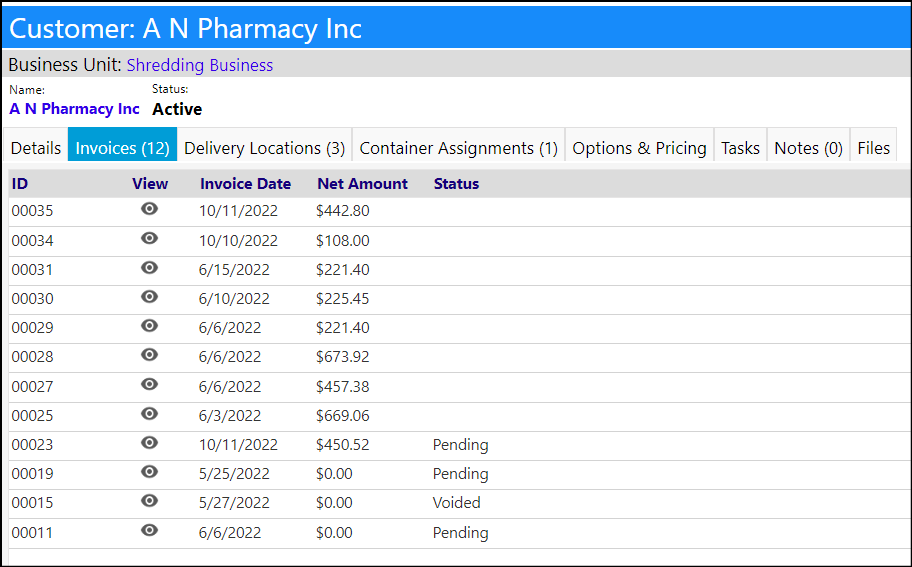
This tab will be used to track any specific invoices tied to this customer. The invoices are typically created using the Customer Orders menu item.
Customer Delivery Locations Tab

-
The Customer Delivery Locations tab is used to identify the customer's addresses you intend to do business at. You are required to enter at least one location.
-
Click the '+' to enter a customer delivery location
-
Enter the Location Name
-
Optionally enter a Contact name, Phone number, and Email
-
Enter the Location Address
-
Select the Pickup Mode
-
Click Save to save your location entries
Customer Container Assignments Tab
This tab is used to optionally track containers delivered to customer locations (including serialized containters).
- Click Save when you are done with your entries
Customer Options & Pricing Tab
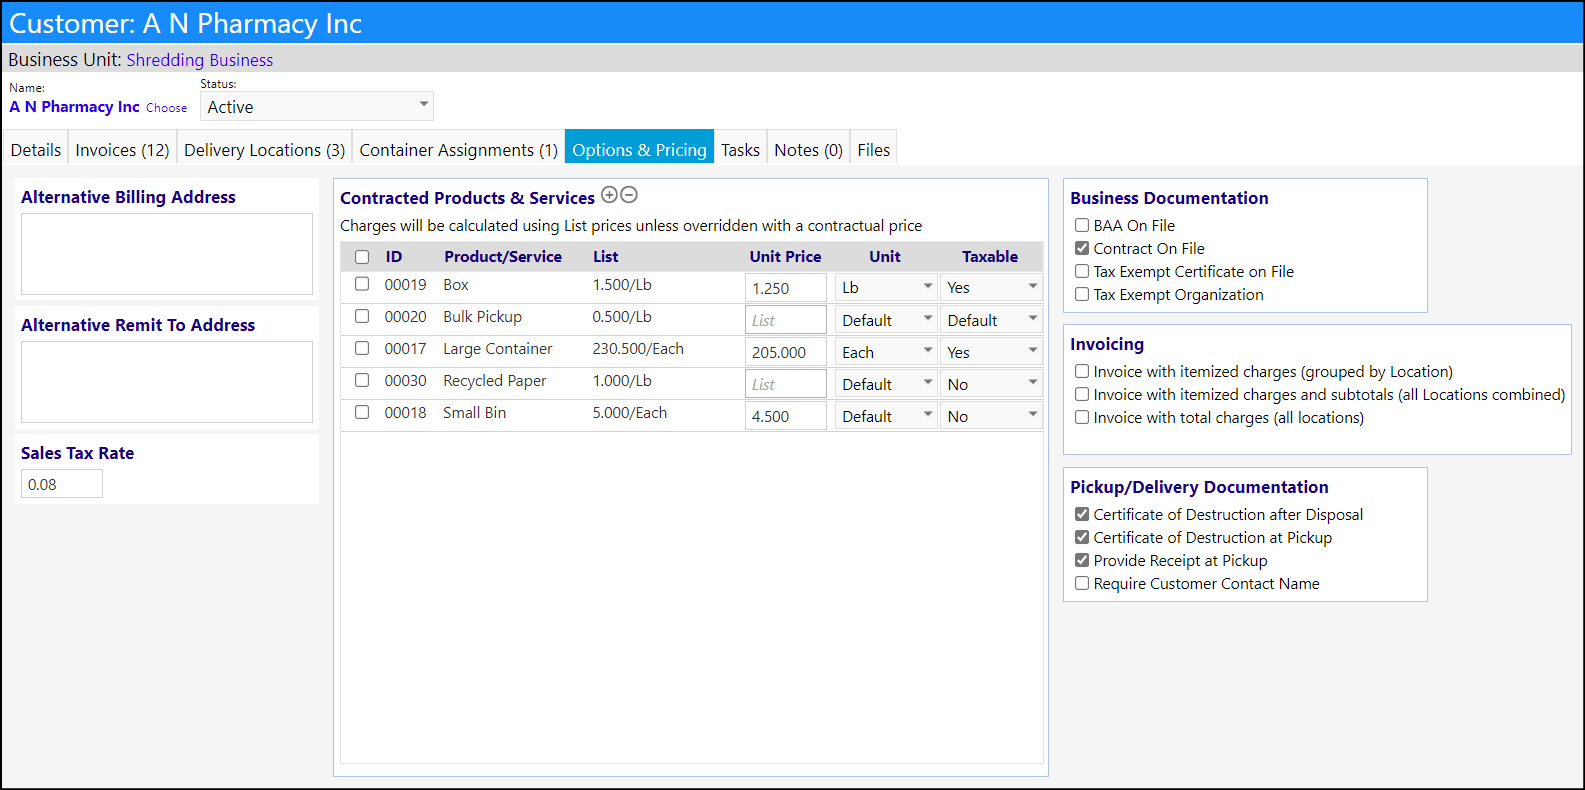
The Options & Pricing tab is where you identify the billing information, specific documentation, and the products or services you might possibly work with for this particular customer, independent of the customer location.
- Optionally enter the Alternative Billing and Remit to Addresses
- Enter the Customer's Sales Tax Rate
- Enter all of the Products and Services you might work with, for this customer, by clicking on the '+' and selecting a product or service from the list
NOTE: this is not just for contracted Products & Services. All Products & Services should be entered in this section if there is a potential of using them for this customer. The Contractual part of this allow you to override the list price you previously entered for the Products and Services so that this particular customer's contractual pricing will apply
- After selecting the item(s), click Save
- The Products and Services, along with their list prices, units of measure, and taxability should display. If the customer has a contractual price for one or more products or services, enter that price in the Unit Price field
- If the customer's contract identifies a particular product or service is tax exempt, change the Taxable setting to from the Default value
- Optionally check the boxes for any Documentation or Invoicing which you have or which may apply
- Click Apply when you are done with your entries
Customer Tasks Tab
In this tab, any customer specific tasks can be entered and tracked. All entered tasks also display in the Task List (Dashboards > Activities > Task List) and can be assigned to individuals.
NOTE: The creation of Tasks is not covered within this article.
Customer Notes Tab
In this tab, any customer specific notes can be left and be shared with all (Public Notes) or be kept private and only shared with specific individuals or teams. Only the creator of the note can change or delete it.
Customer Files Tab
This is a location where you can upload any files that are associated with this particular customer.
- Click the '+' button and drag and drop or select a file from your computer
- Click Upload when finished
- Your uploaded file can be viewed or downloaded
- Click Apply when you are finished uploading files
- Click Save when you are done with entering your Customer Information
Vehicles and Routes Tab
The Vehicles and Routes tab is only used if your agency has specific delivery / pickup routes. This tab is where you would identify the vehicles involved in the pickup/delivery activities, as well as the default routes for those activities, if any, that should be used.
- Setup a delivery vehicle by clicking on the '+' and selecting a vehicle from the list setup in the Vehicle page (Resources > Physical Resources > Assets). The appropriate security rights are required to be able to create and edit Vehicles. Please contact your system administrator for more assistance.
- Create a Default Route by clicking on the '+' in the Default Routes panel, and entering a Route Name and selecting a Vehicle Type
- Click Save when you are finished with the entries
- Repeat the process for other routes
Inspections Tab
All Business Related Inspections are tracked in this tab.
NOTE: Business Related Inspections Types must first be setup in the Reference Libraries in the Inspection Library in Configuration (System > Settings & Security > Configuration). The appropriate security rights are required to be able to work with Configuration. Please contact your system administrator for more assistance.
- Click the '+' to add a single inspection; Click the '++' to add multiple inspections
- If a single inspection, select an Inspection Type and inspection due date
- Optionally select the Inspector by clicking on Choose and selecting the account from the list (these are all Staff Members or Non-Client Accounts and must be setup in imPowr prior to doing this step
- Click Apply to activate the inspection form
- Optionally add any Tasks, Notes, or Files specific to this inspection
- Click Save when the Inspection is setup
- If you were adding multiple inspections, select the inspection type
- Set the repeat pattern (like the 2nd Wednesday of each month, etc.) by clicking on that link
- Click Confirm to generate the inspection dates
- Click Confirm again, after you have reviewed the dates
- Multiple inpections will display in this tab
NOTE: after the inspections are created, they can be assigned to a technician
Tasks Tab
Just like in the Customer Tasks tab, customer specific tasks can be entered and tracked in this tab. All entered tasks also display in the Task List (Dashboards > Activities > Task List) and can be assigned to individuals.
Notes Tab
Similar to the Customer Notes tab, in this tab, any customer specific notes can be left and be shared with all (Public Notes) or be kept private and only shared with specific individuals or teams. Only the creator of the note can change or delete it.
Files Tab
Similar to the Customer Files Tab, in this tab, you can upload any files that are associated with this particular customer.
- Click the '+' button and drag and drop or select a file from your computer
- Click Upload when finished
- Your uploaded file can be viewed or downloaded
- Click Apply when you are finished uploading files
History
All auditable items related to this business are displayed in this tab.
Placing Orders:
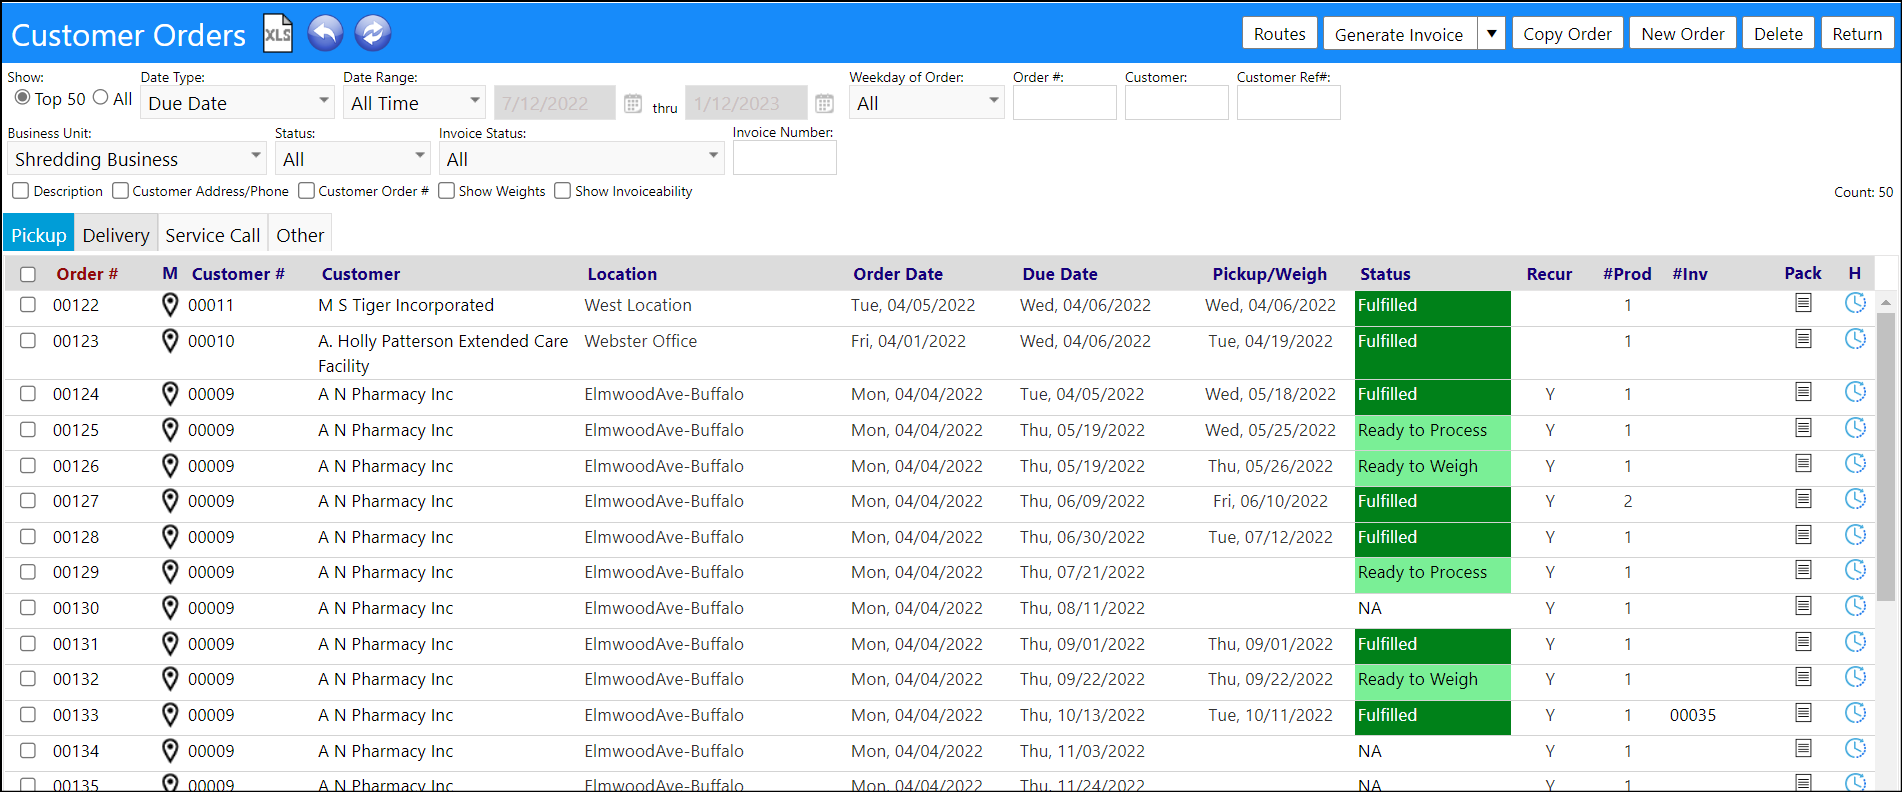
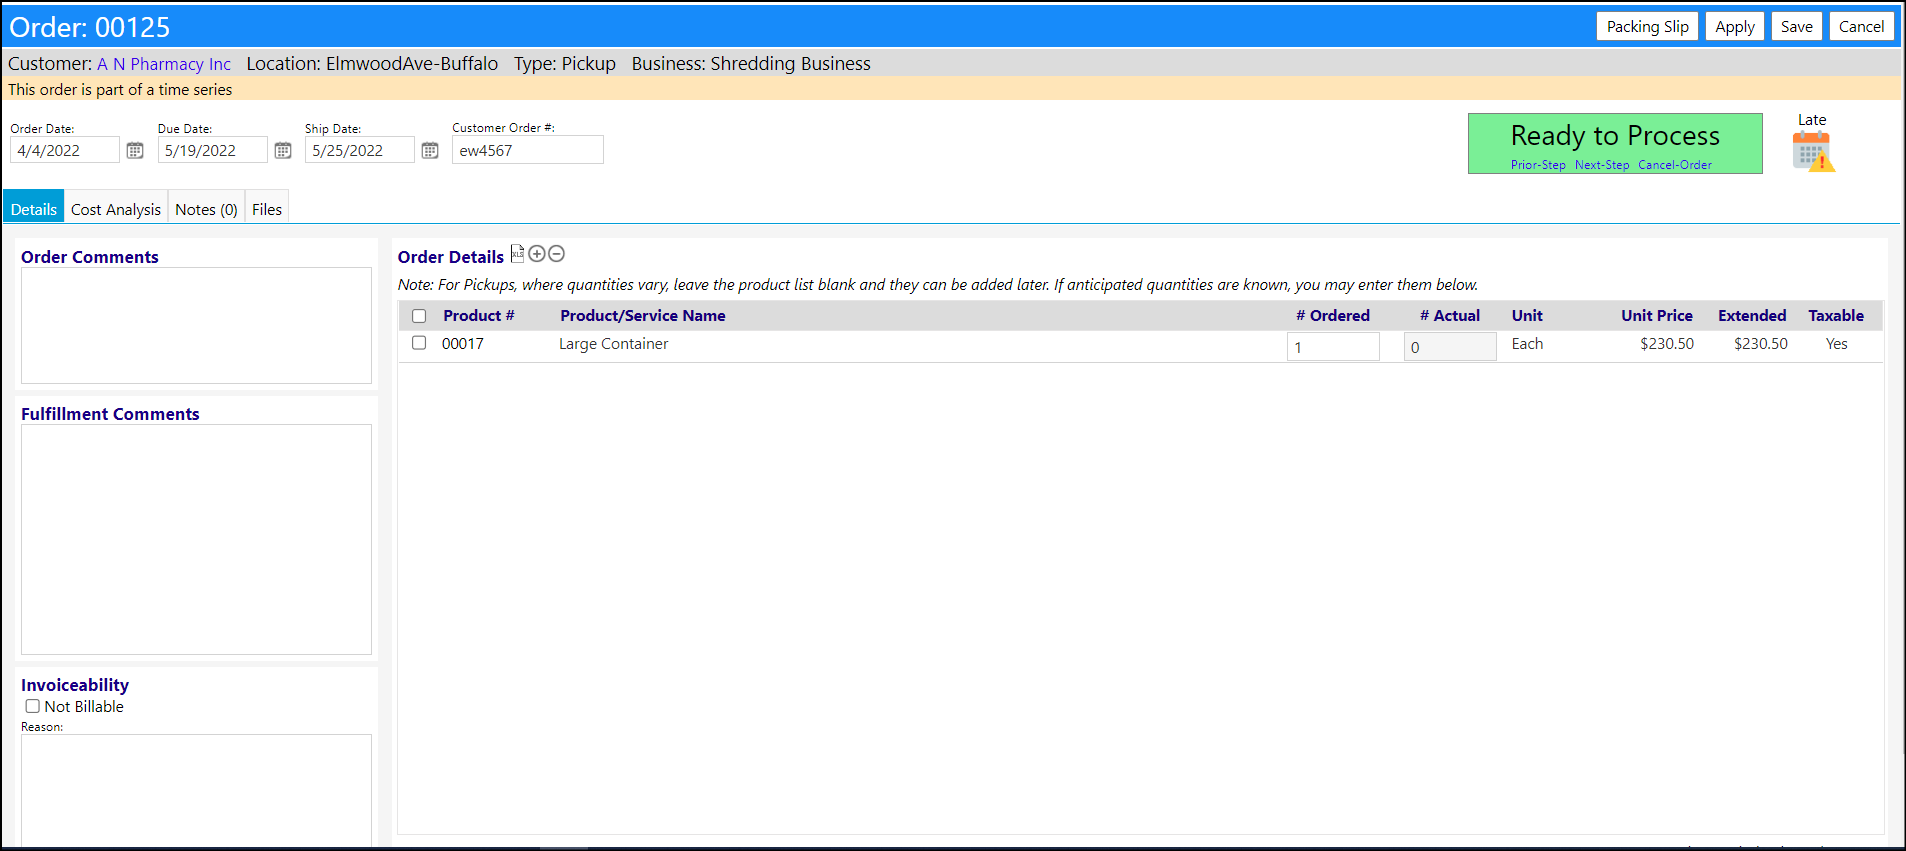
Once the initial setup is completed, the next step is the creation of customer orders in the system. These orders can be to pickup or dropoff items at a customer location.
- Click on Finance > Entrepreneurial Tools > Customer Orders
- Make sure the Business Unit is set to Shredding Business
- Click on the tab for a Pickup Order or a Delivery Order
- Click on New Orders (on the blue bar)
- Choose the customer (click Select)
- Enter an order date
- Enter a due date
- Click Apply
- Click on the ‘+’ next to the Order Details
- Select a product (click Save)
- Leave the # Ordered field blank unless you know how many products you are picking up
- Click Save to save your entries
Process Orders:
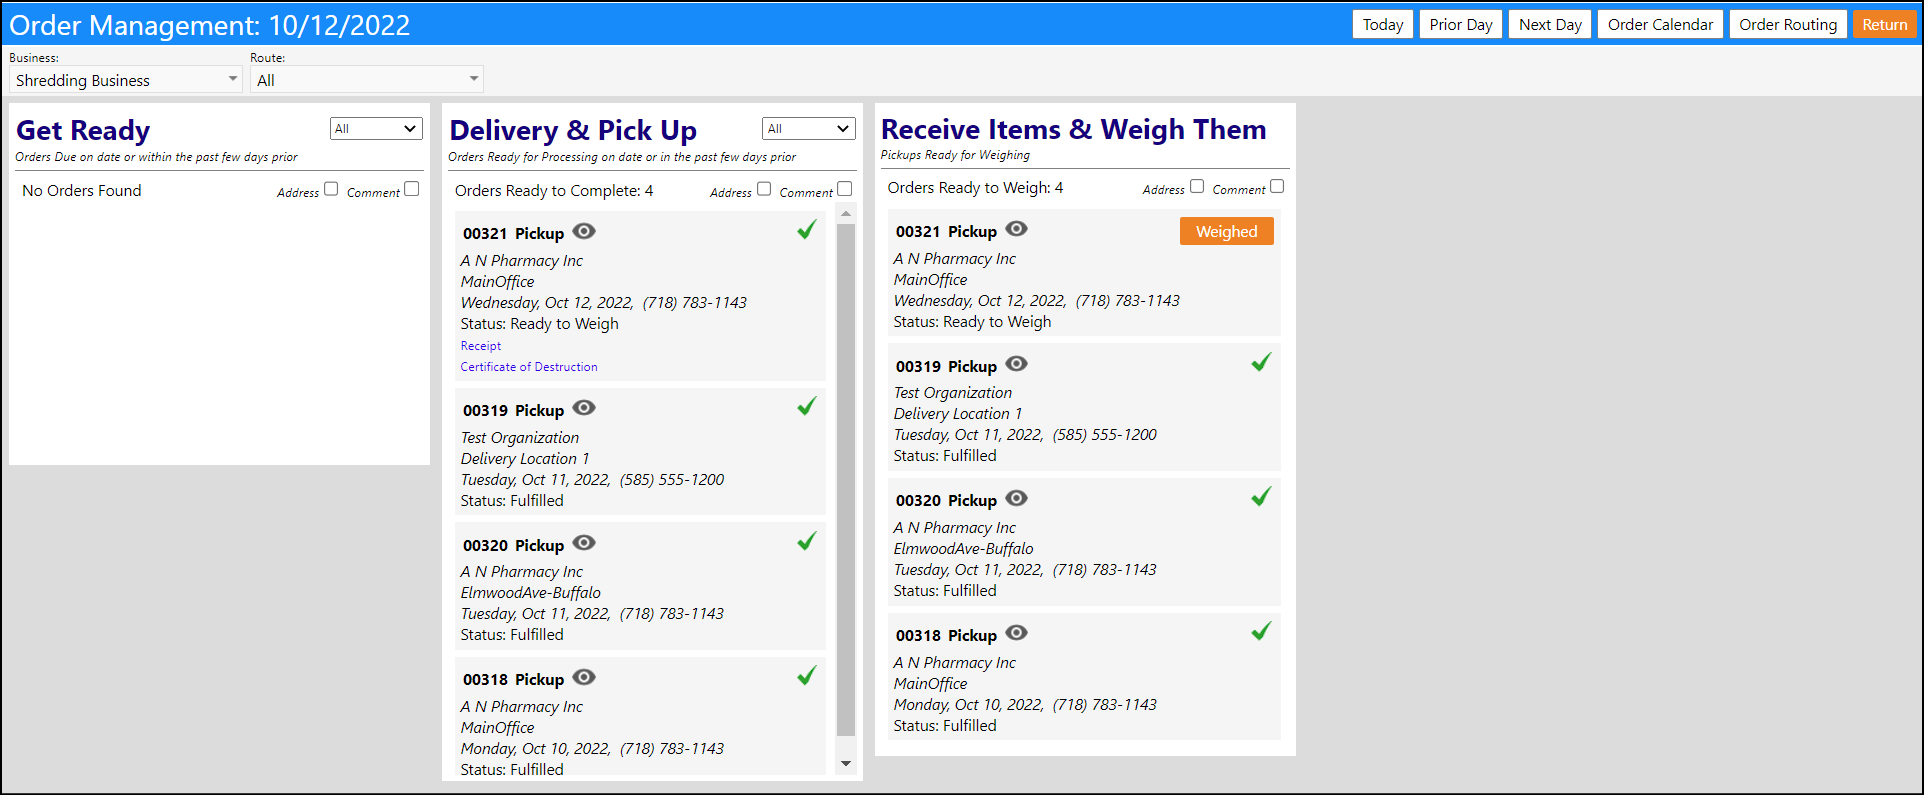
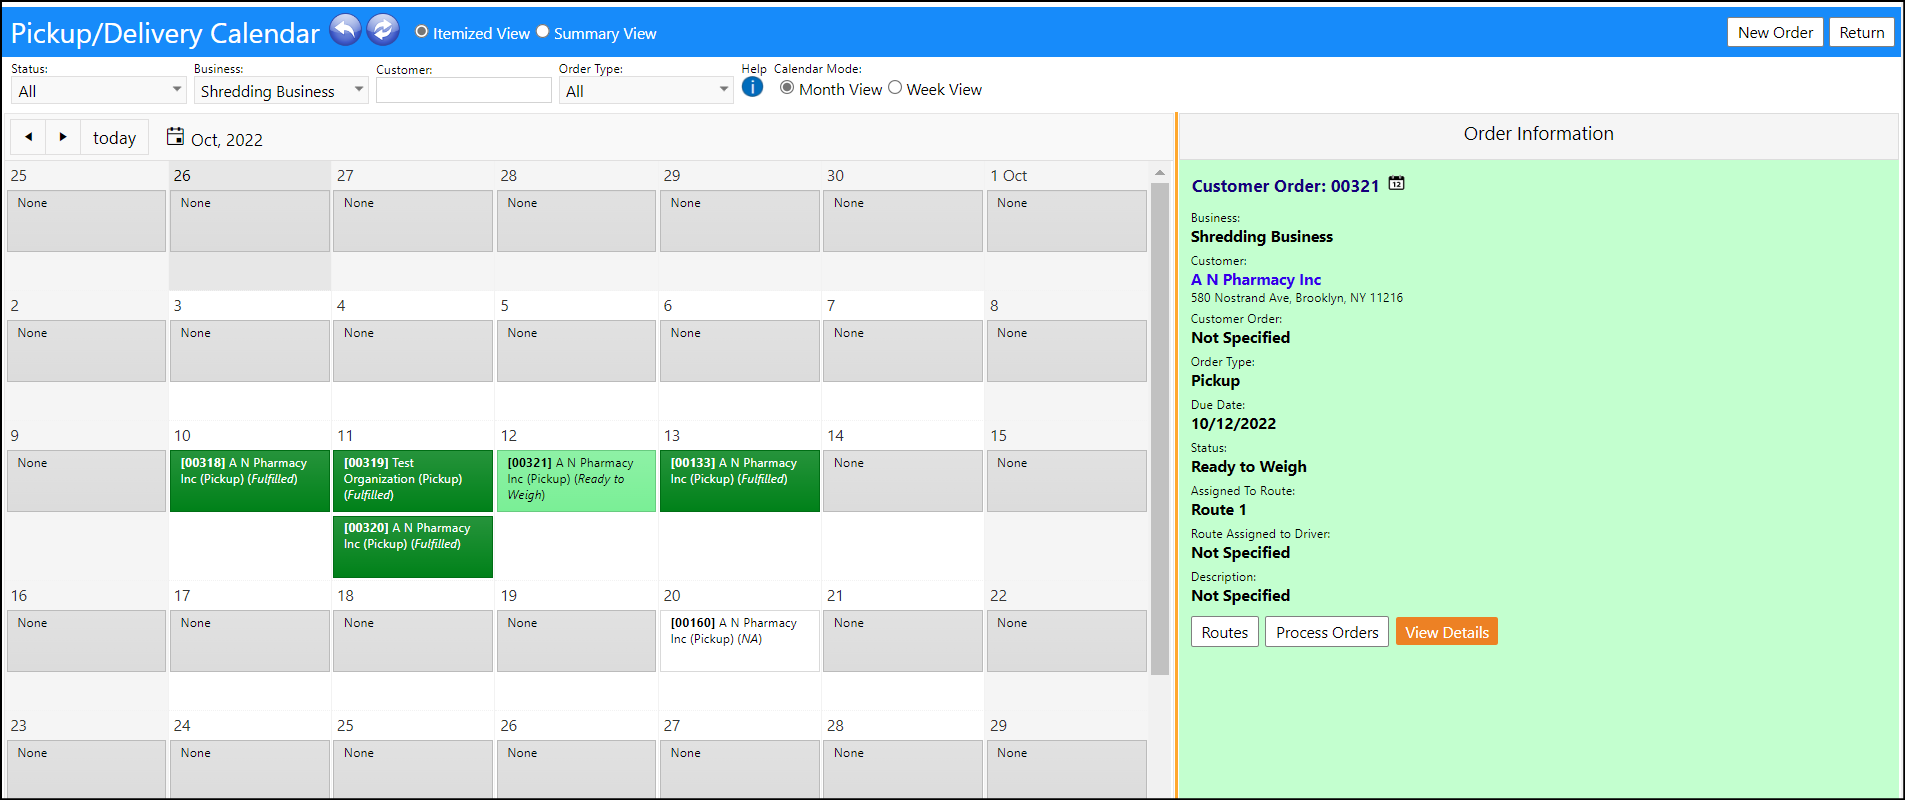
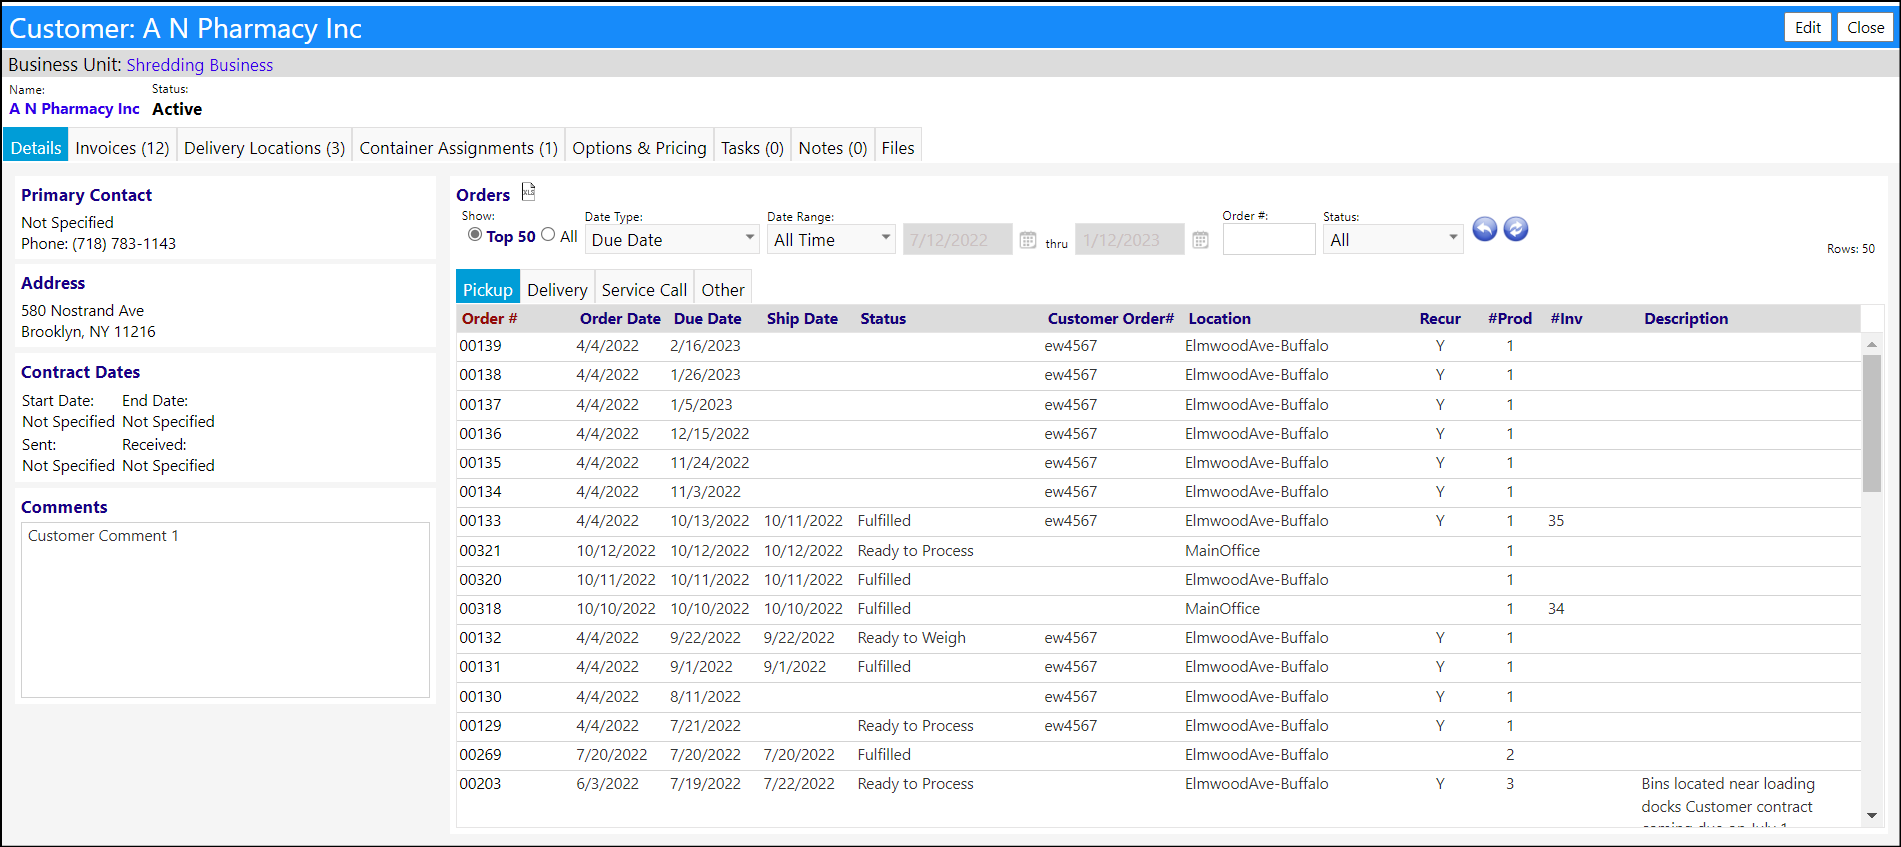
Once the order is created in the system, agencies will typically wait until the due date to process their order. On the due date, the administrator can either receive a notification informing them of a product or service pickup / delivery that is due, or they can view and see that information in their Process Orders panel or their Pickup/Delivery Calendar.
The following are the steps for processing a pickup or delivery order:
- Click on Finance > Entrepreneurial Tools > Process Orders
- Make sure the Business is set to 'Shredding Business'
- Find the order or click on' Order Calendar' (which also takes you to the pickup/delivery calendar at Finance > Entrepreneurial Tools > Pickup/Delivery Calendar) or go click on the prior/next day buttons to view another day if the order does not display
- Click on Confirm in the Get Ready panel to indicate the order is ready to be processed
- When you confirm the order, a checkmark will display in the panel for that order (if you click on that checkmark, to remove it, it will reset your order)
- When you confirm the order, the order will now display in the Delivery & Pickup panel with a ‘Completed' button displaying.
- Your driver would click on Completed when they are picking up the order
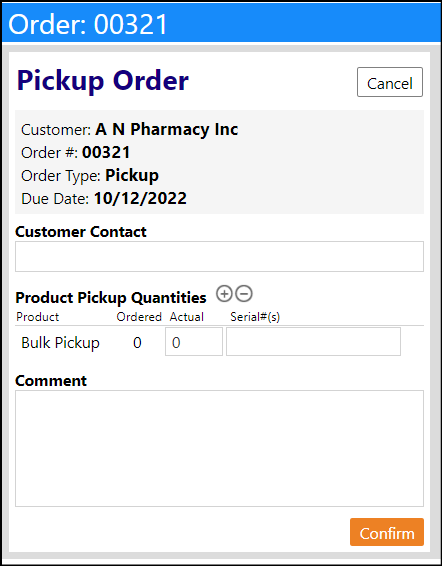
- A new window will open where the driver can optionally enter in the customer contact at the site, as well as the actual pickup quantities
NOTE: for bulk items, leave the actual quantities blank) - or for a delivery order, the driver can enter in quantity of the actual items delivered
- The driver will click Confirm when the order is picked up or delivered
- The items have now been picked up and can be brought back to your warehouse for weighing and shredding, or the items have been confirmed as being delivered to the customer location

    NOTE: If Vehicles and Routing are to be used...in the Order Calendar (Pickup/Delivery Calendar:  Finance > Entrepreneurial Tools > Pickup/Delivery Calendar), the agency can click on 'Routes' and assign the Order(s) Needing Routing to an Available Route.

    * Click the '+'  to add a Route (enter a Route Name and optionally assign a driver, a vehicle type, and a vehicle) and then click Save
    * Select the order from the list by clicking on the checkmark to the left of the order number
    * Click the Choose Icon (looks like a druck) in the Available Routes section to identify a route for that order
    * Click the 'Assign' in the Orders Needing Routing section to assign the order to that route

    NOTE: After assigning orders to routes, if you click the 'eye' on the Route, the pickup/deliver vehicle stop log will display.  You can print this page for the driver or change the pickup/delivery sequence of the stops by clicking on the Route # and setting a sort order for each of the orders in the route.  After saving your changes, you can print the revised stops log if desired.
- Go back to the Order Processing by Clicking on the Process Orders button
Weighing and Processing Items
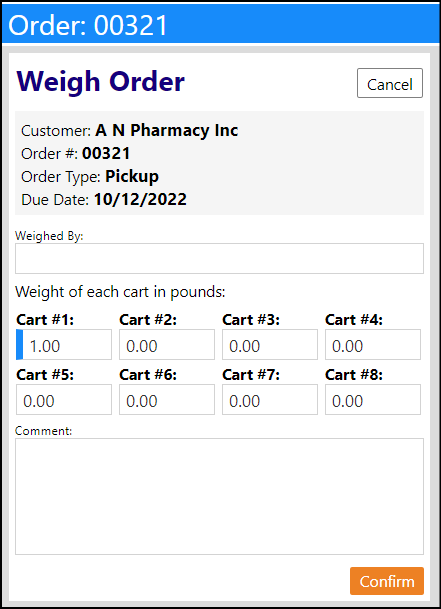
This panel is used to capture the weights of the picked up items so the appropriate bulk item invoicing can occur and so the daily processing weights can be tracked.
- Look for the order in the Delivery & Pickup panel. As soon as the product or service was either delivered or picked up from the customer, a checkmark appeared in the Delivery & Pickup Panel for that order. Additionally, a checkmark appeared for that order in the Receive Items & Weigh Them panel
- If there is a checkmark to the right of the order in the Receive Items & Weigh Them panel and the order was for a delivery, you are now finished with processing the order and can move on to invoicing
- If there is a checkmark to the right of the order in the Receive Items & Weigh Them panel and the order was for a pickup and a box or container was picked up at a customer site... and you charge by the container or box (you can optionally weigh the containers and record their weights), you are also completed with the order processing and can move onto invoicing unless you need to track the weights processed
- If there is a checkmark to the right of the order in the Receive Items & Weigh Them panel and if the order was for a bulk pickup, click that checkmark to remove it;
- Confirm the removal of the checkmark
- A “Weighed” button should appear
- Click the Weighed button
- Enter the weights of the items in each of the carts you picked up (an entry is required in Cart #1)
- Optionally enter the name of the person who weighed the item.
- Confirm the weighing of the items.
NOTE: If the weighing takes place over a few days, return to the order in the Receive Items & Weigh Them panel on a daily basis, remove the checkmark, Update the weights in the Carts, and ‘Confirm’
- Once all of the weights are entered and they are confirmed, the processing of the order is now done and there should be a checkmark to the right of the order in the Receive Items & Weigh Them panel.
Invoicing:
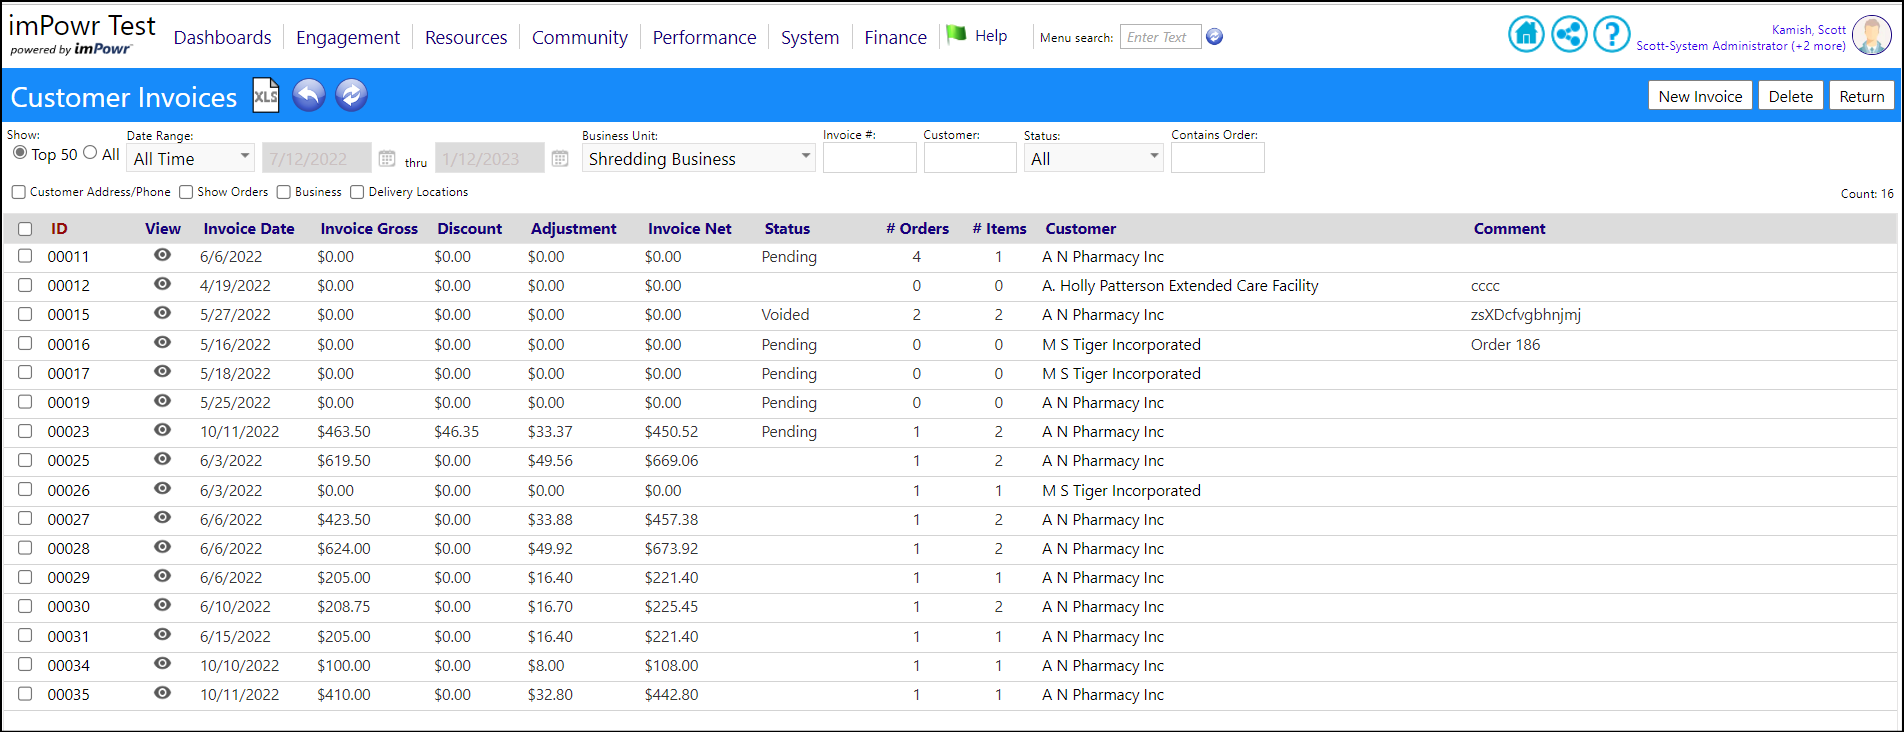
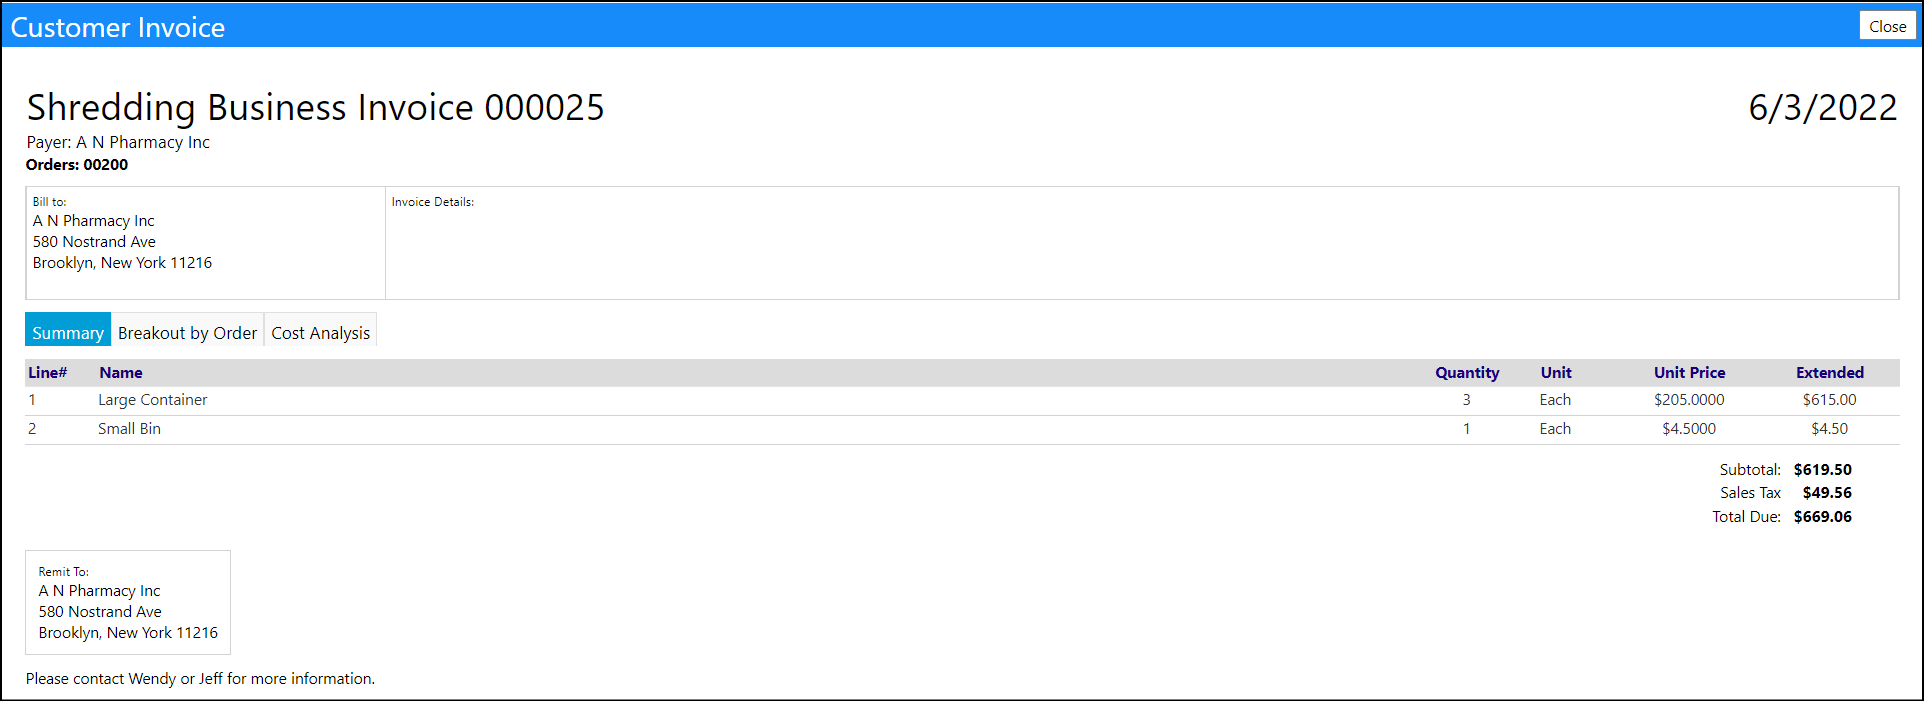
Following weighing of the picked up items or the delivery of the dropoff items, the transaction can be invoiced. For some agencies, invoicing occurs by their Finance Department and not by the Shredding team (they are not involved at all), but for others, the Shredding team must provide the Finance team with the invoicing details so the Finance team can prepare the invoices. For others the Shredding team does the invoicing. This section will identify the steps needed to generate those invoice details for either the Shredding team or for use by the Finance team.
- Click on Finance > Entrepreneurial Tools > Customer Orders
- Make sure the Business Unit is set to Shredding Business
- Find the order and check the box to the left of its number
- Click on ‘Generate Invoice’ on the blue bar on the top of the page (you can also append this invoice for this order, to another invoice, or remove the invoice for this order from an existing invoice, by selecting the option from the drop down list on the "Generate Invoice" button)
- Click Generate to confirm the order that the invoice will be created for
- The invoice will now be created
- Click ‘Save’ to save the invoice.
The invoice can be viewed in the Customer (Finance > Entrepreneurial Tools > Customer), in the Invoices tab, after selecting the customer. It can also be viewed in the Customer Invoices (Finance > Entrepreneurial Tools > Customer Invoices). If you don’t recall the invoice number or the order number, make sure the box for Customer Address/Phone is selected in the filtering section and refresh the screen – you will be able to find your customer and find the invoice. The Finance Departments in the agencies can either be granted access to these pages, receive a hard copy of the invoice list, or a summary of the invoice details.
The Step by Step Shredding Business Process has now been completed from Setup through Invoicing. :)
Please reach out to your imPowr System Administrator if you need any account role privileges, or your imPowr Account Manager for any process related questions.